
Nerf N-Strike Elite Alpha Trooper CS-12 Trigger Spring Replacement

What you need

  1. Nerf N-Strike Elite Alpha Trooper CS-12 Trigger Spring Replacement, Notes Before Starting: step 1, image 1 of 1
    • There are many screws of varying lengths involved in the disassembling of this device. It is important to keep track which screws correspond to which holes. This will help ensure proper reassembly.

    • Be sure that the rifle is discharged and unloaded before starting disassembly.

  2. Nerf N-Strike Elite Alpha Trooper CS-12 Trigger Spring Replacement, Rear Cap Removal: step 2, image 1 of 3 Nerf N-Strike Elite Alpha Trooper CS-12 Trigger Spring Replacement, Rear Cap Removal: step 2, image 2 of 3 Nerf N-Strike Elite Alpha Trooper CS-12 Trigger Spring Replacement, Rear Cap Removal: step 2, image 3 of 3
    • Looking at the rear of the rifle, remove the two 10 mm phillips screws holding the orange cap to the butt of the rifle.

    • Pull off the orange cap.

  3. Nerf N-Strike Elite Alpha Trooper CS-12 Trigger Spring Replacement, Slide Removal: step 3, image 1 of 3 Nerf N-Strike Elite Alpha Trooper CS-12 Trigger Spring Replacement, Slide Removal: step 3, image 2 of 3 Nerf N-Strike Elite Alpha Trooper CS-12 Trigger Spring Replacement, Slide Removal: step 3, image 3 of 3
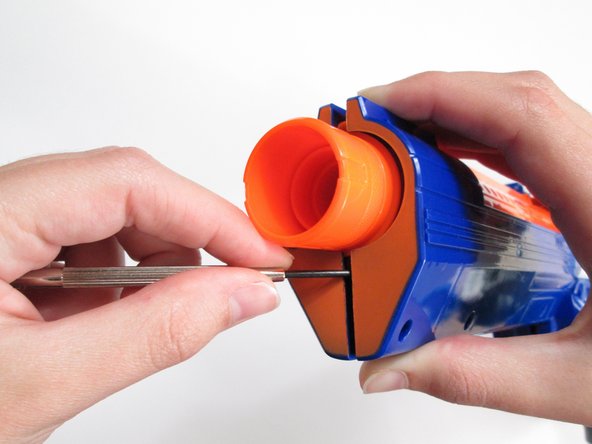
    • With the rifle barrel pointing left, remove the two 8 mm phillips screws holding the slide mechanism together.

    • Remove the three 10 mm phillips screws from the bottom of the slide mechanism.

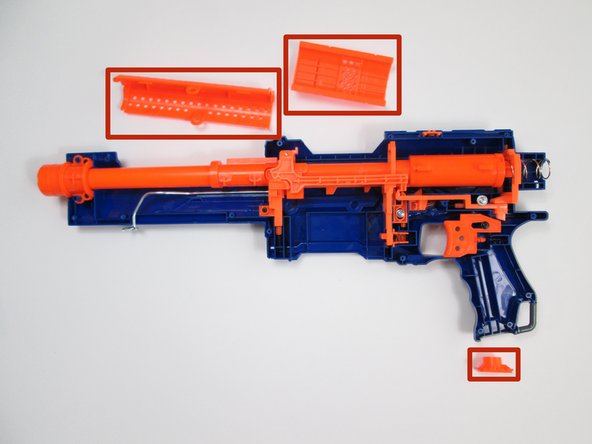
    • Remove the two halves of the slide mechanism.

    • Make sure to keep track of which screws correspond to which holes.

  4. Nerf N-Strike Elite Alpha Trooper CS-12 Trigger Spring Replacement: step 4, image 1 of 2 Nerf N-Strike Elite Alpha Trooper CS-12 Trigger Spring Replacement: step 4, image 2 of 2
    • Again with the rifle barrel pointing left, remove the fourteen 10 mm phillips screws from the main body of the rifle.

    • Remove the two 5mm phillips screws from the main body.

    • Remove the two 8 mm phillips screws from the main body.

    • Screws are varying lengths, make sure to keep track of which screws correspond to which holes.

  5. Nerf N-Strike Elite Alpha Trooper CS-12 Trigger Spring Replacement: step 5, image 1 of 3 Nerf N-Strike Elite Alpha Trooper CS-12 Trigger Spring Replacement: step 5, image 2 of 3 Nerf N-Strike Elite Alpha Trooper CS-12 Trigger Spring Replacement: step 5, image 3 of 3
    • Pull the two halves of the rifle apart.

    • Be careful of the spring at the rear end of the rifle. It may come flying out.

    • If you have difficulty pulling the two halves apart, use a spudger gently pry the edges of the body apart.

    • Also be careful of small parts when opening the gun, they may be easy to lose.

    • Remove the access gate and barrel cover.

  6. Nerf N-Strike Elite Alpha Trooper CS-12 Trigger Spring Replacement, Trigger Removal: step 6, image 1 of 3 Nerf N-Strike Elite Alpha Trooper CS-12 Trigger Spring Replacement, Trigger Removal: step 6, image 2 of 3 Nerf N-Strike Elite Alpha Trooper CS-12 Trigger Spring Replacement, Trigger Removal: step 6, image 3 of 3
    • Remove the single 8mm phillips screw holding the trigger mechanism is place.

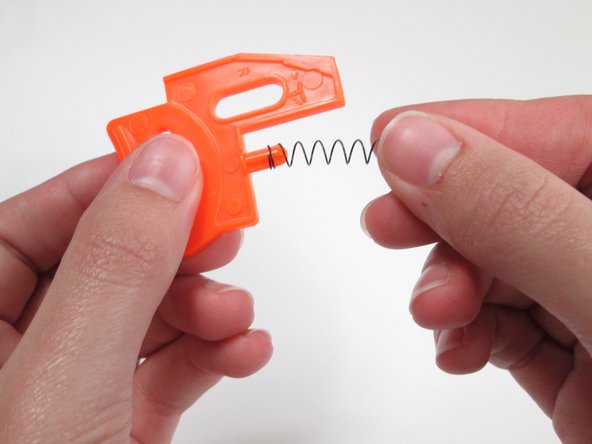
    • Remove the trigger mechanism.

    • Remove the small spring from the rear of the mechanism and replace it with a new spring.

Conclusion

To reassemble your device, follow these instructions in reverse order.

2 other people completed this guide.

Henrique Chan

Member since: 01/24/14

303 Reputation

2 Guides authored

Team

Cal Poly, Team 10-35, Maness Winter 2014 Member of Cal Poly, Team 10-35, Maness Winter 2014

CPSU-MANESS-W14S10G35

4 Members

5 Guides authored

0 Comments

Add Comment

View Statistics:

Past 24 Hours: 0

Past 7 Days: 4

Past 30 Days: 8

All Time: 5,077