
Motorola Moto Z Play Display Installation

Prerequisite Only
This guide is only intended to be used as a prerequisite for other guides. It's incomplete by itself.

What you need

  1. Motorola Moto Z Play Display Installation, Display Installation: step 1, image 1 of 3 Motorola Moto Z Play Display Installation, Display Installation: step 1, image 2 of 3 Motorola Moto Z Play Display Installation, Display Installation: step 1, image 3 of 3
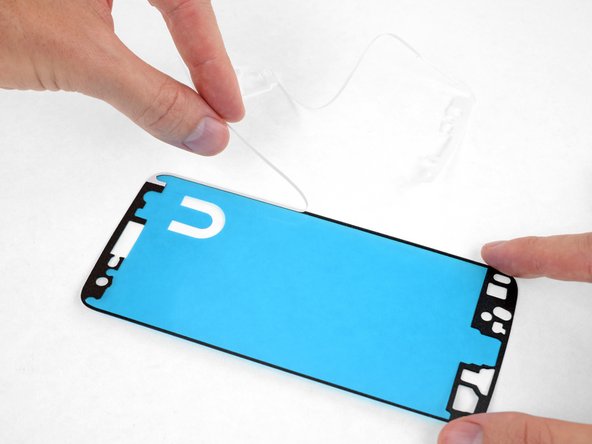
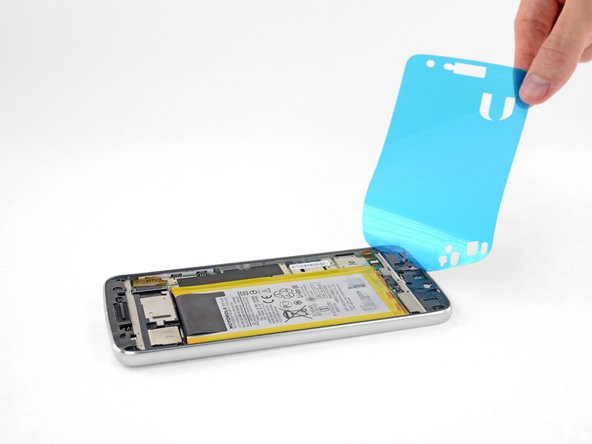
    • Peel away and remove all the old display adhesive from the body of your phone.

    • If you're reinstalling your existing display, remove all the old adhesive from that as well.

    • Use the point of your spudger to scour away and remove any smaller bits of adhesive that remain stuck.

    • Be extremely careful not to accidentally puncture the battery with your spudger.

    • For best results, clean the area underneath the removed adhesive with isopropyl alcohol to help prep the surface so the new adhesive bonds more strongly.

  2. Motorola Moto Z Play Display Installation: step 2, image 1 of 2 Motorola Moto Z Play Display Installation: step 2, image 2 of 2
    • Some pre-cut adhesive sheets for the display contain up to three layers: a plastic liner (usually blue), an adhesive layer in the middle (black), and a wax paper liner (white).

    • If yours came with a paper liner, peel it away and remove it.

  3. Motorola Moto Z Play Display Installation: step 3, image 1 of 3 Motorola Moto Z Play Display Installation: step 3, image 2 of 3 Motorola Moto Z Play Display Installation: step 3, image 3 of 3
    • Peel off and discard any remaining paper liner, exposing the adhesive on one side.

    • Before you continue, the adhesive sheet should look like the third image.

  4. Motorola Moto Z Play Display Installation: step 4, image 1 of 2 Motorola Moto Z Play Display Installation: step 4, image 2 of 2
    • Hold the adhesive sheet with the exposed adhesive facing down, and carefully align it into the lower edge of the phone.

    • Make sure the adhesive sheet is oriented correctly—the edge with multiple holes lines up with the bottom edge, and the rectangular cutout for the earpiece speaker lines up at the top.

    • When it's correctly aligned, lower the rest of the adhesive sheet into the phone.

  5. Motorola Moto Z Play Display Installation: step 5, image 1 of 3 Motorola Moto Z Play Display Installation: step 5, image 2 of 3 Motorola Moto Z Play Display Installation: step 5, image 3 of 3
    • Firmly press the adhesive into place.

    • Use the flat edge of your spudger to press along the edges and hard-to-reach areas.

    • Be very careful not to accidentally puncture the battery with your spudger.

  6. Motorola Moto Z Play Display Installation: step 6, image 1 of 2 Motorola Moto Z Play Display Installation: step 6, image 2 of 2
    • Peel off and discard the plastic liner, exposing the display adhesive.

  7. Motorola Moto Z Play Display Installation: step 7, image 1 of 2 Motorola Moto Z Play Display Installation: step 7, image 2 of 2
    • Before sealing the display in place, connect the flex cables for the display and fingerprint sensor, and then power your phone on.

    • Test all functions to make sure your repair was successful before sealing up the display.

    • When fully inserted, the white line across each flex cable should be even with the markings on the motherboard on each side of the cable.

    • Do not remove, insert, or adjust the cables while the phone is powered on.

    • The cables can be tricky to align and install. Be sure not to touch the gold contacts on the back, or your finger oils may cause a malfunction. If you do accidentally touch them, wipe them gently with isopropyl alcohol.

  8. Motorola Moto Z Play Display Installation: step 8, image 1 of 1
    • When your repair is tested and complete, press the display firmly into place and remove any plastic liners from the screen.

    • To help the display adhesive bond more securely, heat the perimeter of the display and then place the phone face-up under a heavy stack of books for 30 minutes.

    • Don't rest the phone on its camera bump while doing this, or the uneven pressure may prevent your display from adhering correctly. Place a couple thin books under the phone on either side of the camera bump to elevate it and keep the pressure in the right place.

Conclusion

To reassemble your device, follow these instructions in reverse order.

Jeff Suovanen

Member since: 08/06/13

427,796 Reputation

259 Guides authored

Team

iFixit Member of iFixit

Staff

135 Members

16,718 Guides authored

0 Comments

Add Comment

View Statistics:

Past 24 Hours: 0

Past 7 Days: 0

Past 30 Days: 0

All Time: 86