
Motorola Moto G4 Plus Volume Buttons Replacement

What you need

  1. Motorola Moto G4 Plus Volume Buttons Replacement, SIM Card: step 1, image 1 of 2 Motorola Moto G4 Plus Volume Buttons Replacement, SIM Card: step 1, image 2 of 2
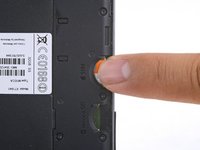
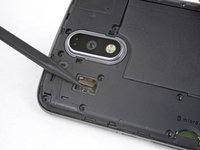
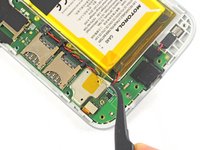
    • Insert a fingernail or a spudger into the notch on bottom edge of the phone near the charging port.

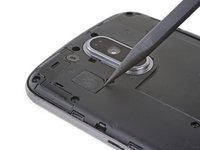
    • Pry the back cover away from the body of the phone.

  2. Motorola Moto G4 Plus Volume Buttons Replacement: step 2, image 1 of 3 Motorola Moto G4 Plus Volume Buttons Replacement: step 2, image 2 of 3 Motorola Moto G4 Plus Volume Buttons Replacement: step 2, image 3 of 3
    • Continue to gently lift the back cover until all plastic clips have been released.

    • Remove the back cover.

    • To reinstall the back cover, align the cover over the body and gently press all around the edges until you feel the clips snap into place.

  3. Motorola Moto G4 Plus Volume Buttons Replacement: step 3, image 1 of 2 Motorola Moto G4 Plus Volume Buttons Replacement: step 3, image 2 of 2
    • Slide out and remove the SIM card.

  4. Motorola Moto G4 Plus Volume Buttons Replacement, Battery: step 4, image 1 of 1
    • Remove the nineteen 3.1 mm T3 screws securing the midframe.

  5. Motorola Moto G4 Plus Volume Buttons Replacement: step 5, image 1 of 2 Motorola Moto G4 Plus Volume Buttons Replacement: step 5, image 2 of 2
    • Use the point of a spudger to pry up the rubber cover over the camera flash connector.

    • Remove the rubber cover.

  6. Motorola Moto G4 Plus Volume Buttons Replacement: step 6, image 1 of 2 Motorola Moto G4 Plus Volume Buttons Replacement: step 6, image 2 of 2
    • Use the point of a spudger to pry up and disconnect the camera flash connector.

  7. Motorola Moto G4 Plus Volume Buttons Replacement: step 7, image 1 of 3 Motorola Moto G4 Plus Volume Buttons Replacement: step 7, image 2 of 3 Motorola Moto G4 Plus Volume Buttons Replacement: step 7, image 3 of 3
    • Loosen the midframe along the edges and lift it away from the body.

    • Remove the midframe.

  8. Motorola Moto G4 Plus Volume Buttons Replacement: step 8, image 1 of 2 Motorola Moto G4 Plus Volume Buttons Replacement: step 8, image 2 of 2
    • Be very careful not to puncture the battery with any sharp tools. A damaged lithium-ion battery can catch fire and/or explode.

    • Peel up and remove the tape securing the battery wires.

    • Peel up and remove the black tape that bridges the battery and the phone.

    • While neither tape pieces are necessary for the operation of the phone, save them if they are in good condition for the reinstallation process.

  9. Motorola Moto G4 Plus Volume Buttons Replacement: step 9, image 1 of 2 Motorola Moto G4 Plus Volume Buttons Replacement: step 9, image 2 of 2
    • Slip the point of a spudger underneath the red and black battery wires and gently pry straight up.

    • Do not pull the plug out, or you will tear the board socket out. Be careful where you pry. Do not pry against the board socket.

    • During reassembly, align the connector in its socket, then press straight down to reconnect it.

  10. Motorola Moto G4 Plus Volume Buttons Replacement: step 10, image 1 of 2 Motorola Moto G4 Plus Volume Buttons Replacement: step 10, image 2 of 2
    • Use tweezers or your fingers to de-route the battery wires from the plastic brackets.

  11. Motorola Moto G4 Plus Volume Buttons Replacement: step 11, image 1 of 3 Motorola Moto G4 Plus Volume Buttons Replacement: step 11, image 2 of 3 Motorola Moto G4 Plus Volume Buttons Replacement: step 11, image 3 of 3
    • Peel the black pull tab from battery and pull slowly but firmly to separate the battery from the frame.

    • A few drops of high concentration (90% or higher) isopropyl alcohol along each side may help soften the adhesive.

    • If the pull tab breaks, use a spudger to gently pry around the edges of the battery until it comes loose.

    • Don't deform or puncture the battery—it can catch fire and/or explode if damaged.

    • Never reinstall a damaged or deformed battery. Replace the battery.

  12. Motorola Moto G4 Plus Volume Buttons Replacement: step 12, image 1 of 1
    Tool used on this step:
    Tesa 61395 Tape
    $5.99
    Buy
    • Remove the battery.

    • To install a battery, orient the new battery such that the wires exit near the bottom of the phone, and the battery connector is on the motherboard side.

    • Clean off any adhesive residue which may prevent the battery from sitting flush against the frame. Use a few strips of adhesive included in the battery kit or some double-sided tape to secure the battery to the frame.

  13. Motorola Moto G4 Plus Volume Buttons Replacement, Motherboard: step 13, image 1 of 2 Motorola Moto G4 Plus Volume Buttons Replacement, Motherboard: step 13, image 2 of 2
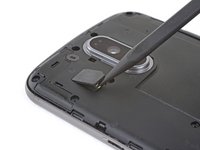
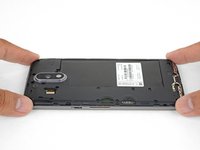
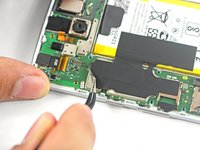
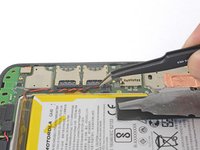
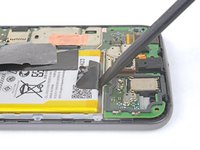
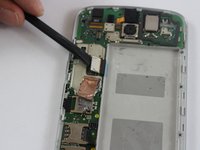
    • Using tweezers, lift up the black silicon piece connecting the motherboard to the front casing.

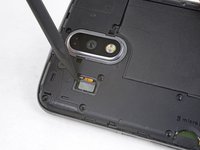
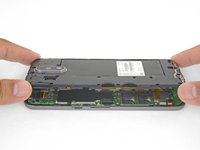
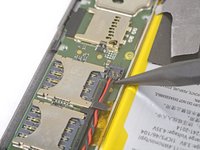
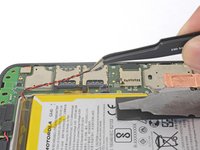
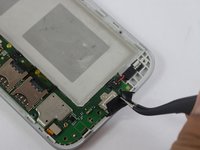
    • Using tweezers, remove the red and black cable connecting the motherboard to the front casing.

  14. Motorola Moto G4 Plus Volume Buttons Replacement: step 14, image 1 of 2 Motorola Moto G4 Plus Volume Buttons Replacement: step 14, image 2 of 2
    • Using a spudger, remove the two metal pieces connecting the motherboard to the front casing.

  15. Motorola Moto G4 Plus Volume Buttons Replacement: step 15, image 1 of 1
    • Using tweezers, remove the yellow film connecting the rear camera to the motherboard.

    • The film is connected by an adhesive, so it may take some jostling to remove.

  16. Motorola Moto G4 Plus Volume Buttons Replacement: step 16, image 1 of 1
    • Remove two 4.0 mm T3 Torx screws connecting the motherboard to the front casing.

  17. Motorola Moto G4 Plus Volume Buttons Replacement: step 17, image 1 of 1
    • Using a spudger, lift up and remove the motherboard.

  18. Motorola Moto G4 Plus Volume Buttons Replacement, Volume Buttons: step 18, image 1 of 1
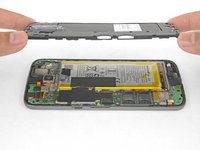
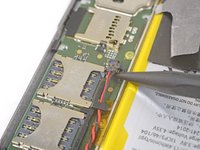
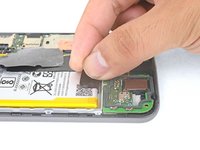
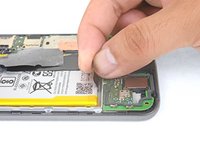
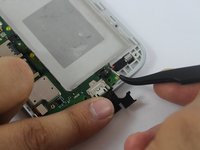
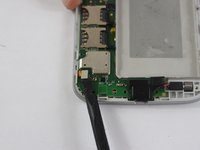
    • Using tweezers, remove the volume buttons.

Conclusion

To reassemble your device, follow these instructions in reverse order.

3 other people completed this guide.

Sami Taha

Member since: 02/20/17

151 Reputation

1 Guide authored

Team

USF Tampa, Team S2-G6, Sullivan Spring 2017 Member of USF Tampa, Team S2-G6, Sullivan Spring 2017

USFT-SULLIVAN-S17S2G6

4 Members

14 Guides authored

0 Comments

Add Comment

View Statistics:

Past 24 Hours: 1

Past 7 Days: 1

Past 30 Days: 15

All Time: 7,296