Moto Z Battery Replacement

What you need

  1. Moto Z Battery Replacement, Display Assembly: step 1, image 1 of 1
    • Heat an iOpener and apply it to the left edge of the phone for at least 90 seconds.

    • A hair dryer, heat gun, or hot plate may also be used, but be careful not to overheat the phone—the OLED display and internal battery are both susceptible to heat damage.

    • As you're waiting for the adhesive to soften, move on and read the following step to get an idea of where to pry.

  2. Moto Z Battery Replacement: step 2, image 1 of 2 Moto Z Battery Replacement: step 2, image 2 of 2
    • In the following steps you will be cutting through the adhesive around the edge of the display assembly.

    • To avoid damage, do not cut in the following areas:

    • The OLED panel

    • The home button

    • The flash unit

  3. Moto Z Battery Replacement: step 3, image 1 of 3 Moto Z Battery Replacement: step 3, image 2 of 3 Moto Z Battery Replacement: step 3, image 3 of 3
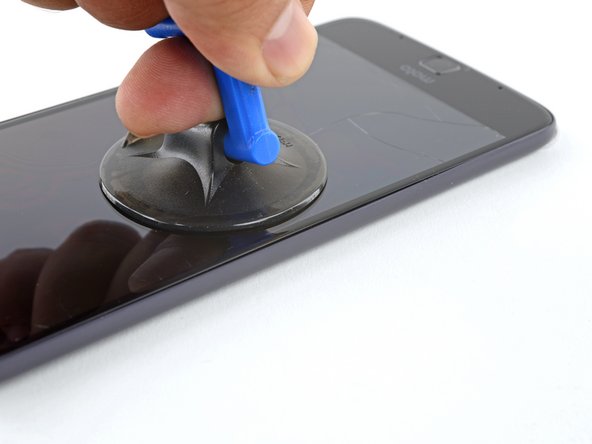
    • Apply a suction cup as close to the heated edge as possible.

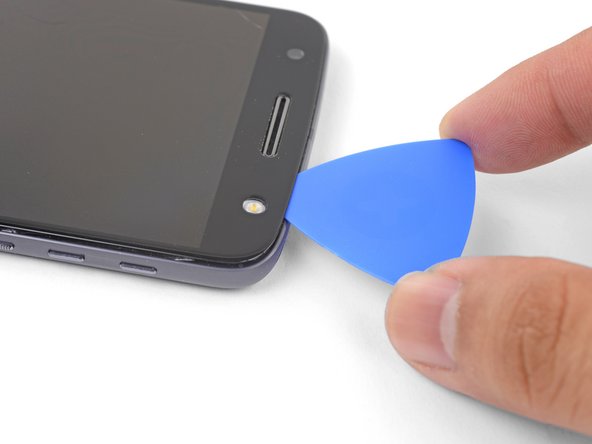
    • Lift on the suction cup and insert the tip of an opening pick into the gap.

    • Do not insert the pick more than 1/16" (1.5 mm). Over-inserting the pick may damage the OLED panel.

  4. Moto Z Battery Replacement: step 4, image 1 of 3 Moto Z Battery Replacement: step 4, image 2 of 3 Moto Z Battery Replacement: step 4, image 3 of 3
    • Carefully slide the tip of the opening pick down and up the side of the phone, making sure not to cut deeper than 1/16" (1.5 mm).

    • As you run the pick along the side, you will feel the tip of the pick press against the edge of the OLED panel. That is as far as the pick should go without damaging the panel.

    • Once you have separated the adhesive, leave an opening pick in the side to keep the adhesive from resealing.

  5. Moto Z Battery Replacement: step 5, image 1 of 1
    • Repeat the heating, lifting, and cutting steps for the remaining long edge of the phone.

  6. Moto Z Battery Replacement: step 6, image 1 of 1
  7. Moto Z Battery Replacement: step 7, image 1 of 2 Moto Z Battery Replacement: step 7, image 2 of 2
    • Insert an opening pick into the flash side corner of the phone and carefully slice around the flash unit.

    • Do not insert the pick more than 1/16" (1.5 mm) into the edge.

    • Once you are done cutting, leave the pick in the corner to prevent the adhesive from resealing.

  8. Moto Z Battery Replacement: step 8, image 1 of 3 Moto Z Battery Replacement: step 8, image 2 of 3 Moto Z Battery Replacement: step 8, image 3 of 3
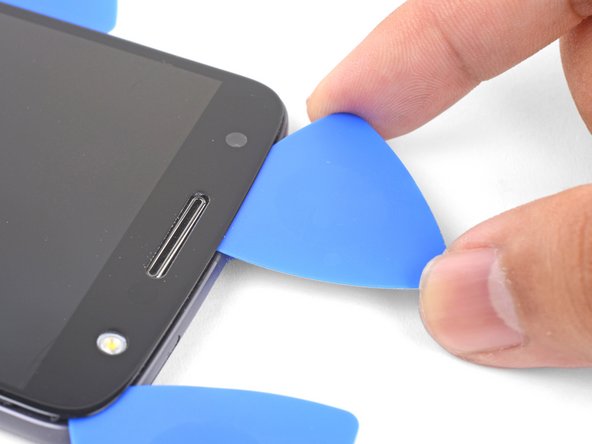
    • Insert an opening pick into the remaining top corner of the phone.

    • Carefully slice through the adhesive across the top of the phone.

    • Do not insert the pick beyond 1/2" (12.5 mm).

  9. Moto Z Battery Replacement: step 9, image 1 of 1
    • Apply a heated iOpener to the bottom edge of the phone for at least 90 seconds.

  10. Moto Z Battery Replacement: step 10, image 1 of 3 Moto Z Battery Replacement: step 10, image 2 of 3 Moto Z Battery Replacement: step 10, image 3 of 3
    • Insert an opening pick into a bottom corner and slice towards the home button, stopping before you reach it.

    • Once you're done with the corner, leave a pick in place to prevent the adhesive from sealing.

    • Repeat the process for the other bottom corner.

  11. Moto Z Battery Replacement: step 11, image 1 of 2 Moto Z Battery Replacement: step 11, image 2 of 2
    • Carefully twist the first opening pick slightly to help release the edge adhesive.

    • Repeat the same process for each remaining pick, moving them as necessary and twisting slightly to release the adhesive.

  12. Moto Z Battery Replacement: step 12, image 1 of 3 Moto Z Battery Replacement: step 12, image 2 of 3 Moto Z Battery Replacement: step 12, image 3 of 3
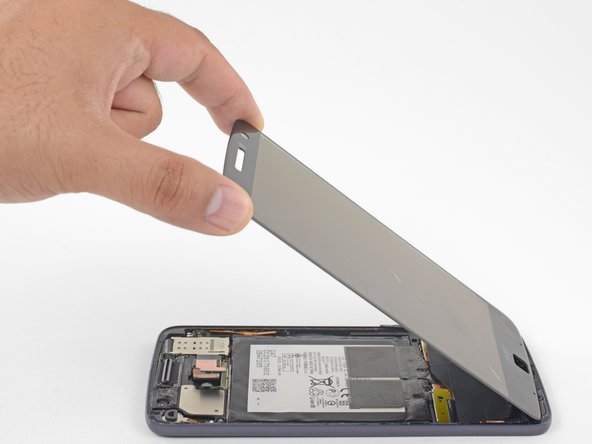
    • Lift the earpiece end of the display up to provide access to the display cables.

    • Do not open the display beyond 90 degrees, and always support the display panel.

  13. Moto Z Battery Replacement: step 13, image 1 of 3 Moto Z Battery Replacement: step 13, image 2 of 3 Moto Z Battery Replacement: step 13, image 3 of 3
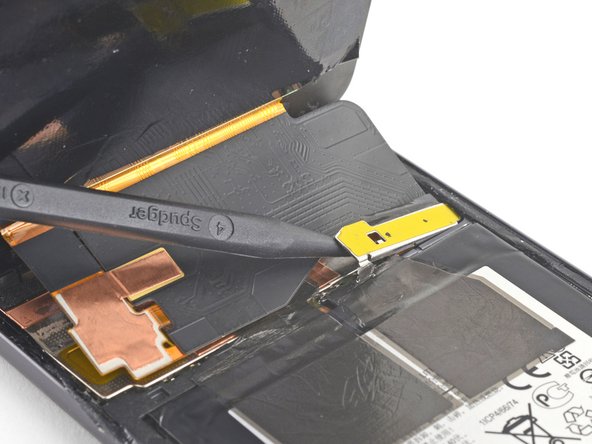
    • Use the point of a spudger to pry the display cable shield up.

    • Remove the display cable shield.

  14. Moto Z Battery Replacement: step 14, image 1 of 2 Moto Z Battery Replacement: step 14, image 2 of 2
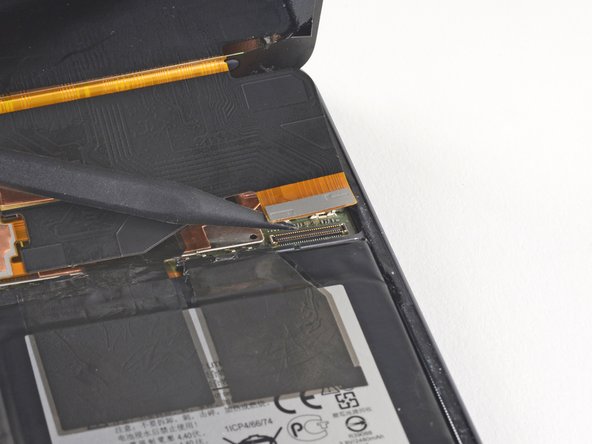
    • Use the point of the spudger to lift and disconnect the display cable connector from its socket.

  15. Moto Z Battery Replacement: step 15, image 1 of 2 Moto Z Battery Replacement: step 15, image 2 of 2
    • Remove the display assembly.

    • Compare your new replacement part to the original part. You may need to transfer remaining components (such as the flash lens) or remove adhesive backings from the new part before installing.

    • Before you reinstall the display assembly, thoroughly remove any remaining adhesive and glass from the frame.

    • After removing all traces of glue and glass from the frame, clean the adhesion areas with 90% (or higher) isopropyl alcohol and a lint-free cloth or coffee filter.

    • Be sure to turn on your phone and test your repair before installing new adhesive and resealing the phone.

    • Use the Motorola Moto Z display adhesive to reseal your phone. Follow this guide for instructions on how to apply adhesive to the replacement screen.

  16. Moto Z Battery Replacement, Battery: step 16, image 1 of 3 Moto Z Battery Replacement, Battery: step 16, image 2 of 3 Moto Z Battery Replacement, Battery: step 16, image 3 of 3
    • Use tweezers to peel the black tape securing the battery to the frame.

    • If your replacement battery did not come with this piece of tape, transfer it from the old battery to the replacement battery.

  17. Moto Z Battery Replacement: step 17, image 1 of 1
    • Lay a heated iOpener on the back of the phone as shown for as least 90 seconds.

  18. Moto Z Battery Replacement: step 18, image 1 of 3 Moto Z Battery Replacement: step 18, image 2 of 3 Moto Z Battery Replacement: step 18, image 3 of 3
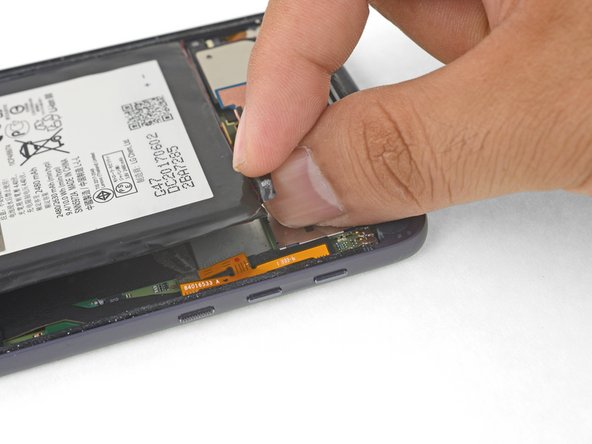
    • Using a pair of tweezers or your fingers, grab the black battery pull tab and slowly pull it upwards until the corner is loose.

    • Do not fully remove the battery as it is still connected by a flex cable.

  19. Moto Z Battery Replacement: step 19, image 1 of 2 Moto Z Battery Replacement: step 19, image 2 of 2
    • Follow this step only if your battery tab has broken. Otherwise, skip to the next step.

    • Insert a spudger into the bottom edge of the battery and slowly pry the corner up.

  20. Moto Z Battery Replacement: step 20, image 1 of 3 Moto Z Battery Replacement: step 20, image 2 of 3 Moto Z Battery Replacement: step 20, image 3 of 3
    • Carefully swing the battery towards the right edge.

    • Lay the battery flat against the work surface while taking care not to strain the battery cable.

  21. Moto Z Battery Replacement: step 21, image 1 of 3 Moto Z Battery Replacement: step 21, image 2 of 3 Moto Z Battery Replacement: step 21, image 3 of 3
    • Use the point of a spudger to pry up the battery connector bracket.

    • The bracket is held in place by some adhesive and tabs.

    • Remove the battery connector bracket.

    • When you reinstall the bracket, make sure to align the tabs on the bracket with the indents on the left edge of the frame.

  22. Moto Z Battery Replacement: step 22, image 1 of 2 Moto Z Battery Replacement: step 22, image 2 of 2
    • Using the point of a spudger, pry up the battery connector from its socket.

  23. Moto Z Battery Replacement: step 23, image 1 of 1
    Tool used on this step:
    Tesa 61395 Tape
    $5.99
    Buy
    • Remove the battery.

    • Do not reuse the battery after it has been removed, as doing so is a potential safety hazard. Replace it with a new battery.

    • To install a new battery:

    • Remove any remaining adhesive from the phone, and clean the glued areas with isopropyl alcohol and a lint-free cloth.

    • Apply pre-cut adhesive strips or double-sided tape to the exposed, silver part of the battery compartment, not on the black foam layer.

    • Press the battery firmly into place for 5-10 seconds.

Arthur Shi

Member since: 01/03/18

249,846 Reputation

503 Guides authored

Team

iFixit Member of iFixit

Staff

135 Members

16,732 Guides authored

View Statistics:

Past 24 Hours: 3

Past 7 Days: 27

Past 30 Days: 138

All Time: 43,667