Free Shipping on Domestic Orders $75+

Marco UP Series Electric Pump Electronic Sensor Replacement

What you need

  1. Marco UP Series Electric Pump Electronic Sensor Replacement, Prepare the tools: step 1, image 1 of 1
    • The additional sensor with the joint and the heat shrink tubing is available as a replacement kit on www.marco.it .

    • Kits are only available as a registered user, and can be seen for each pump in their dedicated tab on the page.

    Ask FixBot

    Add Comment

  2. Marco UP Series Electric Pump Electronic Sensor Replacement, Cut the plastic tie: step 2, image 1 of 1
    • Free the cables by cutting the plastic tie.

    • Don't cut the cables that connect the sensor to the pump.

    • Dont' damage the cables' insulation while cutting the plastic tie.

    Ask FixBot

    Add Comment

  3. Marco UP Series Electric Pump Electronic Sensor Replacement, Cut the joint between the sensor and the motor: step 3, image 1 of 2 Marco UP Series Electric Pump Electronic Sensor Replacement, Cut the joint between the sensor and the motor: step 3, image 2 of 2
    • Use the pliers to cut the red and black cables before and after the joint.

    Ask FixBot

    Add Comment

  4. Marco UP Series Electric Pump Electronic Sensor Replacement, Remove the old sensor: step 4, image 1 of 2 Marco UP Series Electric Pump Electronic Sensor Replacement, Remove the old sensor: step 4, image 2 of 2
    • Use the 17mm wrench to unscrew the sensor.

    Ask FixBot

    Add Comment

  5. Marco UP Series Electric Pump Electronic Sensor Replacement, Screw in the new sensor: step 5, image 1 of 3 Marco UP Series Electric Pump Electronic Sensor Replacement, Screw in the new sensor: step 5, image 2 of 3 Marco UP Series Electric Pump Electronic Sensor Replacement, Screw in the new sensor: step 5, image 3 of 3
    • Screw the new sensor by hand for the initial part.

    Ask FixBot

    Add Comment

  6. Marco UP Series Electric Pump Electronic Sensor Replacement, Tighten the sensor: step 6, image 1 of 1
    • Use the wrench to tighten it in place.

    • Don't over-tighten the screw!

    • Don't add PTFE tape on the screw: there's already an o-ring to seal the connection and it may cause problems to the non-return valve (check valve) underneath.

    Ask FixBot

    Add Comment

  7. Marco UP Series Electric Pump Electronic Sensor Replacement, Check how long you want to strip off the cable: step 7, image 1 of 1
    • Use the joint as a reference on how much you need to remove.

    • Keep in mind that you want to have as much wire inside as possible, but you want to avoid that the peeled wire exits the joint.

    Ask FixBot

    Add Comment

    • Use the cutting plier or (if you have it) the stripping plier to remove the sheath.

    • Try to be careful: you don't want to cut the wires inside, especially on the larger pumps.

    Ask FixBot

    Add Comment

  8. Marco UP Series Electric Pump Electronic Sensor Replacement, Insert the heat shrink tubing: step 9, image 1 of 3 Marco UP Series Electric Pump Electronic Sensor Replacement, Insert the heat shrink tubing: step 9, image 2 of 3 Marco UP Series Electric Pump Electronic Sensor Replacement, Insert the heat shrink tubing: step 9, image 3 of 3
    • Insert the heat shink tubing on both motor's cables.

    Ask FixBot

    Add Comment

  9. Marco UP Series Electric Pump Electronic Sensor Replacement, Insert the metal joints: step 10, image 1 of 1
    • The cable has to be totally inside the metal joint: if you have a longer peeled cable, cut it a little to have it aligned as in picture.

    • Don't insert the plastic sheath inside the metal joint: it worsens the connection and may cause overheating in the large pumps!

    Ask FixBot

    Add Comment

  10. Marco UP Series Electric Pump Electronic Sensor Replacement, Press the metal joint: step 11, image 1 of 3 Marco UP Series Electric Pump Electronic Sensor Replacement, Press the metal joint: step 11, image 2 of 3 Marco UP Series Electric Pump Electronic Sensor Replacement, Press the metal joint: step 11, image 3 of 3
    • Start on the motor side, and press the metal joint on the cable.

    • To have a stronger force in closing the joint use the internal part of the plier, as showed in the picture.

    • Proceed with by inserting the other end, the short cable coming from the sensor.

    • Repeat the process also for the other cable.

    Ask FixBot

    Add Comment

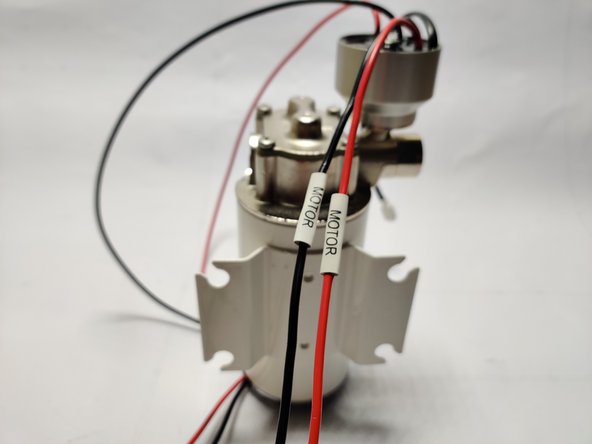
  11. Marco UP Series Electric Pump Electronic Sensor Replacement, Cover the metal joints with the heat shrink tubing: step 12, image 1 of 3 Marco UP Series Electric Pump Electronic Sensor Replacement, Cover the metal joints with the heat shrink tubing: step 12, image 2 of 3 Marco UP Series Electric Pump Electronic Sensor Replacement, Cover the metal joints with the heat shrink tubing: step 12, image 3 of 3
    • Insert the heat shrink tubing.

    • Make sure that it covers perfectly the joint (it must be centered!) on both ends .

    Ask FixBot

    Add Comment

  12. Marco UP Series Electric Pump Electronic Sensor Replacement, Heat the tubes: step 13, image 1 of 2 Marco UP Series Electric Pump Electronic Sensor Replacement, Heat the tubes: step 13, image 2 of 2
    • Heat the tubes until they shink on the joint evenly.

    • Don't heat too much: you may melt the cables.

    • If you don't have a heat gun, you may also use a lighter, but don't touch the plastic with the flame: keep some distance.

    Ask FixBot

    Add Comment

  13. Marco UP Series Electric Pump Electronic Sensor Replacement, Loop the wires: step 14, image 1 of 3 Marco UP Series Electric Pump Electronic Sensor Replacement, Loop the wires: step 14, image 2 of 3 Marco UP Series Electric Pump Electronic Sensor Replacement, Loop the wires: step 14, image 3 of 3
    • Loop the wires as shown in the pictures.

    Ask FixBot

    Add Comment

  14. Marco UP Series Electric Pump Electronic Sensor Replacement, Add the plastic strap: step 15, image 1 of 3 Marco UP Series Electric Pump Electronic Sensor Replacement, Add the plastic strap: step 15, image 2 of 3 Marco UP Series Electric Pump Electronic Sensor Replacement, Add the plastic strap: step 15, image 3 of 3
    • Fix the cables using the plastic strap.

    • Cut the excess of the plastic strap using the cutting pliers.

    Ask FixBot

    Add Comment

  15. Marco UP Series Electric Pump Electronic Sensor Replacement, You're done!: step 16, image 1 of 1
    • You can now enjoy your updated sensor!

    Ask FixBot

    Add Comment

Finish Line

Cancel: I did not complete this guide.

2 other people completed this guide.

Marco Spa

Member since: 12/04/15

1,531 Reputation

5 Guides authored

1 Guide Comment

Hello. Does this pumps works the same in horizontal or verItical position?

I have an horizontal installation and we always have air leaks to circuit problems.

Kind regards

Juan Correa - Reply Share

Add Comment

View Statistics:

Past 24 Hours: 1

Past 7 Days: 14

Past 30 Days: 76

All Time: 4,764