
MacBook Pro 15" Unibody Late 2008 and Early 2009 Optical Drive Replacement

Prerequisite Only
This guide is only intended to be used as a prerequisite for other guides. It's incomplete by itself.

What you need

  1. MacBook Pro 15" Unibody Late 2008 and Early 2009 Optical Drive Replacement, Optical Drive: step 1, image 1 of 1
    • Disconnect the camera cable by pulling the male end straight away from its socket.

  2. MacBook Pro 15" Unibody Late 2008 and Early 2009 Optical Drive Replacement: step 2, image 1 of 1
    • Deroute the camera data cable from the channel in the optical drive.

  3. MacBook Pro 15" Unibody Late 2008 and Early 2009 Optical Drive Replacement: step 3, image 1 of 1
    • Use a spudger to pry the optical drive connector straight up off the logic board.

  4. MacBook Pro 15" Unibody Late 2008 and Early 2009 Optical Drive Replacement: step 4, image 1 of 2 MacBook Pro 15" Unibody Late 2008 and Early 2009 Optical Drive Replacement: step 4, image 2 of 2
    • Remove two 8 mm Phillips screws securing the camera cable bracket to the upper case.

    • The rightmost screw may remain captive in the camera cable.

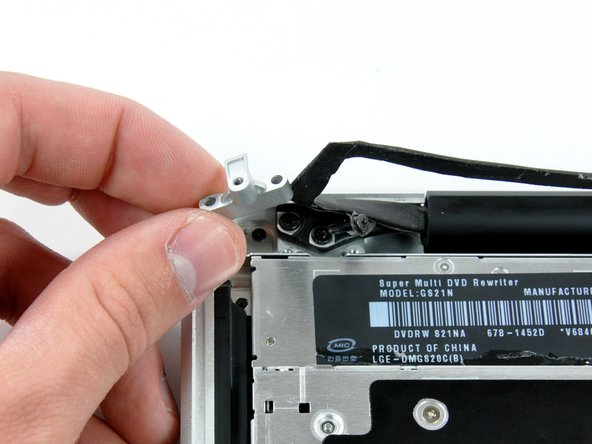
    • Lift the camera cable bracket out from the upper case.

  5. MacBook Pro 15" Unibody Late 2008 and Early 2009 Optical Drive Replacement: step 5, image 1 of 1
    • Remove the following three Phillips screws securing the optical drive to the upper case:

    • One 3.5 mm Phillips screw.

    • Two 2.5 mm Phillips screws.

  6. MacBook Pro 15" Unibody Late 2008 and Early 2009 Optical Drive Replacement: step 6, image 1 of 1
    • Lift the optical drive from its left edge and pull it out of the computer.

View Statistics:

Past 24 Hours: 0

Past 7 Days: 0

Past 30 Days: 1

All Time: 1,241