
MacBook Pro 15" Unibody Early 2011 Subwoofer & Right Speaker Replacement

What you need

  1. MacBook Pro 15" Unibody Early 2011 Subwoofer & Right Speaker Replacement, Lower Case: step 1, image 1 of 1
    • Remove the following ten screws securing the lower case to the upper case:

    • Three 13.5 mm (14.1 mm) Phillips screws.

    • Seven 3 mm Phillips screws.

    • When removing these screws, note how they come out at a slight angle. They must be reinstalled the same way.

  2. MacBook Pro 15" Unibody Early 2011 Subwoofer & Right Speaker Replacement: step 2, image 1 of 1
    • Using both hands, lift the lower case near the vent to pop it off two clips securing it to the upper case.

    • Remove the lower case and set it aside.

  3. MacBook Pro 15" Unibody Early 2011 Subwoofer & Right Speaker Replacement, Battery Connector: step 3, image 1 of 2 MacBook Pro 15" Unibody Early 2011 Subwoofer & Right Speaker Replacement, Battery Connector: step 3, image 2 of 2
    • For certain repairs (e.g. hard drive), disconnecting the battery connector is not necessary but is recommended as it prevents any accidental shorting of electronics on the motherboard. If you do not disconnect the battery connector, please be careful as parts of the motherboard might be electrified.

    • Use the edge of a spudger to pry the battery connector upwards from its socket on the logic board.

    • It is useful to pry upward on both short sides of the connector to "walk" it out of its socket.

  4. MacBook Pro 15" Unibody Early 2011 Subwoofer & Right Speaker Replacement: step 4, image 1 of 1
    • Bend the battery cable slightly away from its socket on the logic board so it does not accidentally connect itself while you work.

  5. MacBook Pro 15" Unibody Early 2011 Subwoofer & Right Speaker Replacement, Optical Drive: step 5, image 1 of 1
    • Disconnect the camera cable connector from its socket on the logic board.

    • Do not lift up on the cable as you disconnect it from the logic board. Pull the cable parallel to the face of the logic board.

  6. MacBook Pro 15" Unibody Early 2011 Subwoofer & Right Speaker Replacement: step 6, image 1 of 1
    • Use the flat end of a spudger to pry the AirPort/Bluetooth connector up from its socket on the logic board.

  7. MacBook Pro 15" Unibody Early 2011 Subwoofer & Right Speaker Replacement: step 7, image 1 of 1
    • Use the flat end of a spudger to pry the optical drive connector up from its socket on the logic board.

  8. MacBook Pro 15" Unibody Early 2011 Subwoofer & Right Speaker Replacement: step 8, image 1 of 2 MacBook Pro 15" Unibody Early 2011 Subwoofer & Right Speaker Replacement: step 8, image 2 of 2
    • Remove following two screws:

    • Take care, as these screws are unusually easy to strip. Apply firm pressure while unscrewing. Read comments before proceeding.

    • One 8.6 mm Phillips screw

    • One 3.9 mm Phillips screw

    • Carefully rotate the AirPort/Bluetooth board housing (with AirPort/Antenna cables still attached) out of the lower case.

  9. MacBook Pro 15" Unibody Early 2011 Subwoofer & Right Speaker Replacement: step 9, image 1 of 1
    • Remove the three 3.5 mm T6 Torx screws securing the optical drive to the upper case.

  10. MacBook Pro 15" Unibody Early 2011 Subwoofer & Right Speaker Replacement: step 10, image 1 of 1
    • Lift the optical drive near its connector and pull it away from the upper case to remove it from the computer.

  11. MacBook Pro 15" Unibody Early 2011 Subwoofer & Right Speaker Replacement, Subwoofer & Right Speaker: step 11, image 1 of 2 MacBook Pro 15" Unibody Early 2011 Subwoofer & Right Speaker Replacement, Subwoofer & Right Speaker: step 11, image 2 of 2
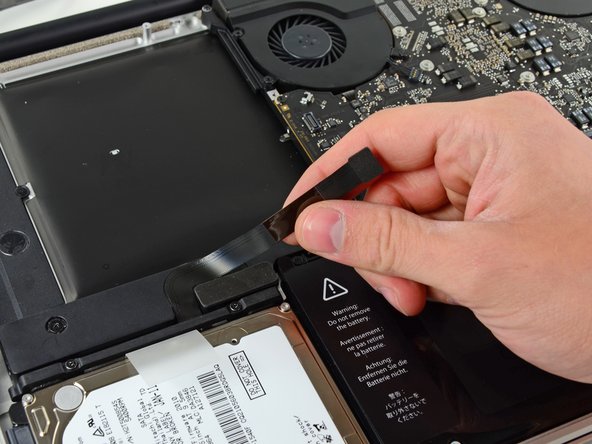
    • Use the flat end of a spudger to pry the hard drive/IR sensor cable connector up off the logic board.

    • Peel the hard drive cable up from the channel within the subwoofer and right speaker.

  12. MacBook Pro 15" Unibody Early 2011 Subwoofer & Right Speaker Replacement: step 12, image 1 of 1
    • Using the flat end of a spudger, pry the subwoofer connector straight up off the logic board.

  13. MacBook Pro 15" Unibody Early 2011 Subwoofer & Right Speaker Replacement: step 13, image 1 of 1
    • Remove the following six screws securing the subwoofer and right speaker to the upper case:

    • Two 3.2 mm Phillips screws.

    • Two 12.3 mm Phillips screws.

    • One 2.5 mm Phillips screw.

    • One 8.3 mm Phillips screw.

  14. MacBook Pro 15" Unibody Early 2011 Subwoofer & Right Speaker Replacement: step 14, image 1 of 2 MacBook Pro 15" Unibody Early 2011 Subwoofer & Right Speaker Replacement: step 14, image 2 of 2
    • Use the flat end of a spudger to dislodge the right speaker from its recess in the upper case.

    • Lift the subwoofer and right speaker assembly out of the upper case.

Conclusion

To reassemble your device, follow these instructions in reverse order.

18 other people completed this guide.

0 Comments

Add Comment

View Statistics:

Past 24 Hours: 1

Past 7 Days: 15

Past 30 Days: 59

All Time: 22,234