MacBook Pro 13インチ Retina Display Late 2012 SSDの交換

What you need

  1. MacBook Pro 13インチ Retina Display Late 2012 SSDの交換, 下部ケース: step 1, image 1 of 1
    Tool used on this step:
    Magnetic Project Mat
    $19.95
    Buy
    • 底ケースと上部ケースを留めている次のネジを10本外します。

    • 2.3 mm P5ペンタロープネジー2本

    • 3.0 mm P5 ペンタロープネジー8本

    • この作業中、外した各ネジの管理を安全に行ってください。再組み立ての際は、デバイスのダメージを防ぐため、正しい位置に装着してください。

  2. MacBook Pro 13インチ Retina Display Late 2012 SSDの交換: step 2, image 1 of 1
    • 上部ケースと底ケースの間に指を差し込みます。

    • 丁寧に底ケースを上部ケースから外していきます。

    • 完全に底ケースを取り出します。

  3. MacBook Pro 13インチ Retina Display Late 2012 SSDの交換: step 3, image 1 of 3 MacBook Pro 13インチ Retina Display Late 2012 SSDの交換: step 3, image 2 of 3 MacBook Pro 13インチ Retina Display Late 2012 SSDの交換: step 3, image 3 of 3
    • 再組み立ての際、下部ケースの中央を軽く押して、2つのプラスチッククリップを再度取り付けます。

    • 下部ケースは中央で上部ケースと2つのプラスチック製クリップで接続されています。

  4. MacBook Pro 13インチ Retina Display Late 2012 SSDの交換, バッテリーコネクター: step 4, image 1 of 1
    • バッテリーボードに装着されているプラスチックカバーを外します。

  5. MacBook Pro 13インチ Retina Display Late 2012 SSDの交換: step 5, image 1 of 1
    • ロジックボードにバッテリーボードを取り付けている次のネジを外します。

    • 2.8 mm T6トルクスネジー2本

    • 7.0 mm T6トルクス肩付きネジー1本

  6. MacBook Pro 13インチ Retina Display Late 2012 SSDの交換: step 6, image 1 of 2 MacBook Pro 13インチ Retina Display Late 2012 SSDの交換: step 6, image 2 of 2
    • ピンセットを使って、バッテリーコネクターボードの右側底付近にある小さいプラスチックカバーを取り出します。

  7. MacBook Pro 13インチ Retina Display Late 2012 SSDの交換: step 7, image 1 of 1
    • バッテリーコネクターをロジックボードアセンブリに留めている広幅の6.4 mm T6トルクスネジを外します。

  8. MacBook Pro 13インチ Retina Display Late 2012 SSDの交換: step 8, image 1 of 2 MacBook Pro 13インチ Retina Display Late 2012 SSDの交換: step 8, image 2 of 2
    • 丁寧にロジックボードからバッテリーコネクターボードを引き上げます。

    • 若干バッテリーケーブルを曲げてください。ボードがロジックボード上で引き上げられた状態にして、作業の邪魔にならないようにします。

    • ボードを完全に折り曲げたり、ケーブルにしわを入れないでください。バッテリーにダメージを与えてしまいます。

  9. MacBook Pro 13インチ Retina Display Late 2012 SSDの交換, バッテリーボード: step 9, image 1 of 2 MacBook Pro 13インチ Retina Display Late 2012 SSDの交換, バッテリーボード: step 9, image 2 of 2
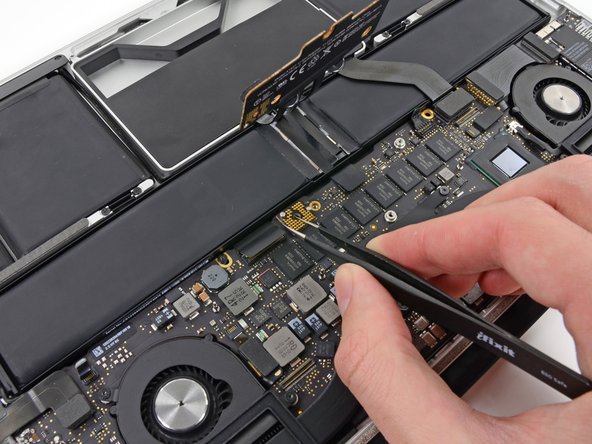
    • ピンセットでインターポーザーを掴みます。

    • インターポーザーとはLSI間の接続を担う役割を持つインターフェイスの名称です。この修理ではバッテリーとロジックボードを接続しているボードを対象とします。

    • インターポーザーをロジックボードから引き上げて外します。

    • このボードを取り外す際は修理作業中、バッテリーが完全に外されているか確認してください。コンピューターがアクシデントにより再起動しないようにご注意ください。バッテリーを取り出しておく事もおすすめです。

  10. MacBook Pro 13インチ Retina Display Late 2012 SSDの交換, SSDアセンブリ: step 10, image 1 of 2 MacBook Pro 13インチ Retina Display Late 2012 SSDの交換, SSDアセンブリ: step 10, image 2 of 2
    • スパッジャーの平面側先端を使って、ロジックボード上のソケットからSSDケーブルのコネクタを持ち上げます。

  11. MacBook Pro 13インチ Retina Display Late 2012 SSDの交換: step 11, image 1 of 3 MacBook Pro 13インチ Retina Display Late 2012 SSDの交換: step 11, image 2 of 3 MacBook Pro 13インチ Retina Display Late 2012 SSDの交換: step 11, image 3 of 3
    • 親指もしくは他の指を使ってSSDトレイ上のプラスチックのバネ用バーを曲げて、デバイス正面側に付いている2つのクリップを外します。

    • バネ用バーを押し仕上げながら、SSDアセンブリを上向きに傾けて取り出します。

  12. MacBook Pro 13インチ Retina Display Late 2012 SSDの交換: step 12, image 1 of 1
    • 上部ケースからSSFアセンブリを取り出します。

  13. MacBook Pro 13インチ Retina Display Late 2012 SSDの交換: step 13, image 1 of 1
    • SSDトレイにSSDを固定している2.9 mm T5 トルクスネジを1本外します。

  14. MacBook Pro 13インチ Retina Display Late 2012 SSDの交換: step 14, image 1 of 2 MacBook Pro 13インチ Retina Display Late 2012 SSDの交換: step 14, image 2 of 2
    • プラスチックの開口ツールの先端をSSDとSSDトレイの間、つまりSSDトレイのソケット側の反対に差し込みます。

    • SSDトレイから、SSDトレイのソケットの反対にあるSSDの端をこじ開けます。

    • SSDを作業をしていない反対側の指でSSDqがつかめて持ち上がる程度まで押し上げあす。高く上げすぎてしまうと、カードやソケットにダメージを与えてしまいます。

  15. MacBook Pro 13インチ Retina Display Late 2012 SSDの交換: step 15, image 1 of 2 MacBook Pro 13インチ Retina Display Late 2012 SSDの交換: step 15, image 2 of 2
    • SSDをSSDトレイ上のソケットからゆっくりと引き抜きます。

  16. MacBook Pro 13インチ Retina Display Late 2012 SSDの交換, SSD: step 16, image 1 of 1
    • SSDが残ります。

Conclusion

デバイスを再組み立てする際は、これらのインストラクションを逆の順番に従って作業を進めてください。

105 other people completed this guide.

Special thanks to these translators:

en jp

100%

Midori Doi is helping us fix the world! Want to contribute?
Start translating ›

9 Comments

I followed the guide and was able to upgrade my wife's MacBook from 128GB to 240 GB!

One thing I noticed was that when I removed the plastic clip in step 6, it left behind a glue dot on the screw head I had to remove in step 7. I wasn't sure why my screwdriver kept rotating until I realized the clear dot was covering the screwed! Then I tweeze the dot off, and put it in the recess on the underside of the clip and all was good.

Everything went to the letter after, until it came time to restart and initialize the new disk. It turns out the old disk had some directory damage, so when it was copied to the new internal SSD, then the Mac wouldn't boot from it until I did a couple FSCK and Repair Disk fixes.

dazifixit - Reply

Vignesh,

Here is an option to recover your data and get a tiny speedy external SSD drive for 28.85

https://eshop.macsales.com/item/OWC/MAU3...

david - Reply

Sam,

The 2012 MacBook Pro uses an PCI Express Mini Card connection between the logic board and the SSD.

"Some notebooks (notably the Asus Eee PC, the MacBook Air, and the Dell mini9 and mini10) use a variant of the PCI Express Mini Card as an SSD. This variant uses the reserved and several non-reserved pins to implement SATA and IDE interface passthrough, keeping only USB, ground lines, and sometimes the core PCIe 1x bus intact.[11] This makes the 'miniPCIe' flash and solid state drives sold for netbooks largely incompatible with true PCI Express Mini implementations."

Source: http://en.wikipedia.org/wiki/PCI_Express...

david - Reply

I fully agree, Especially as it turned out to be a little tricky to get the connector back in his position properly. Don't think there is a higher risk of damage through electric shock or so. Next time I will for sure skip it ;-)

Timpetou -

Aren’t steps 4-10 completely unnecessary?

Wade Murdock - Reply

Add Comment

View Statistics:

Past 24 Hours: 27

Past 7 Days: 175

Past 30 Days: 828

All Time: 180,608