MacBook Air 13" Mid 2013 Display Assembly Replacement

What you need

  1. MacBook Air 13" Mid 2013 Display Assembly Replacement, Lower Case: step 1, image 1 of 1
    Tool used on this step:
    P5 Pentalobe Screwdriver Retina MacBook Pro and Air
    $5.99
    Buy
    • Before proceeding, power down your MacBook. Close the display and lay it on a soft surface, top-side down.

    • Use a P5 Pentalobe driver to remove ten screws securing the lower case, of the following lengths:

    • Two 9 mm screws

    • Eight 2.6 mm screws

  2. MacBook Air 13" Mid 2013 Display Assembly Replacement: step 2, image 1 of 1
    • Wedge your fingers between the display and the lower case and pull upward to pop the lower case off the Air.

    • Remove the lower case and set it aside.

  3. MacBook Air 13" Mid 2013 Display Assembly Replacement, Battery Connector: step 3, image 1 of 2 MacBook Air 13" Mid 2013 Display Assembly Replacement, Battery Connector: step 3, image 2 of 2
    • To ensure that everything is de-energized and won't turn on while you're working, it is recommended that you disconnect the battery.

    • Grab the clear plastic pull tab attached to the battery connector and pull it parallel to the board toward the front edge of the Air.

    • Do not lift upward on the connector as you disconnect it or you risk damage to the connector socket.

  4. MacBook Air 13" Mid 2013 Display Assembly Replacement, I/O Board Cable: step 4, image 1 of 1
    • Use the flat end of a spudger to pry the I/O board cable connector up out of its socket on the I/O board.

  5. MacBook Air 13" Mid 2013 Display Assembly Replacement: step 5, image 1 of 1
    • Carefully peel the I/O board cable from the adhesive securing it to the top of the fan.

    • During reassembly, make sure this cable is in the correct orientation. It will fit if reversed, but the laptop will not boot.

  6. MacBook Air 13" Mid 2013 Display Assembly Replacement: step 6, image 1 of 2 MacBook Air 13" Mid 2013 Display Assembly Replacement: step 6, image 2 of 2
    • The following connector has an especially deep socket. Use care when disconnecting it.

    • While gently pulling the I/O board cable upward near its connection to the logic board, use the flat end of a spudger to pry up on alternating sides of the connector to help "walk" it out of its socket.

    • Remove the I/O board cable.

  7. MacBook Air 13" Mid 2013 Display Assembly Replacement, Fan: step 7, image 1 of 1
    • Use the tip of a spudger to carefully flip up the retaining flap on the fan cable ZIF socket.

    • Be sure you are prying up on the hinged retaining flap, not the socket itself.

  8. MacBook Air 13" Mid 2013 Display Assembly Replacement: step 8, image 1 of 1
    • Peel the rubber gasket off the adhesive on the top of the fan.

  9. MacBook Air 13" Mid 2013 Display Assembly Replacement: step 9, image 1 of 1
    • Remove the following three screws securing the fan to the upper case:

    • One 3.6 mm T5 Torx screw

    • One 2.7 mm T5 Torx screw

    • One 3.6 mm T5 Torx screw with a short head

  10. MacBook Air 13" Mid 2013 Display Assembly Replacement: step 10, image 1 of 2 MacBook Air 13" Mid 2013 Display Assembly Replacement: step 10, image 2 of 2
    • Lift the fan from the I/O board side and pull it free from the upper case.

    • Removing the fan will also disconnect the fan ribbon cable. Be careful not to snag it.

  11. MacBook Air 13" Mid 2013 Display Assembly Replacement, I/O Board: step 11, image 1 of 1
    • Disconnect the I/O board by pulling its power cable away from its socket on the logic board.

    • Pull the cable parallel to the face of the logic board toward the right edge of the Air.

  12. MacBook Air 13" Mid 2013 Display Assembly Replacement: step 12, image 1 of 2 MacBook Air 13" Mid 2013 Display Assembly Replacement: step 12, image 2 of 2
    • Use the flat end of a spudger to pry the left speaker cable connector up and out of its socket on the I/O board.

    • Pry up from beneath the wires.

  13. MacBook Air 13" Mid 2013 Display Assembly Replacement: step 13, image 1 of 2 MacBook Air 13" Mid 2013 Display Assembly Replacement: step 13, image 2 of 2
    • Use the tip of a spudger to carefully flip up the retaining flap on the microphone ribbon cable ZIF socket.

    • Make sure you are flipping up the retaining flap, not the socket itself.

  14. MacBook Air 13" Mid 2013 Display Assembly Replacement: step 14, image 1 of 1
    • Remove the single 3.6 mm T5 Torx screw securing the I/O board to the upper case.

  15. MacBook Air 13" Mid 2013 Display Assembly Replacement: step 15, image 1 of 2 MacBook Air 13" Mid 2013 Display Assembly Replacement: step 15, image 2 of 2
    • Gently de-route the camera cable from its notch on the I/O board and push it out of the way with the tip of a spudger.

  16. MacBook Air 13" Mid 2013 Display Assembly Replacement: step 16, image 1 of 1
    • Lift the I/O board from the logic board side and pull it free from the upper case.

    • Removing the I/O board will also disconnect the microphone ribbon cable. Be careful not to snag it.

  17. MacBook Air 13" Mid 2013 Display Assembly Replacement, Display Assembly: step 17, image 1 of 2 MacBook Air 13" Mid 2013 Display Assembly Replacement, Display Assembly: step 17, image 2 of 2
    • Use the flat end of a spudger to pry each of the antenna connectors up from their sockets on the AirPort/Bluetooth card.

  18. MacBook Air 13" Mid 2013 Display Assembly Replacement: step 18, image 1 of 2 MacBook Air 13" Mid 2013 Display Assembly Replacement: step 18, image 2 of 2
    • Disconnect the camera cable connector with the tip of a spudger.

    • Push first on one side of the connector, then on the other side to carefully "walk" it out of its socket.

    • Pull the camera cable parallel to the face of the I/O board toward the front edge of the Air to disconnect it from its socket.

    • Do not lift upward on this cable as you disconnect it, as its socket may break off the logic board.

  19. MacBook Air 13" Mid 2013 Display Assembly Replacement: step 19, image 1 of 2 MacBook Air 13" Mid 2013 Display Assembly Replacement: step 19, image 2 of 2
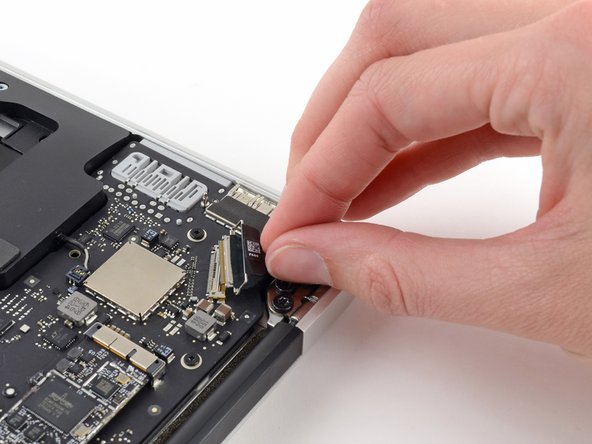
    • Pull the plastic tab on the display data cable connector to unlock it.

  20. MacBook Air 13" Mid 2013 Display Assembly Replacement: step 20, image 1 of 2 MacBook Air 13" Mid 2013 Display Assembly Replacement: step 20, image 2 of 2
    • Pull the display data cable connector straight out of its socket.

    • Make sure to pull the connector parallel to the logic board, do not lift straight up from its socket.

  21. MacBook Air 13" Mid 2013 Display Assembly Replacement: step 21, image 1 of 2 MacBook Air 13" Mid 2013 Display Assembly Replacement: step 21, image 2 of 2
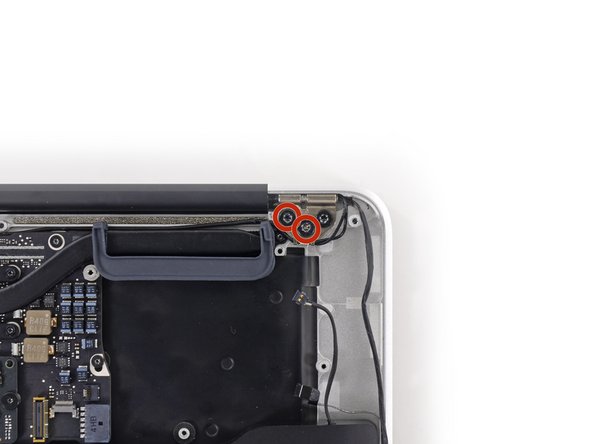
    • Remove the inner four (two on each side) 4.9 mm T8 Torx screws securing the right and left display hinges to the upper case.

    • Leaving the outer screws in place for now will aid in disassembly.

  22. MacBook Air 13" Mid 2013 Display Assembly Replacement: step 22, image 1 of 1
    • Gently de-route the antenna cables out of the channel cut into the upper case.

  23. MacBook Air 13" Mid 2013 Display Assembly Replacement: step 23, image 1 of 1
    • Open the display so that it is perpendicular to the upper case and place it on a table as shown.

  24. MacBook Air 13" Mid 2013 Display Assembly Replacement: step 24, image 1 of 1
    • While holding the Air steady, remove the remaining 4.9 mm T8 Torx screw from the left display bracket.

  25. MacBook Air 13" Mid 2013 Display Assembly Replacement: step 25, image 1 of 1
    • Turn the computer onto its opposite edge so the right display screw is now easily accesible.

    • Before removing the last display screw, be sure to hold the display and upper case steady with your other hand. Failure to do so may allow the components to fall onto the table, causing potentially expensive damage.

    • Remove the last 4.9 mm T8 Torx screw securing the display to the upper case.

  26. MacBook Air 13" Mid 2013 Display Assembly Replacement: step 26, image 1 of 3 MacBook Air 13" Mid 2013 Display Assembly Replacement: step 26, image 2 of 3 MacBook Air 13" Mid 2013 Display Assembly Replacement: step 26, image 3 of 3
    • Open the Air slightly to allow room for the hinges to slide out of their notches.

    • Push the upper case slightly toward the display assembly, then push it back from the hinges.

    • Once the two display hinges have cleared the upper case, remove the display and set it aside.

  27. MacBook Air 13" Mid 2013 Display Assembly Replacement: step 27, image 1 of 2 MacBook Air 13" Mid 2013 Display Assembly Replacement: step 27, image 2 of 2
    • During reassembly, use the flat end of a spudger to tuck the Wi-Fi/Bluetooth antenna back into its channel.

Conclusion

To reassemble your device, follow these instructions in reverse order.

77 other people completed this guide.

17 Comments

Just a reminder that you DO NOT want to touch the battery with your hands or a screw driver you can compromise the integrity of the battery and possibly cause a thermal event. Always use proper battery cover kit.

http://www.macpalace.com/076-1372-batter...

Corey - Reply

It's not written to remove the screen cable connector (at the top left corner, looking to the lower surface). Please add this step

Emilio - Reply

This step is still needed (before step 18, which shows it disconnected). I didn't notice this until I attempted to remove the display.

Stuart Mc -

When reassembling the device, keep in mind that the holes in the hinges are relatively big compared to the T8 screws, so there will be a certain play. Check if display and body are in line when the MacBook is closed, then tighten the screws.

Marcel - Reply

When I noticed this (also similar issue when installing the trackpad), I thought "what an inferior engineering for such an expensive product".

Gene Pavlovsky -

Add Comment

View Statistics:

Past 24 Hours: 9

Past 7 Days: 47

Past 30 Days: 256

All Time: 86,793