
Mac Pro Late 2013 SSD Replacement

What you need

  1. Mac Pro Late 2013 SSD Replacement, Outer Case: step 1, image 1 of 2 Mac Pro Late 2013 SSD Replacement, Outer Case: step 1, image 2 of 2
    • Slide the lock switch to the right, to the unlocked position.

  2. Mac Pro Late 2013 SSD Replacement: step 2, image 1 of 3 Mac Pro Late 2013 SSD Replacement: step 2, image 2 of 3 Mac Pro Late 2013 SSD Replacement: step 2, image 3 of 3
    • Lift the outer case straight up off the Mac Pro.

    • It may help to push down on the center of the fan while lifting the case up.

  3. Mac Pro Late 2013 SSD Replacement, SSD: step 3, image 1 of 1
    • Remove the single 6.5 mm T8 Torx screw.

  4. Mac Pro Late 2013 SSD Replacement: step 4, image 1 of 3 Mac Pro Late 2013 SSD Replacement: step 4, image 2 of 3 Mac Pro Late 2013 SSD Replacement: step 4, image 3 of 3
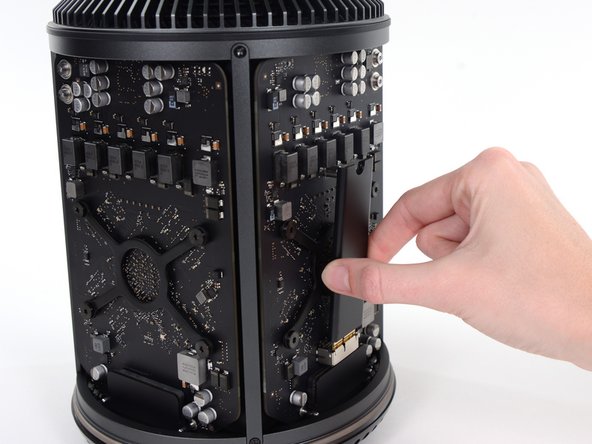
    • Pull the SSD slightly away from the graphics card.

    • Do not pull the top edge of the SSD more than 1/2" away from the graphics card, or you will risk damaging it.

    • Lift the SSD straight up out of its slot on the graphics card.

Andrew Optimus Goldheart

Member since: 10/17/09

502,786 Reputation

407 Guides authored

Team

iFixit Member of iFixit

Staff

135 Members

16,767 Guides authored

View Statistics:

Past 24 Hours: 34

Past 7 Days: 156

Past 30 Days: 862

All Time: 81,325