
Logitech Harmony Companion Remote Motherboard Replacement

What you need

  1. Logitech Harmony Companion Remote Motherboard Replacement, Remote Battery: step 1, image 1 of 1
    • Hold the remote with the Logitech label toward you.

  2. Logitech Harmony Companion Remote Motherboard Replacement: step 2, image 1 of 1
    • Push the battery cover upward.

    MY Logitech Harmony smart control does NOT have a battery door. There is absolutely no way to get to any battery HELP

    ussscamp - Reply

  3. Logitech Harmony Companion Remote Motherboard Replacement: step 3, image 1 of 3 Logitech Harmony Companion Remote Motherboard Replacement: step 3, image 2 of 3 Logitech Harmony Companion Remote Motherboard Replacement: step 3, image 3 of 3
    • Use your finger to lift the battery out of the compartment.

    • When the battery has lifted, push it up to remove it.

  4. Logitech Harmony Companion Remote Motherboard Replacement, Remote Motherboard: step 4, image 1 of 2 Logitech Harmony Companion Remote Motherboard Replacement, Remote Motherboard: step 4, image 2 of 2
    • Remove the two 5.0 mm Phillips #0 screws.

  5. Logitech Harmony Companion Remote Motherboard Replacement: step 5, image 1 of 2 Logitech Harmony Companion Remote Motherboard Replacement: step 5, image 2 of 2
    • Use the plastic opening tool to pry open the back cover of the remote.

    • It is recommended to have the point of the opening tool facing the back of the remote.

    • Insert the opening tool on each side of the bottom of the remote, and pull up until you hear the cover click open.

    • Pry the back cover off by sliding the plastic opening tool down each side.

  6. Logitech Harmony Companion Remote Motherboard Replacement: step 6, image 1 of 2 Logitech Harmony Companion Remote Motherboard Replacement: step 6, image 2 of 2
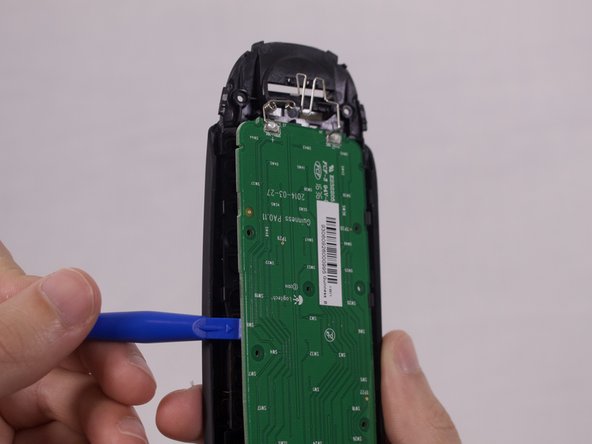
    • Use the plastic opening tool to remove the motherboard.

    Pay careful attention to how the battery holders (the wires at the top) are positioned before removing, especially the springs which are designed to push the battery out when lifted, but if not carefully reinstalled will not allow the battery click into place.

    Tom Scott - Reply

Conclusion

To reassemble your device, follow these instructions in reverse order.

4 other people completed this guide.

Cassidy Wardlow

Member since: 09/28/17

662 Reputation

4 Guides authored

Team

USF Tampa, Team S1-G3, Nance Fall 2017 Member of USF Tampa, Team S1-G3, Nance Fall 2017

USFT-NANCE-F17S1G3

3 Members

4 Guides authored

One Comment

Any source on that motherboard? I've got two dead buttons and replacement remotes are expensive and hard to come by.

Karl Wooster - Reply

Add Comment

View Statistics:

Past 24 Hours: 3

Past 7 Days: 22

Past 30 Days: 113

All Time: 5,625