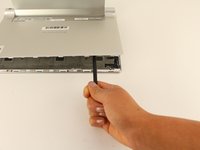
Lenovo Yoga Tablet 10 Back Camera Replacement

What you need

  1. Lenovo Yoga Tablet 10 Back Camera Replacement, Back Cover: step 1, image 1 of 1
    • Remove the two Phillips #000 screws.

    • These screws are located behind the stand for the device.

    • Our device did not include these screws.

  2. Lenovo Yoga Tablet 10 Back Camera Replacement: step 2, image 1 of 1
    • Use a plastic iFixit opening tool to pry the edges of the back case loose by placing it in between the edge of the cover and the screen.

    • Do not immediately attempt to remove the back of the case without attempting Step three, or you risk snapping the back cover.

  3. Lenovo Yoga Tablet 10 Back Camera Replacement: step 3, image 1 of 2 Lenovo Yoga Tablet 10 Back Camera Replacement: step 3, image 2 of 2
    • Use the spudger to reach into the center of the device and pry off the back case by giving it a light force upwards.

  4. Lenovo Yoga Tablet 10 Back Camera Replacement, Back Camera: step 4, image 1 of 2 Lenovo Yoga Tablet 10 Back Camera Replacement, Back Camera: step 4, image 2 of 2
    • Remove one 5mm screw using the Phillips #00 Screwdriver.

  5. Lenovo Yoga Tablet 10 Back Camera Replacement: step 5, image 1 of 3 Lenovo Yoga Tablet 10 Back Camera Replacement: step 5, image 2 of 3 Lenovo Yoga Tablet 10 Back Camera Replacement: step 5, image 3 of 3
    • Use the spudger to disconnect the camera and battery from the printed circuit board by putting the spudger in between the connections and the printed circuit board and pushing the spudger up.

  6. Lenovo Yoga Tablet 10 Back Camera Replacement: step 6, image 1 of 1
    • Remove one 5mm screw with the Phillips #00 screwdriver.

  7. Lenovo Yoga Tablet 10 Back Camera Replacement: step 7, image 1 of 3 Lenovo Yoga Tablet 10 Back Camera Replacement: step 7, image 2 of 3 Lenovo Yoga Tablet 10 Back Camera Replacement: step 7, image 3 of 3
    • Use the nylon tip tweezers to push the camera out from between the power button and the kickstand.

Conclusion

To reassemble your device, follow these instructions in reverse order.

One other person completed this guide.

Juan Benjamin

Member since: 01/24/19

490 Reputation

4 Guides authored

Team

Cal Poly, Team S2-G6, White Winter 2019 Member of Cal Poly, Team S2-G6, White Winter 2019

CPSU-WHITE-W19S2G6

4 Members

7 Guides authored

One Comment

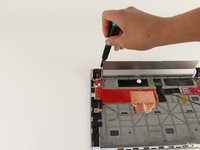
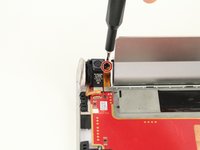
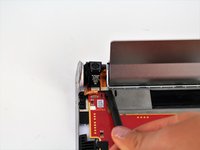
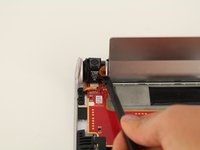
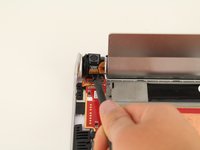
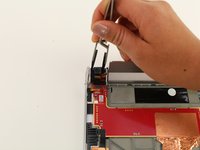
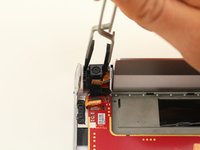
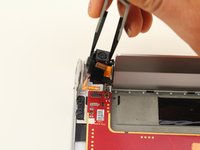
“To reassemble your device, follow these instructions in reverse order. “ Including unripping the power switch tail, which is soldered to the board. Look at the last picture!

The camera/speaker assembly cannot be removed without unsoldering this tail.

Fixin Ma Stuff - Reply

Add Comment

View Statistics:

Past 24 Hours: 0

Past 7 Days: 0

Past 30 Days: 3

All Time: 461