
Lenovo Yoga 720-15IKB Motherboard Replacement

What you need

  1. Lenovo Yoga 720-15IKB Motherboard Replacement, Bottom Cover: step 1, image 1 of 3 Lenovo Yoga 720-15IKB Motherboard Replacement, Bottom Cover: step 1, image 2 of 3 Lenovo Yoga 720-15IKB Motherboard Replacement, Bottom Cover: step 1, image 3 of 3
    • Power off the device before starting.

    • Flip the device over with the hinges facing away from you.

    • Remove seven 5.0 mm Torx T5 screws.

    • Remove three 9.5 mm Torx T5 screws.

  2. Lenovo Yoga 720-15IKB Motherboard Replacement: step 2, image 1 of 2 Lenovo Yoga 720-15IKB Motherboard Replacement: step 2, image 2 of 2
    • Pry around the edges from one side to another with a plastic opening tool.

    • Do not pry on the side with the hinges because this can break the cover.

    • Lift the case from the front until you feel resistance.

    • Do not keep lifting after you feel resistance, or the bottom cover can break.

    • Pull the cover towards you, away from the hinges.

    • Completely lift off the cover.

  3. Lenovo Yoga 720-15IKB Motherboard Replacement, Fan: step 3, image 1 of 2 Lenovo Yoga 720-15IKB Motherboard Replacement, Fan: step 3, image 2 of 2
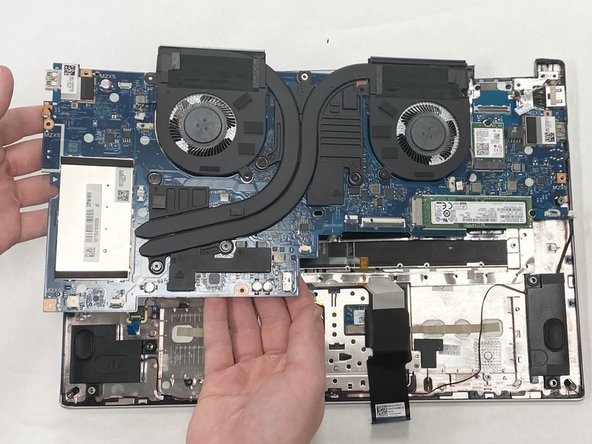
    • Remove the six 5.2mm Torx T5 screws holding the fan in place.

    • Remove the five 5.0mm Torx T5 screws holding the fan in place.

  4. Lenovo Yoga 720-15IKB Motherboard Replacement: step 4, image 1 of 3 Lenovo Yoga 720-15IKB Motherboard Replacement: step 4, image 2 of 3 Lenovo Yoga 720-15IKB Motherboard Replacement: step 4, image 3 of 3
    • Disconnect the two fan wire connectors.

    • Firmly pull the connector out horizontally away from the socket.

    • Carefully lift the fan up and out.

  5. Lenovo Yoga 720-15IKB Motherboard Replacement, Battery: step 5, image 1 of 2 Lenovo Yoga 720-15IKB Motherboard Replacement, Battery: step 5, image 2 of 2
    • Remove the four 4mm screws surrounding the battery with a Phillips #0 screwdriver.

    • Each is marked by "M2x5" with a small white arrow pointing to the screw itself.

  6. Lenovo Yoga 720-15IKB Motherboard Replacement: step 6, image 1 of 2 Lenovo Yoga 720-15IKB Motherboard Replacement: step 6, image 2 of 2
    • Pull firmly on the battery connector to disconnect it.

  7. Lenovo Yoga 720-15IKB Motherboard Replacement: step 7, image 1 of 1
    • Lift the battery out of the case to remove it.

  8. Lenovo Yoga 720-15IKB Motherboard Replacement, Motherboard: step 8, image 1 of 1
    • Using the Phillips #000 screwdriver, remove the five screws.

  9. Lenovo Yoga 720-15IKB Motherboard Replacement: step 9, image 1 of 2 Lenovo Yoga 720-15IKB Motherboard Replacement: step 9, image 2 of 2
    • Disconnect the power outlet connector.

    • Disconnect the speaker wire connector.

    • Carefully lift the motherboard up and out of the device.

Conclusion

To reassemble your device, follow these instructions in reverse order.

0 Comments

Add Comment

View Statistics:

Past 24 Hours: 4

Past 7 Days: 17

Past 30 Days: 44

All Time: 1,348