
Lenovo Thinkpad X1 Carbon 4th Gen Fingerprint Press Scanner Replacement

What you need

  1. Lenovo Thinkpad X1 Carbon 4th Gen Fingerprint Press Scanner Replacement, Bottom Panel: step 1, image 1 of 2 Lenovo Thinkpad X1 Carbon 4th Gen Fingerprint Press Scanner Replacement, Bottom Panel: step 1, image 2 of 2
    • Unscrew the nine captive screws on the bottom cover of the laptop using a Phillips #1 screwdriver.

    • The screws do not fully come out of the back cover, so there is no need for screw management.

    • There are a few small clips around the edge that you may need to pry at to free them. An opening pick may be helpful for this process.

  2. Lenovo Thinkpad X1 Carbon 4th Gen Fingerprint Press Scanner Replacement: step 2, image 1 of 1
    • Lift the back cover up and off of the computer.

  3. Lenovo Thinkpad X1 Carbon 4th Gen Fingerprint Press Scanner Replacement, Speakers: step 3, image 1 of 3 Lenovo Thinkpad X1 Carbon 4th Gen Fingerprint Press Scanner Replacement, Speakers: step 3, image 2 of 3 Lenovo Thinkpad X1 Carbon 4th Gen Fingerprint Press Scanner Replacement, Speakers: step 3, image 3 of 3
    • Carefully unplug the speaker connector by pulling it towards you.

  4. Lenovo Thinkpad X1 Carbon 4th Gen Fingerprint Press Scanner Replacement: step 4, image 1 of 2 Lenovo Thinkpad X1 Carbon 4th Gen Fingerprint Press Scanner Replacement: step 4, image 2 of 2
    • Remove the two 5 mm screws on each speaker with a Phillips #1 screwdriver.

  5. Lenovo Thinkpad X1 Carbon 4th Gen Fingerprint Press Scanner Replacement: step 5, image 1 of 2 Lenovo Thinkpad X1 Carbon 4th Gen Fingerprint Press Scanner Replacement: step 5, image 2 of 2
    • Unweave the blue and white wires from underneath the plastic tabs connected to the battery.

  6. Lenovo Thinkpad X1 Carbon 4th Gen Fingerprint Press Scanner Replacement: step 6, image 1 of 1
    • Lift each speaker up and out from the computer.

  7. Lenovo Thinkpad X1 Carbon 4th Gen Fingerprint Press Scanner Replacement, Lithium Battery: step 7, image 1 of 3 Lenovo Thinkpad X1 Carbon 4th Gen Fingerprint Press Scanner Replacement, Lithium Battery: step 7, image 2 of 3 Lenovo Thinkpad X1 Carbon 4th Gen Fingerprint Press Scanner Replacement, Lithium Battery: step 7, image 3 of 3
    • Carefully lift the far end of the battery connector with an opening tool facing towards you.

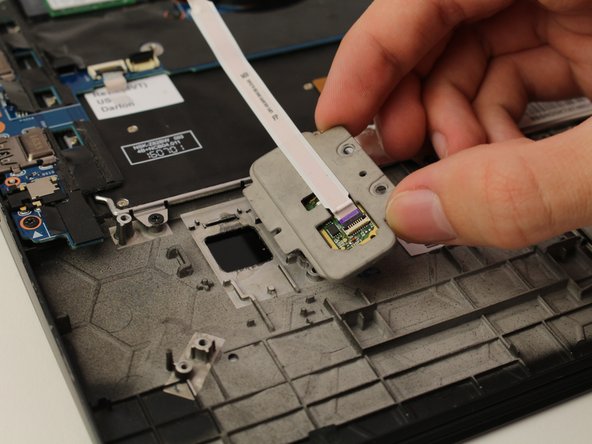
    • Remove the connector by pushing it forward and lifting.

  8. Lenovo Thinkpad X1 Carbon 4th Gen Fingerprint Press Scanner Replacement: step 8, image 1 of 2 Lenovo Thinkpad X1 Carbon 4th Gen Fingerprint Press Scanner Replacement: step 8, image 2 of 2
    • Remove the central 5 mm screw with a Phillips #1 screwdriver.

  9. Lenovo Thinkpad X1 Carbon 4th Gen Fingerprint Press Scanner Replacement: step 9, image 1 of 1
    • Lift the battery up and out of the computer.

  10. Lenovo Thinkpad X1 Carbon 4th Gen Fingerprint Press Scanner Replacement, Fingerprint Press Scanner: step 10, image 1 of 2 Lenovo Thinkpad X1 Carbon 4th Gen Fingerprint Press Scanner Replacement, Fingerprint Press Scanner: step 10, image 2 of 2
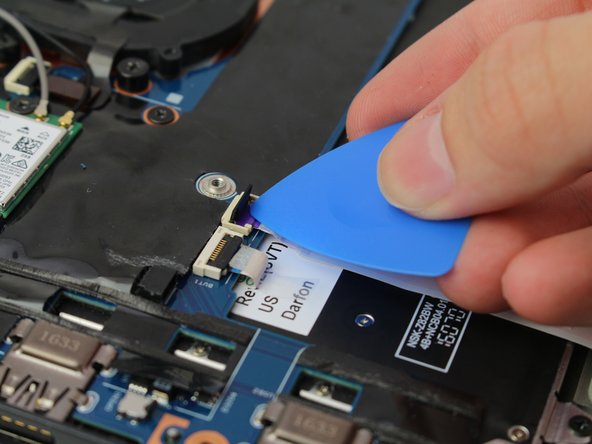
    • Lift the black hinge that is on top of the ribbon connector using the iFixit pick.

  11. Lenovo Thinkpad X1 Carbon 4th Gen Fingerprint Press Scanner Replacement: step 11, image 1 of 2 Lenovo Thinkpad X1 Carbon 4th Gen Fingerprint Press Scanner Replacement: step 11, image 2 of 2
    • Lift the purple ribbon connector up and out.

    • There are small plastic tabs that prevent the ribbon connector from being pulled horizontally out.

  12. Lenovo Thinkpad X1 Carbon 4th Gen Fingerprint Press Scanner Replacement: step 12, image 1 of 1
    • Remove the two 2.5 mm black screws on the fingerprint scanner with a Phillips #1 screwdriver.

  13. Lenovo Thinkpad X1 Carbon 4th Gen Fingerprint Press Scanner Replacement: step 13, image 1 of 3 Lenovo Thinkpad X1 Carbon 4th Gen Fingerprint Press Scanner Replacement: step 13, image 2 of 3 Lenovo Thinkpad X1 Carbon 4th Gen Fingerprint Press Scanner Replacement: step 13, image 3 of 3
    • Gently lift the right edge up of the fingerprint scanner up and slide the scanner to the right before lifting.

Conclusion

To reassemble your device, follow these instructions in reverse order.

Alexander Davis

Member since: 01/23/20

1,093 Reputation

7 Guides authored

Team

Cal Poly, Team S1-G4, White Winter 2020 Member of Cal Poly, Team S1-G4, White Winter 2020

CPSU-WHITE-W20S1G4

3 Members

19 Guides authored

0 Comments

Add Comment

View Statistics:

Past 24 Hours: 0

Past 7 Days: 2

Past 30 Days: 11

All Time: 1,789