
Lenovo Thinkpad T450 Speakers Replacement

What you need

  1. Lenovo Thinkpad T450 Speakers Replacement, External Battery: step 1, image 1 of 3 Lenovo Thinkpad T450 Speakers Replacement, External Battery: step 1, image 2 of 3 Lenovo Thinkpad T450 Speakers Replacement, External Battery: step 1, image 3 of 3
    • Using your hands, slide the two locking tabs away from each other to release the battery.

    • Slide the battery up and out of the device.

  2. Lenovo Thinkpad T450 Speakers Replacement, Back Cover: step 2, image 1 of 1
    • Using the JIS #00 screwdriver, unscrew seven screws from the back cover.

    • These screws are not removable and will remain in the back cover.

    • Use the JIS #00 screwdriver to remove the single 2.8 mm screw from the back cover.

  3. Lenovo Thinkpad T450 Speakers Replacement: step 3, image 1 of 3 Lenovo Thinkpad T450 Speakers Replacement: step 3, image 2 of 3 Lenovo Thinkpad T450 Speakers Replacement: step 3, image 3 of 3
    • Insert a plastic opening tool into the edges of the laptop and work your way around the edges to pry off the back cover from the device.

    • Remove the back cover from the device.

  4. Lenovo Thinkpad T450 Speakers Replacement, SSD: step 4, image 1 of 1
    • Using the JIS #00 screwdriver, remove the single 2.8 mm screw securing the SSD to the device.

  5. Lenovo Thinkpad T450 Speakers Replacement: step 5, image 1 of 2 Lenovo Thinkpad T450 Speakers Replacement: step 5, image 2 of 2
    • Lift the SSD up and to the left and remove it from the device.

  6. Lenovo Thinkpad T450 Speakers Replacement, RAM: step 6, image 1 of 2 Lenovo Thinkpad T450 Speakers Replacement, RAM: step 6, image 2 of 2
    • Lift up the black piece of tape and remove it to uncover the RAM sticks underneath.

  7. Lenovo Thinkpad T450 Speakers Replacement: step 7, image 1 of 2 Lenovo Thinkpad T450 Speakers Replacement: step 7, image 2 of 2
    • Using your fingers, push the two clips securing the RAM away from each other to release the RAM.

    • The RAM stick should pop up at a 30 degree angle.

    • Remove the RAM stick from the device.

    • Repeat this step for any additional RAM sticks.

  8. Lenovo Thinkpad T450 Speakers Replacement, Fan and Heatsink Assembly: step 8, image 1 of 1
    • Using the JIS #00 screwdriver, unscrew the four screws securing the fan and heatsink assembly to the motherboard.

    • These screws are not removable and will stay on the fan and heatsink assembly.

  9. Lenovo Thinkpad T450 Speakers Replacement: step 9, image 1 of 1
    • Disconnect the fan and heatsink assembly from the motherboard using the plastic opening tool.

  10. Lenovo Thinkpad T450 Speakers Replacement: step 10, image 1 of 2 Lenovo Thinkpad T450 Speakers Replacement: step 10, image 2 of 2
    • Lift up the fan and heatsink assembly and remove it from the device.

    • When you reassemble your device, don't forget to reapply thermal paste to the back of the heatsink and fan assembly. For proper technique and thermal paste application, please visit the How to Apply Thermal Paste guide.

  11. Lenovo Thinkpad T450 Speakers Replacement, Wi-Fi Card (WLAN): step 11, image 1 of 1
    • Lift and remove the black piece of plastic to expose the Wi-Fi card.

  12. Lenovo Thinkpad T450 Speakers Replacement: step 12, image 1 of 1
    • Using the plastic opening tool, disconnect the two cables from the Wi-Fi card.

  13. Lenovo Thinkpad T450 Speakers Replacement: step 13, image 1 of 1
    • Using the JIS #00 screwdriver, remove the single 2.8 mm screw.

    • After removing the screw, the Wi-Fi card should pop up on its own.

  14. Lenovo Thinkpad T450 Speakers Replacement: step 14, image 1 of 2 Lenovo Thinkpad T450 Speakers Replacement: step 14, image 2 of 2
    • Lift the Wi-Fi card out of the slot and remove it from the device.

  15. Lenovo Thinkpad T450 Speakers Replacement, Cables and Plastic: step 15, image 1 of 1
    • Use the plastic opening tool to remove the black piece of tape holding the cables together.

  16. Lenovo Thinkpad T450 Speakers Replacement: step 16, image 1 of 2 Lenovo Thinkpad T450 Speakers Replacement: step 16, image 2 of 2
    • Use the JIS #00 screwdriver to remove the single 2.8 mm screw from the motherboard.

    • Remove the black plastic covering the motherboard.

  17. Lenovo Thinkpad T450 Speakers Replacement, CMOS Battery: step 17, image 1 of 3 Lenovo Thinkpad T450 Speakers Replacement, CMOS Battery: step 17, image 2 of 3 Lenovo Thinkpad T450 Speakers Replacement, CMOS Battery: step 17, image 3 of 3
    • Using the plastic opening tool, disconnect the CMOS battery from the motherboard.

  18. Lenovo Thinkpad T450 Speakers Replacement: step 18, image 1 of 2 Lenovo Thinkpad T450 Speakers Replacement: step 18, image 2 of 2
    • Insert the plastic opening tool underneath the CMOS battery and pry it up and away from the motherboard.

    • When you reassemble your device, you may need to reapply adhesive to the back of the CMOS battery.

  19. Lenovo Thinkpad T450 Speakers Replacement, Motherboard: step 19, image 1 of 2 Lenovo Thinkpad T450 Speakers Replacement, Motherboard: step 19, image 2 of 2
    • Use the JIS #00 screwdriver to remove two 2.8 mm screws securing the display cable bracket to the motherboard.

    • Remove the display cable bracket from the device.

  20. Lenovo Thinkpad T450 Speakers Replacement: step 20, image 1 of 2 Lenovo Thinkpad T450 Speakers Replacement: step 20, image 2 of 2
    • Disconnect the daughterboard cable and the display cable using the plastic opening tool.

  21. Lenovo Thinkpad T450 Speakers Replacement: step 21, image 1 of 2 Lenovo Thinkpad T450 Speakers Replacement: step 21, image 2 of 2
    • Using the JIS #00 screwdriver, remove the single 5 mm screw securing the bracket to the motherboard.

    • Remove the metal bracket from the device.

  22. Lenovo Thinkpad T450 Speakers Replacement: step 22, image 1 of 2 Lenovo Thinkpad T450 Speakers Replacement: step 22, image 2 of 2
    • Disconnect the speaker cable from the motherboard using the plastic opening tool.

  23. Lenovo Thinkpad T450 Speakers Replacement: step 23, image 1 of 2 Lenovo Thinkpad T450 Speakers Replacement: step 23, image 2 of 2
    • Using the plastic opening tool, flip up the locking tab on the zero insertion force (ZIF) connector and disconnect the cable from the motherboard.

    • For more information on different types of cables and connectors, please visit the Recognizing & Disconnect Cable Connectors guide.

  24. Lenovo Thinkpad T450 Speakers Replacement: step 24, image 1 of 3 Lenovo Thinkpad T450 Speakers Replacement: step 24, image 2 of 3 Lenovo Thinkpad T450 Speakers Replacement: step 24, image 3 of 3
    • Using the plastic opening tool, disconnect the CMOS and power cables.

    • The power cable is a zero insertion force (ZIF) connector. For more information on disconnecting ZIF connectors, please visit the Recognizing & Disconnecting Cable Connectors guide.

  25. Lenovo Thinkpad T450 Speakers Replacement: step 25, image 1 of 3 Lenovo Thinkpad T450 Speakers Replacement: step 25, image 2 of 3 Lenovo Thinkpad T450 Speakers Replacement: step 25, image 3 of 3
    • Using a plastic opening tool, disconnect the smartcard reader cable from the motherboard.

    • Using the same plastic opening tool, flip up the locking tab and disconnect the trackpad cable from the motherboard.

  26. Lenovo Thinkpad T450 Speakers Replacement: step 26, image 1 of 2 Lenovo Thinkpad T450 Speakers Replacement: step 26, image 2 of 2
    • Using the JIS #00 screwdriver, remove six 2.8 mm screws securing the motherboard to the device.

  27. Lenovo Thinkpad T450 Speakers Replacement: step 27, image 1 of 3 Lenovo Thinkpad T450 Speakers Replacement: step 27, image 2 of 3 Lenovo Thinkpad T450 Speakers Replacement: step 27, image 3 of 3
    • Carefully grab the motherboard and lift it up slightly off of the device.

    • Do not completely remove the motherboard from the device. There is a zero insertion force (ZIF) connector underneath the motherboard.

    • Disconnect the ZIF connector and remove the motherboard from the device.

    • For more information on zero insertion force (ZIF) connectors, please visit the Recognizing and Disconnecting Cable Connectors guide.

  28. Lenovo Thinkpad T450 Speakers Replacement, Speakers: step 28, image 1 of 2 Lenovo Thinkpad T450 Speakers Replacement, Speakers: step 28, image 2 of 2
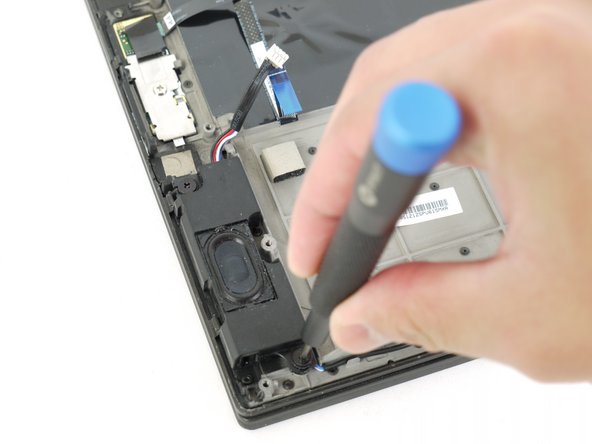
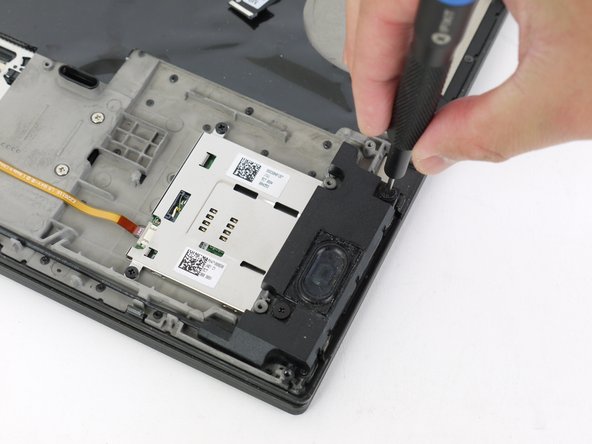
    • Using the JIS #00 screwdriver, remove the two 4.2 mm screws securing the left-side speaker to the device.

  29. Lenovo Thinkpad T450 Speakers Replacement: step 29, image 1 of 2 Lenovo Thinkpad T450 Speakers Replacement: step 29, image 2 of 2
    • Use the same JIS #00 screwdriver to remove two 4.2 mm screws from the right-side speaker.

  30. Lenovo Thinkpad T450 Speakers Replacement: step 30, image 1 of 3 Lenovo Thinkpad T450 Speakers Replacement: step 30, image 2 of 3 Lenovo Thinkpad T450 Speakers Replacement: step 30, image 3 of 3
    • Grab the speakers and unravel the cables to remove it from the device.

Conclusion

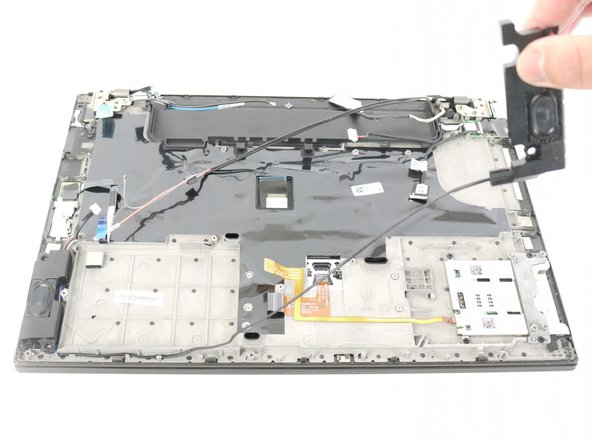
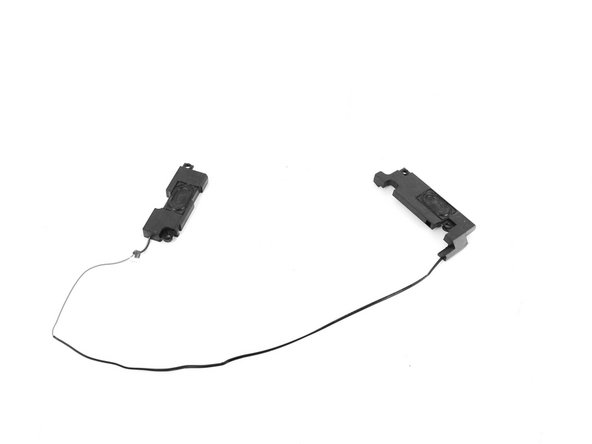
To reassemble your device, follow these instructions in reverse order.

Take your e-waste to an R2 or e-Stewards certified recycler.

One other person completed this guide.

Justin Ogihara

Member since: 09/18/17

27,142 Reputation

52 Guides authored

Team

EDU Team Member of EDU Team

Staff

7 Members

637 Guides authored

0 Comments

Add Comment

View Statistics:

Past 24 Hours: 1

Past 7 Days: 3

Past 30 Days: 26

All Time: 829