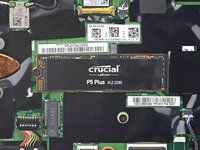
Lenovo ThinkPad X1 Carbon 7th Gen SSD Replacement

What you need

  1. Lenovo ThinkPad X1 Carbon 7th Gen SSD Replacement, Back cover removal: step 1, image 1 of 2 Lenovo ThinkPad X1 Carbon 7th Gen SSD Replacement, Back cover removal: step 1, image 2 of 2
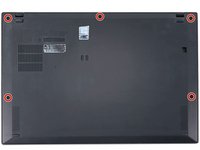
    • Use a Phillips #1 screwdriver to loosen the five captive screws securing the back cover.

  2. Lenovo ThinkPad X1 Carbon 7th Gen SSD Replacement, Insert an opening pick: step 2, image 1 of 3 Lenovo ThinkPad X1 Carbon 7th Gen SSD Replacement, Insert an opening pick: step 2, image 2 of 3 Lenovo ThinkPad X1 Carbon 7th Gen SSD Replacement, Insert an opening pick: step 2, image 3 of 3
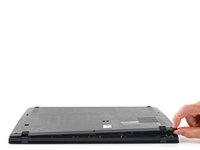
    • Insert an opening pick at a 45˚ angle between the back cover and frame near the rear middle screw.

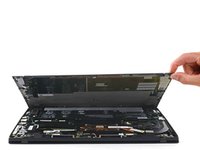
    • Pry up on the pick to release the clips securing the back cover to the frame.

    • You will hear several clicks while prying up.

  3. Lenovo ThinkPad X1 Carbon 7th Gen SSD Replacement, Remove the back cover: step 3, image 1 of 3 Lenovo ThinkPad X1 Carbon 7th Gen SSD Replacement, Remove the back cover: step 3, image 2 of 3 Lenovo ThinkPad X1 Carbon 7th Gen SSD Replacement, Remove the back cover: step 3, image 3 of 3
    • Lift the back cover up and remove it from the chassis.

    • You will hear several clicks while lifting up.

    • During reassembly, this is a good point to power on your laptop and test all functions before sealing it up. Be sure to power your laptop back down before you continue working.

  4. Lenovo ThinkPad X1 Carbon 7th Gen SSD Replacement, Battery disconnect: step 4, image 1 of 3 Lenovo ThinkPad X1 Carbon 7th Gen SSD Replacement, Battery disconnect: step 4, image 2 of 3 Lenovo ThinkPad X1 Carbon 7th Gen SSD Replacement, Battery disconnect: step 4, image 3 of 3
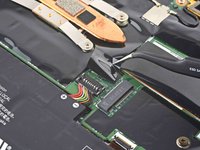
    • Use tweezers or your fingers to peel back the plastic shield covering the battery connector.

  5. Lenovo ThinkPad X1 Carbon 7th Gen SSD Replacement, Disconnect the battery: step 5, image 1 of 3 Lenovo ThinkPad X1 Carbon 7th Gen SSD Replacement, Disconnect the battery: step 5, image 2 of 3 Lenovo ThinkPad X1 Carbon 7th Gen SSD Replacement, Disconnect the battery: step 5, image 3 of 3
    • Use the flat end of a spudger to pry up on and disconnect the battery cable.

  6. Lenovo ThinkPad X1 Carbon 7th Gen SSD Replacement, SSD removal: step 6, image 1 of 3 Lenovo ThinkPad X1 Carbon 7th Gen SSD Replacement, SSD removal: step 6, image 2 of 3 Lenovo ThinkPad X1 Carbon 7th Gen SSD Replacement, SSD removal: step 6, image 3 of 3
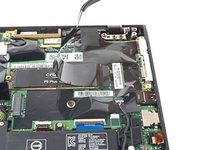
    • Use tweezers or your fingers to peel back the plastic shield covering the SSD.

  7. Lenovo ThinkPad X1 Carbon 7th Gen SSD Replacement: step 7, image 1 of 2 Lenovo ThinkPad X1 Carbon 7th Gen SSD Replacement: step 7, image 2 of 2
    • Use a Phillips screwdriver to remove the 2.9 mm screw securing the SSD to the motherboard.

  8. Lenovo ThinkPad X1 Carbon 7th Gen SSD Replacement, Remove the SSD: step 8, image 1 of 3 Lenovo ThinkPad X1 Carbon 7th Gen SSD Replacement, Remove the SSD: step 8, image 2 of 3 Lenovo ThinkPad X1 Carbon 7th Gen SSD Replacement, Remove the SSD: step 8, image 3 of 3
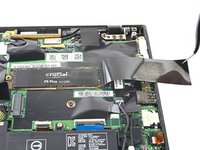
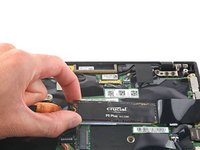
    • Grip the edges of the SSD near the screw indent.

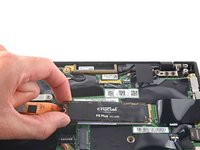
    • Lift the SSD up to separate it from the thermal pad.

    • Do not lift more than 5 mm or the SSD and socket may be damaged.

    • If the thermal pad is clean and intact, carefully peel it off and transfer it to the replacement SSD.

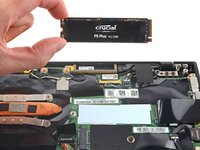
    • Gently pull to remove the SSD.

Conclusion

To reassemble your device, follow these instructions in reverse order.

Take your e-waste to an R2 or e-Stewards certified recycler.

Repair didn’t go as planned? Try some basic troubleshooting, or ask our Lenovo ThinkPad X1 Carbon Answers community for help.

4 other people completed this guide.

Chayton Ritter

Member since: 08/21/20

17,974 Reputation

99 Guides authored

Team

Guide Team Member of Guide Team

Staff

6 Members

7,250 Guides authored

0 Comments

Add Comment

View Statistics:

Past 24 Hours: 13

Past 7 Days: 66

Past 30 Days: 323

All Time: 11,943