Introduction
If your Lenovo ThinkPad T495 is experiencing slow computer speeds, then your solid state drive may be the issue. This step-by-step guide will show you how to replace the solid state drive in your laptop. Before using this guide, first try clearing as much space in your laptop as possible. This can be done by uninstalling apps. First click on the "Start," click on "Settings," and then click on "Apps." Wait 5 seconds. This will display the complete list of apps that are downloaded and installed on your computer. Use the search-bar at the top of the page to search for apps, or scroll down to find the app/apps you want to uninstall. Left click on the application you don't want on your laptop and click on "Uninstall." Follow the prompts to uninstall the app/apps you no longer want on your laptop.
What you need
-
-
Tool used on this step:Tweezers$4.99
-
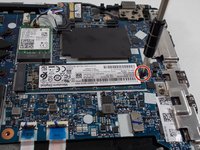
Use a Phillips #00 screwdriver to remove the 6 mm screw.
-
Use tweezers or an iFixit opening tool to lift the SSD up and away from the thermal pad it rests on.
-
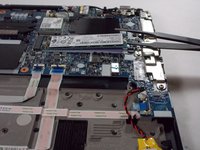
Grip the SSD between your fingers and pull it horizontally to the right at a slight angle until it releases from the port.
-


To reassemble your device, follow these instructions in reverse order.
Cancel: I did not complete this guide.
3 other people completed this guide.

Team

UMass Dartmouth, Team 1-6, Petersen Spring 2022 Member of UMass Dartmouth, Team 1-6, Petersen Spring 2022
UMASSD-PETERSEN-S22S1G6
3 Members
8 Guides authored