
Lenovo N22 Chromebook Motherboard Replacement

What you need

  1. Lenovo N22 Chromebook Motherboard Replacement, Keyboard: step 1, image 1 of 3 Lenovo N22 Chromebook Motherboard Replacement, Keyboard: step 1, image 2 of 3 Lenovo N22 Chromebook Motherboard Replacement, Keyboard: step 1, image 3 of 3
    • Power down the Chromebook before starting the repair.

    • Opening the Chromebook voids the manufacturer warranty.

    • Flip the Chromebook so that the bottom is facing up.

    • Use a Phillips #1 screwdriver to remove the six 6.6 mm screws on the bottom.

    • Use a spudger to remove each of the 4 rubber feet.

    • Use a Phillips #1 screwdriver to remove the four additional screws under the rubber feet.

  2. Lenovo N22 Chromebook Motherboard Replacement: step 2, image 1 of 3 Lenovo N22 Chromebook Motherboard Replacement: step 2, image 2 of 3 Lenovo N22 Chromebook Motherboard Replacement: step 2, image 3 of 3
    • Flip the Chromebook back over and open the screen.

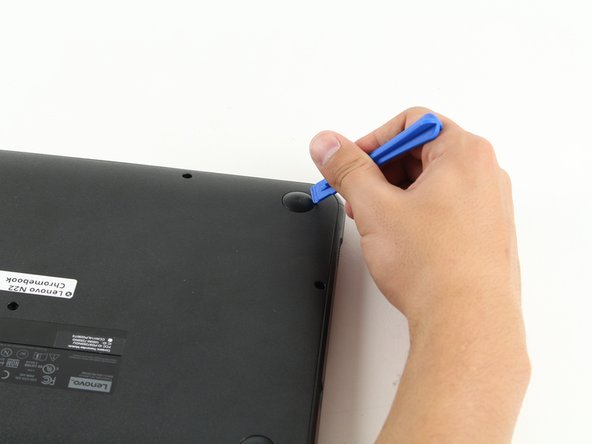
    • Wedge the plastic opening tool between the keyboard and the bottom of the Chromebook.

    • Run the plastic opening tool along the seam between the keyboard and the bottom of the Chromebook until the keyboard moves freely. Several tabs will pop out.

    • It is normal for the tabs to make a loud click when released. The corner tabs will be harder to release than the others and will make a louder click.

  3. Lenovo N22 Chromebook Motherboard Replacement: step 3, image 1 of 2 Lenovo N22 Chromebook Motherboard Replacement: step 3, image 2 of 2
    • Once the keyboard is released, grab the two top corners closest to the screen and slowly lift the keyboard up.

    • Do not lift the keyboard quickly or you might break the two cables that connect the keyboard to the motherboard.

    • Disconnect the cables by lifting up the retaining flaps on the black ZIF connectors.

    • Slowly pull the cables up and out of the connectors.

  4. Lenovo N22 Chromebook Motherboard Replacement: step 4, image 1 of 1
    • Lift the keyboard up and off the back panel, exposing the motherboard and battery.

  5. Lenovo N22 Chromebook Motherboard Replacement, Motherboard: step 5, image 1 of 3 Lenovo N22 Chromebook Motherboard Replacement, Motherboard: step 5, image 2 of 3 Lenovo N22 Chromebook Motherboard Replacement, Motherboard: step 5, image 3 of 3
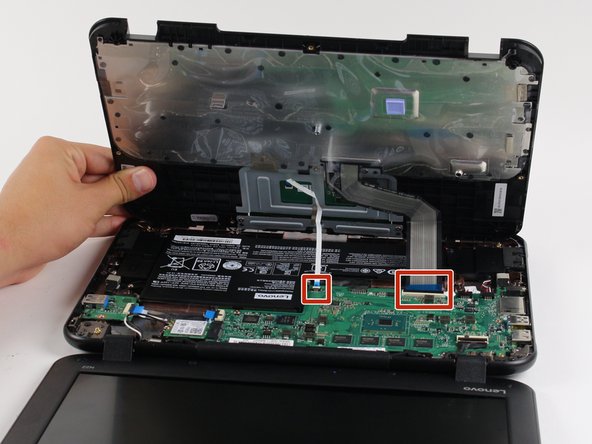
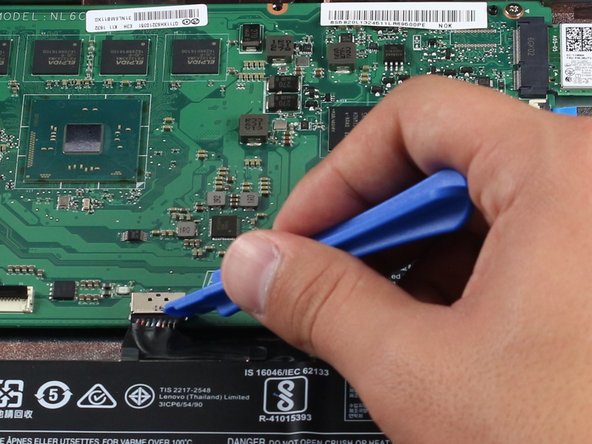
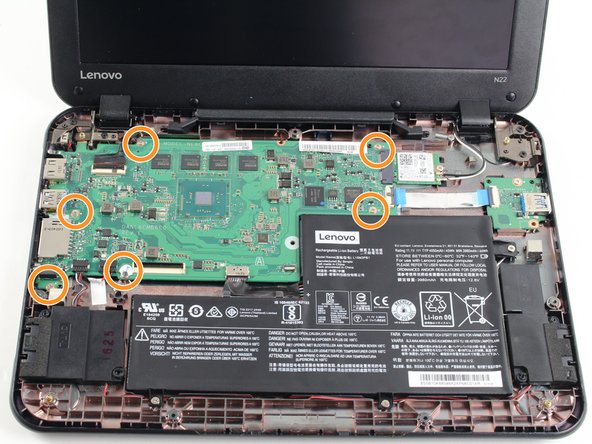
    • Disconnect the speaker and battery cables from their sockets on the motherboard by using the edge of the plastic opening tool to separate the cable connectors from the sockets.

    • Pull the cables towards you and away from the sockets.

  6. Lenovo N22 Chromebook Motherboard Replacement: step 6, image 1 of 3 Lenovo N22 Chromebook Motherboard Replacement: step 6, image 2 of 3 Lenovo N22 Chromebook Motherboard Replacement: step 6, image 3 of 3
    • Use a Phillips #1 screwdriver to remove the 3.6 mm screw in the wireless card.

    • Gently slide the wireless card to the right to remove it from the standard socket on the motherboard.

  7. Lenovo N22 Chromebook Motherboard Replacement: step 7, image 1 of 2 Lenovo N22 Chromebook Motherboard Replacement: step 7, image 2 of 2
    • Disconnect the display cable from the motherboard by lifting up the black ZIF connector retaining flap.

    • Gently pull the cable up towards the screen.

  8. Lenovo N22 Chromebook Motherboard Replacement: step 8, image 1 of 1
    • Disconnect the USB circuit from the motherboard by lifting the black ZIF retaining flap up.

    • Gently pull the blue tab to the right to remove the cable.

  9. Lenovo N22 Chromebook Motherboard Replacement: step 9, image 1 of 2 Lenovo N22 Chromebook Motherboard Replacement: step 9, image 2 of 2
    • Wedge the plastic opening tool between the rubber foot and the bottom of the chromebook. Lift up the plastic opening tool to remove the foot. This exposes the back end of a screw holding down the motherboard.

  10. Lenovo N22 Chromebook Motherboard Replacement: step 10, image 1 of 2 Lenovo N22 Chromebook Motherboard Replacement: step 10, image 2 of 2
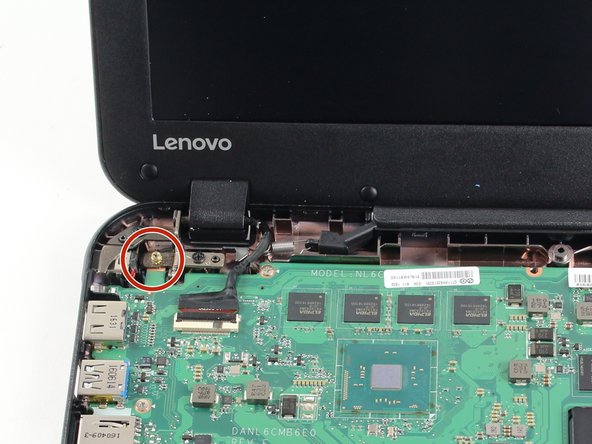
    • Flip the laptop on its top so that the screen is facing up and the back panel is bent at a 90 degree angle. This will allow you to see both the gold nut and the screw.

    • Hold the gold nut steady with a pair of needle nose pliers.

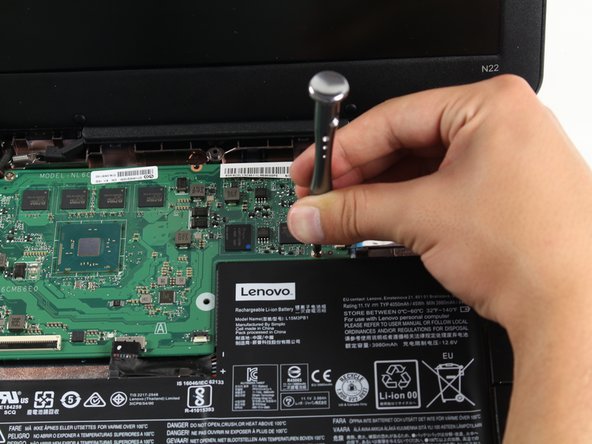
    • While holding onto the gold nut on the motherboard, remove the 6.5 mm screw on the bottom of the chromebook by rotating the Phillips #1 screwdriver to the left.

    • You may need an extra pair of hands for this step.

  11. Lenovo N22 Chromebook Motherboard Replacement: step 11, image 1 of 3 Lenovo N22 Chromebook Motherboard Replacement: step 11, image 2 of 3 Lenovo N22 Chromebook Motherboard Replacement: step 11, image 3 of 3
    • Remove the Lenovo sticker on top of the screw.

    • Use a Phillips #1 screwdriver to remove the six 3.6 mm screws from the motherboard.

  12. Lenovo N22 Chromebook Motherboard Replacement: step 12, image 1 of 1
    • Carefully lift the motherboard up and out of the back panel to remove it.

    • When reinstalling the motherboard make sure to line up the left corner of the motherboard with the silver slit on the back panel.

Conclusion

To reassemble your device, follow these instructions in reverse order.

One other person completed this guide.

Jackson Tucker

Member since: 04/26/17

869 Reputation

3 Guides authored

Team

Cal Poly, Team S21-G1, Livingston Spring 2017 Member of Cal Poly, Team S21-G1, Livingston Spring 2017

CPSU-LIVINGSTON-S17S21G1

4 Members

14 Guides authored

4 Comments

The gold “nuts” as you describe them should not remain inside the machine. Those are the keyboard mounts and should have be removed when the keyboard was removed. They should have remained inside the keyboard itself.

Nate Thompson - Reply

Where is the ram stick???

flip - Reply

The motherboards arrive with only Shopfloor diags on them. The SHIM build instructions don’t seem to work. Finding the process to complete the new installation after the hardware component seems to be impossible.

s.watts - Reply

i love it it is working very good

Gabriel Knapp - Reply

Add Comment

View Statistics:

Past 24 Hours: 1

Past 7 Days: 3

Past 30 Days: 23

All Time: 4,229