Free Shipping on Domestic Orders $75+

Lenovo Ideapad 320-15ABR Hard Drive Replacement

What you need

    1. Lenovo Ideapad 320-15ABR Hard Drive Replacement, Back Panel: step 1, image 1 of 1
      • Before you proceed, make sure your computer is turned off and is not connected to any power source.

      • Remove the single 7 mm Phillips #1 screw securing the optical drive.

      • Be sure to store the screws carefully as they are easy to lose. A magnetic project mat is recommended

      Ask FixBot

      Add Comment

    2. Lenovo Ideapad 320-15ABR Hard Drive Replacement: step 2, image 1 of 3 Lenovo Ideapad 320-15ABR Hard Drive Replacement: step 2, image 2 of 3 Lenovo Ideapad 320-15ABR Hard Drive Replacement: step 2, image 3 of 3
      • Carefully remove the optical drive bracket by pulling the bezel away from the laptop.

      Ask FixBot

      Add Comment

    3. Lenovo Ideapad 320-15ABR Hard Drive Replacement: step 3, image 1 of 2 Lenovo Ideapad 320-15ABR Hard Drive Replacement: step 3, image 2 of 2
      • Using the Phillips #1 screwdriver, remove the twelve screws around the back panel from the laptop.

      Ask FixBot

      Add Comment

    4. Lenovo Ideapad 320-15ABR Hard Drive Replacement: step 4, image 1 of 3 Lenovo Ideapad 320-15ABR Hard Drive Replacement: step 4, image 2 of 3 Lenovo Ideapad 320-15ABR Hard Drive Replacement: step 4, image 3 of 3
      • Use an opening tool to pry out the back cover.

      Ask FixBot

      Add Comment

    5. Lenovo Ideapad 320-15ABR Hard Drive Replacement: step 5, image 1 of 3 Lenovo Ideapad 320-15ABR Hard Drive Replacement: step 5, image 2 of 3 Lenovo Ideapad 320-15ABR Hard Drive Replacement: step 5, image 3 of 3
      • Remove the back panel by pulling it up and away from the laptop.

      Ask FixBot

      Add Comment

    1. Lenovo Ideapad 320-15ABR Hard Drive Replacement, Hard Drive: step 6, image 1 of 2 Lenovo Ideapad 320-15ABR Hard Drive Replacement, Hard Drive: step 6, image 2 of 2
      • Before removing the drive, make a backup copy of all the information on it if possible. Never remove the drive while the system is operating or in suspend mode.

      • Gently lift up the hard disk from the left.

      Ask FixBot

      Add Comment

    2. Lenovo Ideapad 320-15ABR Hard Drive Replacement: step 7, image 1 of 3 Lenovo Ideapad 320-15ABR Hard Drive Replacement: step 7, image 2 of 3 Lenovo Ideapad 320-15ABR Hard Drive Replacement: step 7, image 3 of 3
      • Do not lift hard drive straight up as it risks breaking the connection port.

      • Carefully pull the hard drive away and out of the connection port.

      Ask FixBot

      Add Comment

    3. Lenovo Ideapad 320-15ABR Hard Drive Replacement: step 8, image 1 of 3 Lenovo Ideapad 320-15ABR Hard Drive Replacement: step 8, image 2 of 3 Lenovo Ideapad 320-15ABR Hard Drive Replacement: step 8, image 3 of 3
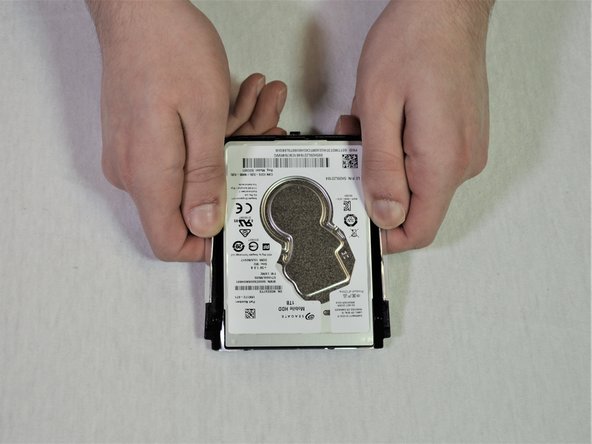
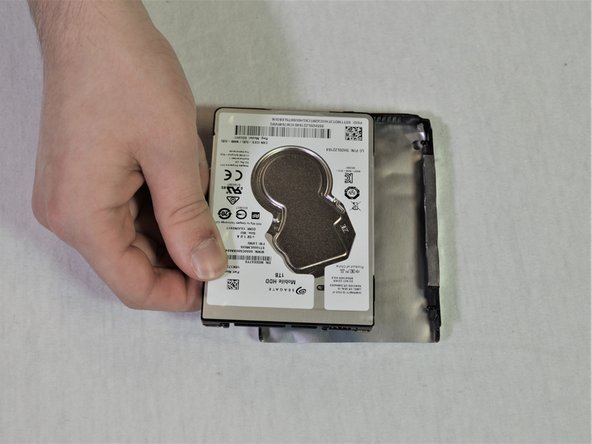
      • Detach the bracket from the hard drive by pulling the bracket edges apart.

      Ask FixBot

      Add Comment

Conclusion

To reassemble your device, follow these instructions in reverse order.

Cancel: I did not complete this guide.

27 other people completed this guide.

4 Guide Comments

What is the maximum thickness of the replacement Hard Drive/SSD.

Drew Howden - Reply Share

It takes a standard 2.5” laptop HDD/SSD. They do not vary in thickness.

TheSolderSnake - Reply Share

@TheSolderSnake You might want to use google to see the variation in 2.5” laptop drive thickness before making such a confident statement. ;)

Ben - Reply Share

This is gonna be fun! lol. I’ll be doing this in 5-15 minutes. Wish me luck!!!

Paul Hucik Jr - Reply Share

Add Comment

View Statistics:

Past 24 Hours: 1

Past 7 Days: 17

Past 30 Days: 115

All Time: 28,005