
LG G3 Screen Assembly

What you need

  1. LG G3 Screen Assembly, Back Cover: step 1, image 1 of 2 LG G3 Screen Assembly, Back Cover: step 1, image 2 of 2
    • Power off your phone before beginning disassembly.

    • Insert a thumbnail, or a prying tool like a spudger, into the notch at the bottom left of the back cover.

    • Pry the back cover up to separate its plastic clips.

  2. LG G3 Screen Assembly: step 2, image 1 of 2 LG G3 Screen Assembly: step 2, image 2 of 2
    • Lift the back cover to release the rest of the plastic clips and remove it.

    • In case you can't lift the back cover completely, slide your fingernail or your prying tool around the midframe to release the remaining clips.

    • To reinstall the back cover, press it firmly into place until you hear a snap from the plastic clips to form a seamless connection with the rear side of the phone.

  3. LG G3 Screen Assembly, Battery: step 3, image 1 of 2 LG G3 Screen Assembly, Battery: step 3, image 2 of 2
    • Use a fingernail or a prying tool at the marked notch to lever the battery out of its recess.

  4. LG G3 Screen Assembly: step 4, image 1 of 2 LG G3 Screen Assembly: step 4, image 2 of 2
    • Lift the battery out of its recess and remove it.

  5. LG G3 Screen Assembly, Loudspeaker: step 5, image 1 of 1
    • Remove the four Phillips #00 screws (4 mm length).

  6. LG G3 Screen Assembly: step 6, image 1 of 2 LG G3 Screen Assembly: step 6, image 2 of 2
    • Insert a thumbnail, or a prying tool like a spudger, into the notch at the bottom left of the back cover you used earlier to remove the back cover.

    • Pry up the plastic panel, including the loudspeaker, until you can get a good grip.

  7. LG G3 Screen Assembly: step 7, image 1 of 3 LG G3 Screen Assembly: step 7, image 2 of 3 LG G3 Screen Assembly: step 7, image 3 of 3
    • Carefully remove the plastic panel including the loudspeaker by gently pulling it away from the phone assembly.

  8. LG G3 Screen Assembly, Motherboard Cover Assembly: step 8, image 1 of 1
    • Remove the eight Phillips #00 screws (4 mm length).

  9. LG G3 Screen Assembly: step 9, image 1 of 3 LG G3 Screen Assembly: step 9, image 2 of 3 LG G3 Screen Assembly: step 9, image 3 of 3
    • Insert an opening pick between the bottom right corner of the motherboard cover and the motherboard.

    • Pry up the motherboard cover to open the plastic clips which hold the cover in its place.

    • The clips can be a bit resistive. If you're having trouble prying up the motherboard cover, slightly rotate the opening pick sideways to make the process easier.

    • Work your way along the right edge.

  10. LG G3 Screen Assembly: step 10, image 1 of 3 LG G3 Screen Assembly: step 10, image 2 of 3 LG G3 Screen Assembly: step 10, image 3 of 3
    • Carefully lift the right edge of the motherboard cover.

    • The remaining plastic clips should open during this process or can be unhinged easily by hand.

    • Remove the motherboard assembly.

  11. LG G3 Screen Assembly, Motherboard: step 11, image 1 of 2 LG G3 Screen Assembly, Motherboard: step 11, image 2 of 2
    • Use a spudger to pry up and disconnect the display flex cable.

  12. LG G3 Screen Assembly: step 12, image 1 of 2 LG G3 Screen Assembly: step 12, image 2 of 2
    • Use a spudger to pry up and disconnect the digitizer flex cable.

  13. LG G3 Screen Assembly: step 13, image 1 of 2 LG G3 Screen Assembly: step 13, image 2 of 2
    • Use a spudger to pry up and disconnect the rear camera flex cable.

  14. LG G3 Screen Assembly: step 14, image 1 of 2 LG G3 Screen Assembly: step 14, image 2 of 2
    • Use a spudger to pry up and disconnect the front camera flex cable.

  15. LG G3 Screen Assembly: step 15, image 1 of 2 LG G3 Screen Assembly: step 15, image 2 of 2
    • During these next few steps, make sure to avoid damaging the flex cables you disconnected.

    • Slide an opening pick under the bottom right corner of the motherboard and slowly pry it out of its recess by rotating the opening pick sideways.

  16. LG G3 Screen Assembly: step 16, image 1 of 2 LG G3 Screen Assembly: step 16, image 2 of 2
    • Slide the opening pick under the right edge of the motherboard where the SIM card slot is located and pry it up by rotating the opening pick sideways.

  17. LG G3 Screen Assembly: step 17, image 1 of 2 LG G3 Screen Assembly: step 17, image 2 of 2
    • Grab the top section of the motherboard and carefully lift it out of the phone.

  18. LG G3 Screen Assembly, Screen Assembly: step 18, image 1 of 1
  19. LG G3 Screen Assembly: step 19, image 1 of 2 LG G3 Screen Assembly: step 19, image 2 of 2
    • During the removal of the earpiece speaker, remove it together with the foam gasket underneath.

    • Use a pair of tweezers to remove the earpiece speaker.

  20. LG G3 Screen Assembly: step 20, image 1 of 2 LG G3 Screen Assembly: step 20, image 2 of 2
    • Use a pair of tweezers to remove the front camera.

  21. LG G3 Screen Assembly: step 21, image 1 of 2 LG G3 Screen Assembly: step 21, image 2 of 2
    • If you're having trouble removing the rear camera or the vibration motor, reapply the heated iOpener to loosen the adhesive underneath.

    • Use a pair of tweezers to remove the rear camera.

  22. LG G3 Screen Assembly: step 22, image 1 of 3 LG G3 Screen Assembly: step 22, image 2 of 3 LG G3 Screen Assembly: step 22, image 3 of 3
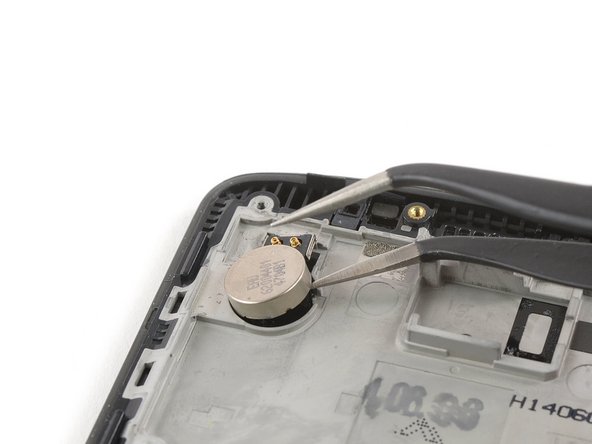
    • Insert one half of a pair of tweezers under the vibration motor and pry it up.

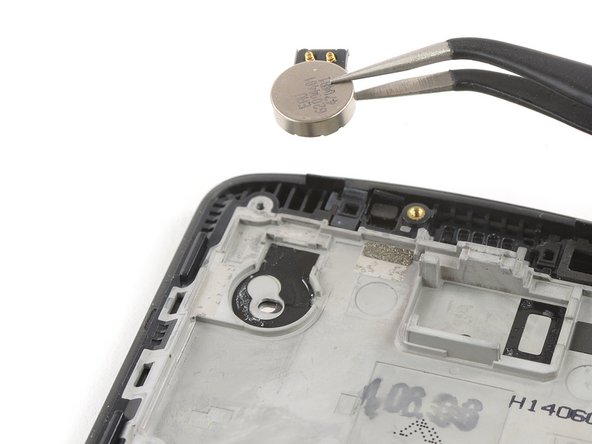
    • Use the tweezers to remove the vibration motor.

  23. LG G3 Screen Assembly: step 23, image 1 of 1
  24. LG G3 Screen Assembly: step 24, image 1 of 3 LG G3 Screen Assembly: step 24, image 2 of 3 LG G3 Screen Assembly: step 24, image 3 of 3
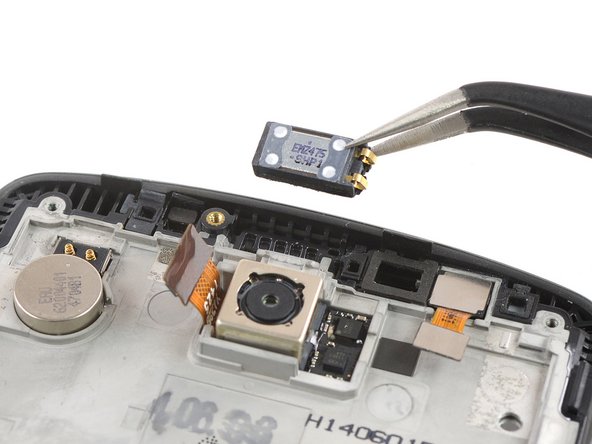
    • Use the pointed end of a spudger to pry up the headphone jack and remove it with a pair of tweezers.

  25. LG G3 Screen Assembly: step 25, image 1 of 3 LG G3 Screen Assembly: step 25, image 2 of 3 LG G3 Screen Assembly: step 25, image 3 of 3
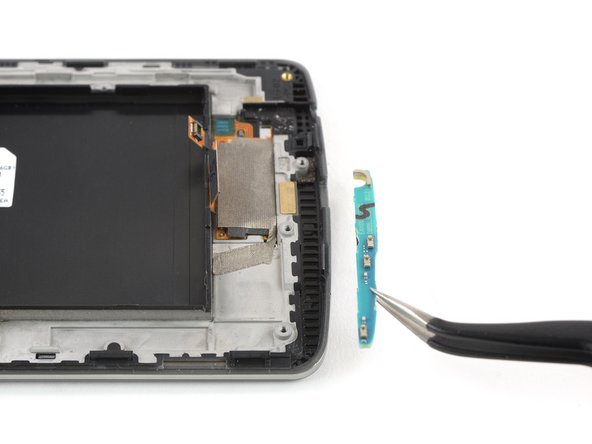
    • Use a pair of tweezers to carefully pry up and remove the daughterboard at the bottom end of the screen assembly.

  26. LG G3 Screen Assembly: step 26, image 1 of 1
    • Compare your new replacement part to the original part—you may need to transfer remaining components or remove adhesive backings from the new part before installing.

Dominik Schnabelrauch

Member since: 11/23/16

203,299 Reputation

682 Guides authored

Team

iFixit Member of iFixit

Staff

135 Members

16,817 Guides authored

View Statistics:

Past 24 Hours: 2

Past 7 Days: 4

Past 30 Days: 35

All Time: 248,638