
JBL Flip 2 Battery Replacement

What you need

  1. JBL Flip 2 Battery Replacement, JBL Flip 2 Outer Case Disassembly: step 1, image 1 of 2 JBL Flip 2 Battery Replacement, JBL Flip 2 Outer Case Disassembly: step 1, image 2 of 2
    • Begin by removing the rubber caps on both sides of the JBL Flip 2 by using the black spudger to get in between the creases.

    • Be very careful when removing the NFC rubber cap. There is a chip that is glued to the inside of the rubber cap. So, peel the rubber cap off slowly and remove the chip on the inside while peeling the rubber cap off.

    From where i can buy these speakers?

    Nitin Z - Reply

    First thing I did was rip the wire from the NFC chip! Luclily I don't need it as I only ever use my flip with my iPhone.

    Ken McMahon - Reply

  2. JBL Flip 2 Battery Replacement: step 2, image 1 of 2 JBL Flip 2 Battery Replacement: step 2, image 2 of 2
    • Remove the eight 7.0 mm Phillips #1 screws on both sides of the JBL Flip 2.

  3. JBL Flip 2 Battery Replacement: step 3, image 1 of 3 JBL Flip 2 Battery Replacement: step 3, image 2 of 3 JBL Flip 2 Battery Replacement: step 3, image 3 of 3
    • The NFC chip is glued onto the side of the device. Use the black spudger to separate the mic from the surface.

    • Be careful not to sever the wire connecting the nfc chip to the inside of the device.

    • Gently slide the NFC chip into the device through the slot that the wire comes from.

    what if the wire DID disconnect? could s.o. add a detail pic of exactly where the cables connect on the chip?

    dfhdrt34f3t - Reply

    Need the real name of the NFC chip, caus i broked and need to change

    Thanks

    Daniel Huot - Reply

    Need the real name of the NFC chip, cause i broked and need to change

    Thanks

    Daniel Huot - Reply

    My chip reads WN-3088 20130912

    Thomas Blanchard - Reply

  4. JBL Flip 2 Battery Replacement: step 4, image 1 of 2 JBL Flip 2 Battery Replacement: step 4, image 2 of 2
    • Peel the black rubber piece from one end to the other.

  5. JBL Flip 2 Battery Replacement: step 5, image 1 of 3 JBL Flip 2 Battery Replacement: step 5, image 2 of 3 JBL Flip 2 Battery Replacement: step 5, image 3 of 3
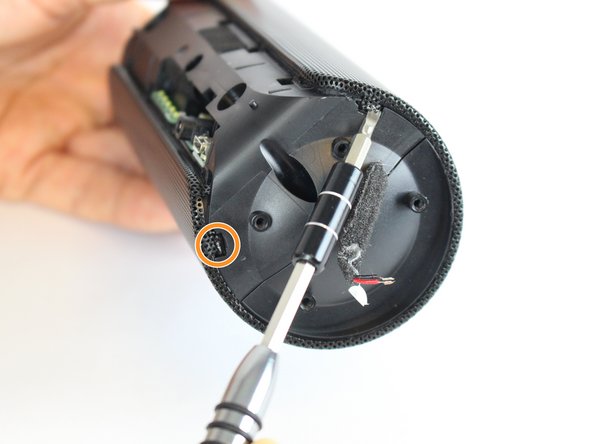
    • Remove the two 7.0 mm Phillips #1 screws.

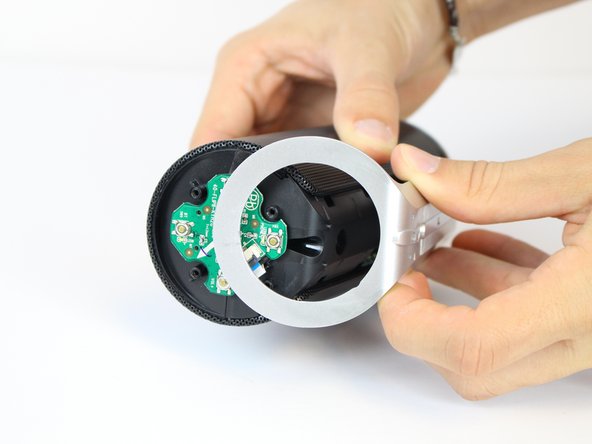
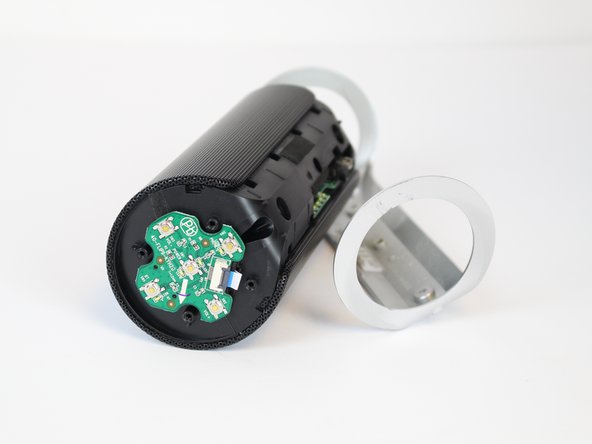
    • Carefully detach the silver plastic cover by pulling both ends off.

    • Pull both ends at the same time with the same amount of force to prevent the cover from breaking.

    • Separate the silver plastic piece by pulling it off from the middle.

    Tutto molto interessante.

    Ma la cosa più importante è:

    Dove acquistare gli altoparlanti ??

    terlizzigianfranco75 - Reply

  6. JBL Flip 2 Battery Replacement: step 6, image 1 of 3 JBL Flip 2 Battery Replacement: step 6, image 2 of 3 JBL Flip 2 Battery Replacement: step 6, image 3 of 3
    • Using a flat-head screwdriver or spudger, pry out the 8 metal nibs on the back side of the speaker.

    • Repeat the same process for the 4 remaining metal nibs (two on each end).

  7. JBL Flip 2 Battery Replacement: step 7, image 1 of 2 JBL Flip 2 Battery Replacement: step 7, image 2 of 2
    • Expand the metal casing and carefully slide it off the speaker.

  8. JBL Flip 2 Battery Replacement: step 8, image 1 of 2 JBL Flip 2 Battery Replacement: step 8, image 2 of 2
    • Using the driver adapter, first insert the #4 socket into the driver; followed by the #1 Philip's head bit in order to reach the three 13.0 mm screws.

  9. JBL Flip 2 Battery Replacement: step 9, image 1 of 3 JBL Flip 2 Battery Replacement: step 9, image 2 of 3 JBL Flip 2 Battery Replacement: step 9, image 3 of 3
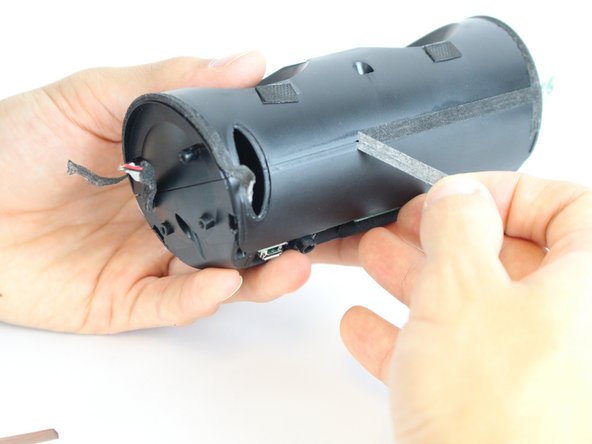
    • Using the classic spudger, get underneath the black tape strips found on both side of the device.

    • After lifting a portion of the tape off of the device, gently peel the tape off of the device, making sure to keep it intact.

    • There is another piece of tape on the side of the device with the control buttons. Lift the tape with the classic spudger and then peel the rest of the tape off.

    For easier removal warm the tape up with a hair dryer. It tears apart very easily.

    hale1730 - Reply

    Keeping the tape intact is impossible - I replaced it with electrical tape.

    Ken McMahon - Reply

  10. JBL Flip 2 Battery Replacement: step 10, image 1 of 3 JBL Flip 2 Battery Replacement: step 10, image 2 of 3 JBL Flip 2 Battery Replacement: step 10, image 3 of 3
    • Wedge a spudger between the two halves where the tape was to pry the device open.

    • When working with electronics, it's important to choose a tool that's ESD-safe to avoid accidental damage to the device. The regular black nylon spudger or a plastic opening tool should be used whenever possible.

  11. JBL Flip 2 Battery Replacement: step 11, image 1 of 2 JBL Flip 2 Battery Replacement: step 11, image 2 of 2
    • Use the black spudger to disconnect the speaker cord from it's socket.

  12. JBL Flip 2 Battery Replacement: step 12, image 1 of 2 JBL Flip 2 Battery Replacement: step 12, image 2 of 2
    • Use the black spudger to disconnect the auxiliary wire from its socket.

    What is the function of auxi. Wire

    Debabrata Paul - Reply

    When you plug in the audio jack it goes to the motherboard, the amplifier and then to the wire directly to the speakers.

    Jose Palacios - Reply

  13. JBL Flip 2 Battery Replacement: step 13, image 1 of 1
    • Carefully remove the cable connecting the control chip to the motherboard.

    What's the name of the cable connecting the control chip to the motherboard

    Jose Cabello - Reply

    I want motherboard control chip

    moneykandan110 - Reply

    connecting the control chip kitne ka hai

    Niraj Kumar - Reply

  14. JBL Flip 2 Battery Replacement: step 14, image 1 of 2 JBL Flip 2 Battery Replacement: step 14, image 2 of 2
    • Using the black spudger, carefully remove the cord connecting the battery to the motherboard.

    If you can“t see a connector here , you have an earlier version of Flip2 - the connector is on the backside and requires a different battery - see the comment at the end of the feature

    Klaus - Reply

  15. JBL Flip 2 Battery Replacement: step 15, image 1 of 1
    • Carefully remove the cable connecting the nfc chip to the motherboard.

  16. JBL Flip 2 Battery Replacement, Battery: step 16, image 1 of 2 JBL Flip 2 Battery Replacement, Battery: step 16, image 2 of 2
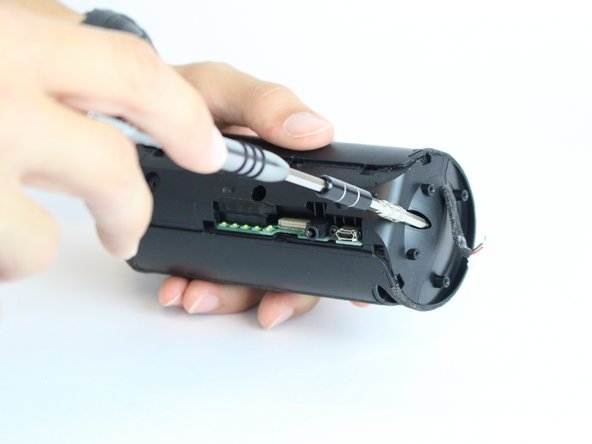
    • Remove the one 7.0 mm Phillips #1 screw attaching the motherboard to the casing.

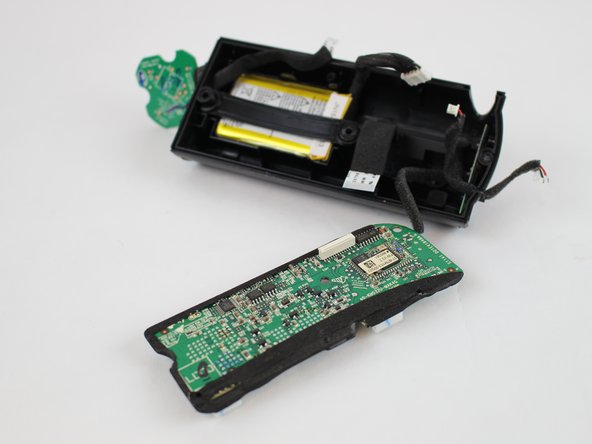
    • Lift the motherboard out of the case to reveal the battery.

  17. JBL Flip 2 Battery Replacement: step 17, image 1 of 2 JBL Flip 2 Battery Replacement: step 17, image 2 of 2
    • Remove the cord that connects the ports board to the motherboard.

    • Put the motherboard to the side.

  18. JBL Flip 2 Battery Replacement: step 18, image 1 of 2 JBL Flip 2 Battery Replacement: step 18, image 2 of 2
    • Using the black spudger, loosen the brace holding in the battery.

    • To remove the brace, turn it 90 degrees clockwise and lift it up from its socket.

  19. JBL Flip 2 Battery Replacement: step 19, image 1 of 2 JBL Flip 2 Battery Replacement: step 19, image 2 of 2
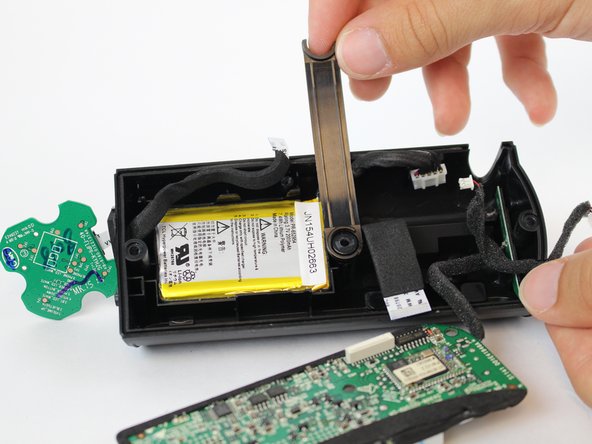
    • Using the black spudger, loosen the battery and remove.

    Hi!

    That looks like two stacked batteries, to give +/- 3.7V with a ground center?

    Having the dimensions of the pack would be great, making it easy to find suitable replacements!

    Thanks

    Patrik

    Patrik Floding - Reply

Conclusion

To reassemble your device, follow these instructions in reverse order.

18 other people completed this guide.

Jonathan Wear

Member since: 02/09/16

1,220 Reputation

5 Guides authored

Team

USF Tampa, Team 11-2, Cheng Spring 2016 Member of USF Tampa, Team 11-2, Cheng Spring 2016

USFT-CHENG-S16S11G2

4 Members

8 Guides authored

10 Comments

were i can buy a new battrery?

Joao lemos - Reply

were i can buy a new battrery?

likea g6 - Reply

were i can buy a new battrery

Fanie Schoeman - Reply

Great guide. Detail was appreciated. I bought my battery at Newegg.com Item#: 9SIA3HK6018406. Thank you.

hale1730 - Reply

I just managed to find a replacement battery for the older JBL Flip2 , which has a LI-ion battery (just three cables with a different connector) for in this feature just the newer Lipo battery is covered:

This is the right battery for the early version:

https://www.amazon.de/gp/aw/d/B002XCR3UI...

it has a different connector , so soldering the old connector to the new battery is required: Easy enough, since the colors are the same - yellow to yellow , black-black and red-red.

it‘s a tiny bit wider so with a knife the side holders have to be cut out a little, you will see when you receive the battery.

open it up first and you will see which version you have, the LIPo version has the connector at the front as pictured above, the LI-ion version has a 3pin connector at the backside of the PCB.

fir this version you need a LI-ion battery as in the link above.

Everything else is just as described above - ists such a great little speaker and Im happy that it plays again… ;-)

Klaus - Reply

Hi Klaus,

What are the first letters of your JBL Flip 2 serial number ?

I don’t want to buy the wrong one, mine begins with GG letters.

thank you,

Romain Loiseau -

The serial number of my Flip 2 also starts with GG, which version is this?

Christoph Straten -

Hey! How are you?

I want to know why this battery has 2 black cables, 2 red cables and 1 white, because i wanted to put another kind of battery that only has 1 black cable and 1 red cable

Severino Alcantara - Reply

Hey,

where can I buy the battery with 1 red, 1 yellow and 1 black cable?

The suggestion from Klaus isn’t compatible.

thx for suggestions

Kirpi Kirpi - Reply

Hey every one, thank you very much for this guide. and thanks Mike for your explanation about the both models.

I have the model with 5 pin (it’s the model 2014 with battery PR-652954 ). The older one had swelled. I only saw that when i took it off. Not a good sign!

Nicolas

nicolas - Reply

Add Comment

View Statistics:

Past 24 Hours: 13

Past 7 Days: 58

Past 30 Days: 188

All Time: 32,242