
JBL Charge 2 Motherboard Replacement

What you need

  1. JBL Charge 2 Motherboard Replacement, Battery: step 1, image 1 of 1
    • Remove the screen cover from the speaker using a metal spudger.

  2. JBL Charge 2 Motherboard Replacement: step 2, image 1 of 2 JBL Charge 2 Motherboard Replacement: step 2, image 2 of 2
    • Using a Phillips #1 screwdriver (PH1), remove the (4) four 8mm screws.

    • Remove the end cap of the device. Repeat the same process to remove the other end cap.

  3. JBL Charge 2 Motherboard Replacement: step 3, image 1 of 2 JBL Charge 2 Motherboard Replacement: step 3, image 2 of 2
    • To remove the end diaphragms, use a Phillips #1 screwdriver (PH1) and remove the (4) four 6mm screws.

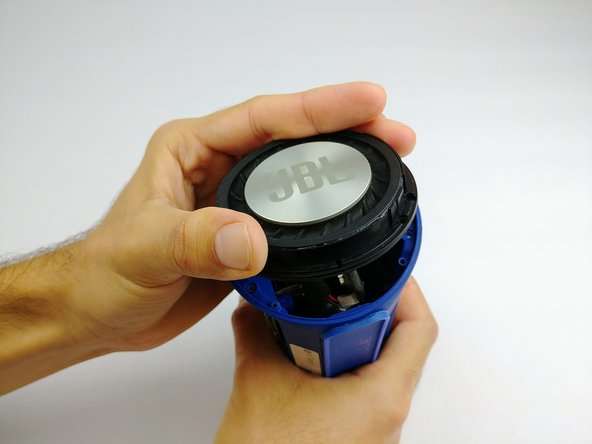
    • Twist off the end cap and remove them from the device.

  4. JBL Charge 2 Motherboard Replacement: step 4, image 1 of 2 JBL Charge 2 Motherboard Replacement: step 4, image 2 of 2
    • Use a Phillips #1 screwdriver (PH1) to remove the (2) two screws from the battery cover.

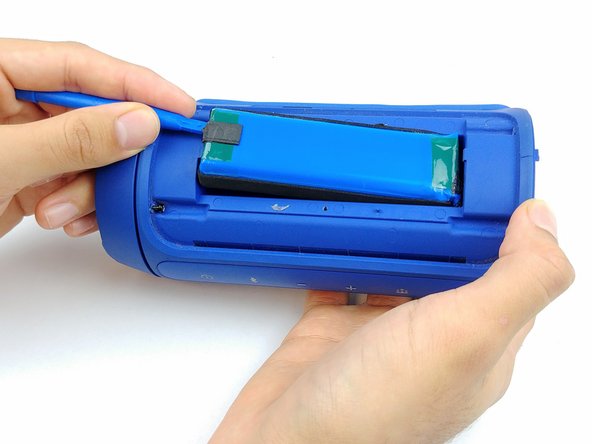
    • Pry away the plastic battery cover with a plastic spudger.

  5. JBL Charge 2 Motherboard Replacement: step 5, image 1 of 1
    • Disconnect the battery connector with a plastic opening tool and wiggle the connector free.

  6. JBL Charge 2 Motherboard Replacement: step 6, image 1 of 3 JBL Charge 2 Motherboard Replacement: step 6, image 2 of 3 JBL Charge 2 Motherboard Replacement: step 6, image 3 of 3
    • Scrape the battery wire sealant off with a plastic opening tool, and ensure it is free of the body of the speaker and wires.

    • Slide the battery free.

  7. JBL Charge 2 Motherboard Replacement, Speakers: step 7, image 1 of 1
    • Remove the opposite screen cover using a metal spudger

  8. JBL Charge 2 Motherboard Replacement: step 8, image 1 of 1
    • Use the Phillips #1 screwdriver (PH1) to remove the (8) eight screws.

    • Pull out the speakers from the device.

  9. JBL Charge 2 Motherboard Replacement: step 9, image 1 of 1
    • Disconnect the wiring from the speaker by using the fine tip pry tool.

    • Remove the speakers from the device.

  10. JBL Charge 2 Motherboard Replacement, Motherboard: step 10, image 1 of 1
    • Use a spudger to disconnect the gold antenna connector from the main circuit board.

  11. JBL Charge 2 Motherboard Replacement: step 11, image 1 of 1
    • Disconnect the microphone connector using the plastic opening tool.

  12. JBL Charge 2 Motherboard Replacement: step 12, image 1 of 1
    • Use a plastic opening tool to disconnect the 3.5 mm headphone connector.

  13. JBL Charge 2 Motherboard Replacement: step 13, image 1 of 1
    • Disconnect micro-b connector with a plastic opening tool.

  14. JBL Charge 2 Motherboard Replacement: step 14, image 1 of 1
    • Remove the connector to the USB connector using a plastic opening tool.

  15. JBL Charge 2 Motherboard Replacement: step 15, image 1 of 1
    • Remove the speaker wires from the control panel by prying off with a plastic opening tool.

  16. JBL Charge 2 Motherboard Replacement: step 16, image 1 of 1
    • Next, disconnect the control-panel ribbon by prying out the grey plastic tab using a plastic opening tool. The ribbon should freely come out afterwards.

  17. JBL Charge 2 Motherboard Replacement: step 17, image 1 of 3 JBL Charge 2 Motherboard Replacement: step 17, image 2 of 3 JBL Charge 2 Motherboard Replacement: step 17, image 3 of 3
    • Caution: Touching the capacitors will short out the circuit board. Push on the end of the circuit board and carefully keep thumbs on foam insulation on ends of board.

    • Remove the motherboard from the device.

Mauzor Ilonzo

Member since: 09/26/17

495 Reputation

3 Guides authored

Team

USF Tampa, Team S2-G4, Passmore Fall 2017 Member of USF Tampa, Team S2-G4, Passmore Fall 2017

USFT-PASSMORE-F17S2G4

4 Members

8 Guides authored

View Statistics:

Past 24 Hours: 4

Past 7 Days: 14

Past 30 Days: 65

All Time: 8,199