Introduction
Use this guide to replace a worn-out or dead battery in your Huawei P8 Lite (2017).
If your battery is swollen, take appropriate precautions. For your safety, discharge your battery below 25% before disassembling your phone. This reduces the risk of a dangerous thermal event if the battery is accidentally damaged during the repair.
You’ll need replacement adhesive to reattach components when reassembling the device.
What you need
-
-
Apply a suction cup to the rear glass, as close to the right edge as possible.
-
Pull up on the suction up with strong, steady force to create a gap.
-
Insert the tip of an opening pick into the gap between the rear glass and frame.
-
-
-
Slide the tip of the opening pick to the bottom right corner to cut the adhesive.
-
Leave it there to prevent the adhesive from resealing.
-
-
-
Insert a second opening pick at the bottom right corner.
-
Slide the tip of the opening pick to the top right corner to slice the adhesive.
-
Leave the opening pick at its place to prevent the adhesive from resealing.
-
-
-
Insert a third opening pick at the top right corner.
-
Slide it to the top left corner to cut the adhesive.
-
Leave the opening pick at its place to prevent the adhesive from resealing.
-
-
-
Insert a fourth opening pick at the top left corner.
-
Slide the tip of the opening pick to the bottom left corner to cut the adhesive.
-
Leave the opening pick in its place to prevent the adhesive from resealing.
-
-
-
Insert a fifth opening pick at the bottom left corner.
-
Slide it to the bottom right corner to cut the remaining adhesive.
-
-
-
-
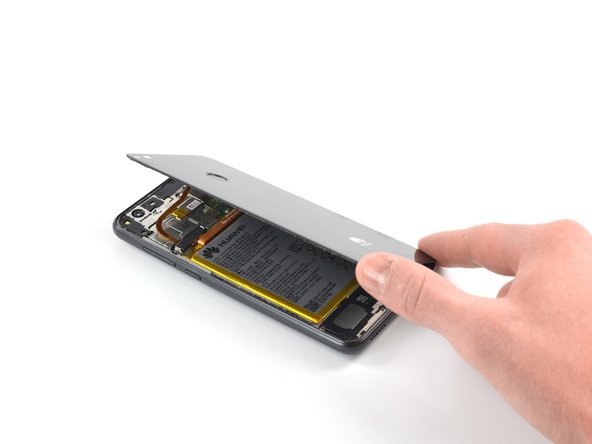
Open the P8 Lite by swinging the rear glass up from the left side, like the back cover of a book.
-
Place the rear glass on the top of the battery.
-
-
-
Use a Phillips #00 screwdriver to remove the 2.9 mm screw.
-
-
-
Use the tip of an opening pick to pry up and loosen the metal shield.
-
-
-
Use a Phillips #00 screwdriver to remove the two 2.9 mm-long screws securing the battery connector shield.
-
-
-
Use the tip of an opening pick to pry up the battery connector shield.
-
Remove the metal shield.
-
-
-
Heat an iOpener and apply it to the display to loosen the adhesive beneath the battery for two minutes.
-
-
-
Insert the wide edge of an opening pick on the bottom left corner into the gap between the battery and the frame.
-
Slide the opening pick at a flat angle as far under the battery as possible. Be careful not to deform the battery.
-
-
-
Once the battery has slightly lifted, insert a second opening pick at the bottom left corner.
-
Slide the opening pick along the edge to the left center and slide it under the battery.
-
Insert a third opening in the center of the right edge and slide it under the battery to cut the remaining adhesive.
-