
Huawei P8 Lite (2017) Battery Replacement

What you need

  1. Huawei P8 Lite (2017) Battery Replacement, Apply a heated iOpener: step 1, image 1 of 1
    • Heat an iOpener and apply it to the rear glass for two minutes.

    • A hair dryer, heat gun, or hot plate may also be used, but be careful not to overheat the P8 Lite—the display and internal battery are both susceptible to heat damage.

  2. Huawei P8 Lite (2017) Battery Replacement, Create a gap: step 2, image 1 of 2 Huawei P8 Lite (2017) Battery Replacement, Create a gap: step 2, image 2 of 2
    • Apply a suction cup to the rear glass, as close to the right edge as possible.

    • If the phone's rear glass is cracked, the suction handle may not stick. Try lifting it with strong tape, or superglue the suction handle in place and allow it to cure so you can proceed.

    • Pull up on the suction up with strong, steady force to create a gap.

    • Depending on the age of your device, this may be difficult. If you have trouble, apply more heat to further soften the adhesive and try again.

    • Insert the tip of an opening pick into the gap between the rear glass and frame.

  3. Huawei P8 Lite (2017) Battery Replacement, Slice the adhesive: step 3, image 1 of 2 Huawei P8 Lite (2017) Battery Replacement, Slice the adhesive: step 3, image 2 of 2
    • Slide the tip of the opening pick to the bottom right corner to cut the adhesive.

    • Leave it there to prevent the adhesive from resealing.

  4. Huawei P8 Lite (2017) Battery Replacement: step 4, image 1 of 2 Huawei P8 Lite (2017) Battery Replacement: step 4, image 2 of 2
    • Insert a second opening pick at the bottom right corner.

    • Slide the tip of the opening pick to the top right corner to slice the adhesive.

    • Leave the opening pick at its place to prevent the adhesive from resealing.

  5. Huawei P8 Lite (2017) Battery Replacement: step 5, image 1 of 2 Huawei P8 Lite (2017) Battery Replacement: step 5, image 2 of 2
    • Insert a third opening pick at the top right corner.

    • Slide it to the top left corner to cut the adhesive.

    • In case you're having trouble to cut the adhesive, reapply the iOpener for another minute to loosen it.

    • Leave the opening pick at its place to prevent the adhesive from resealing.

  6. Huawei P8 Lite (2017) Battery Replacement: step 6, image 1 of 2 Huawei P8 Lite (2017) Battery Replacement: step 6, image 2 of 2
    • Insert a fourth opening pick at the top left corner.

    • Do not insert the opening pick deeper than 1 cm (1/3rd of an inch) to avoid damage the fingerprint sensor cable.

    • Slide the tip of the opening pick to the bottom left corner to cut the adhesive.

    • Leave the opening pick in its place to prevent the adhesive from resealing.

  7. Huawei P8 Lite (2017) Battery Replacement: step 7, image 1 of 2 Huawei P8 Lite (2017) Battery Replacement: step 7, image 2 of 2
    • Insert a fifth opening pick at the bottom left corner.

    • Slide it to the bottom right corner to cut the remaining adhesive.

    • Try not to remove the rear glass yet! The fingerprint sensor is still connected to the motherboard.

  8. Huawei P8 Lite (2017) Battery Replacement, Rotate the rear glass: step 8, image 1 of 3 Huawei P8 Lite (2017) Battery Replacement, Rotate the rear glass: step 8, image 2 of 3 Huawei P8 Lite (2017) Battery Replacement, Rotate the rear glass: step 8, image 3 of 3
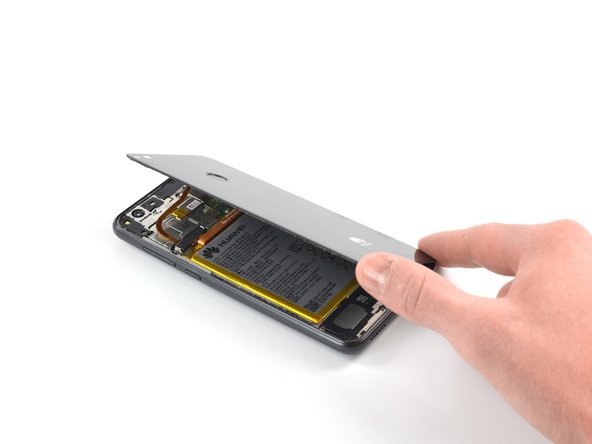
    • Open the P8 Lite by swinging the rear glass up from the left side, like the back cover of a book.

    • Place the rear glass on the top of the battery.

    • Avoid tensioning the display cable during this procedure.

  9. Huawei P8 Lite (2017) Battery Replacement, Unscrew the fingerprint sensor connector cover: step 9, image 1 of 1
    • Use a Phillips #00 screwdriver to remove the 2.9 mm screw.

  10. Huawei P8 Lite (2017) Battery Replacement, Remove the metal shield: step 10, image 1 of 2 Huawei P8 Lite (2017) Battery Replacement, Remove the metal shield: step 10, image 2 of 2
    • Use the tip of an opening pick to pry up and loosen the metal shield.

  11. Huawei P8 Lite (2017) Battery Replacement, Remove the metal shield: step 11, image 1 of 1
    • Use a pair of tweezers to remove the metal shield.

  12. Huawei P8 Lite (2017) Battery Replacement: step 12, image 1 of 2 Huawei P8 Lite (2017) Battery Replacement: step 12, image 2 of 2
    • Use a spudger to pry up and disconnect the fingerprint sensor cable.

  13. Huawei P8 Lite (2017) Battery Replacement: step 13, image 1 of 1
    • Remove the rear glass.

    • After installing the rear glass, apply strong, steady pressure to your phone for several minutes to help the adhesive form a good bond—a stack of heavy books works well.

  14. Huawei P8 Lite (2017) Battery Replacement, Battery: step 14, image 1 of 1
    • Use a Phillips #00 screwdriver to remove the two 2.9 mm-long screws securing the battery connector shield.

  15. Huawei P8 Lite (2017) Battery Replacement, Remove the metal shield: step 15, image 1 of 2 Huawei P8 Lite (2017) Battery Replacement, Remove the metal shield: step 15, image 2 of 2
    • Use the tip of an opening pick to pry up the battery connector shield.

    • Remove the metal shield.

  16. Huawei P8 Lite (2017) Battery Replacement, Disconnect the battery: step 16, image 1 of 2 Huawei P8 Lite (2017) Battery Replacement, Disconnect the battery: step 16, image 2 of 2
    • Use a spudger to pry up and disconnect the battery flex cable.

  17. Huawei P8 Lite (2017) Battery Replacement, Apply a heated iOpener: step 17, image 1 of 1
    • Heat an iOpener and apply it to the display to loosen the adhesive beneath the battery for two minutes.

    • A hair dryer, heat gun, or hot plate may also be used, but be careful not to overheat the P8 Lite—the display and internal battery are both susceptible to heat damage.

  18. Huawei P8 Lite (2017) Battery Replacement, Insert an opening pick: step 18, image 1 of 3 Huawei P8 Lite (2017) Battery Replacement, Insert an opening pick: step 18, image 2 of 3 Huawei P8 Lite (2017) Battery Replacement, Insert an opening pick: step 18, image 3 of 3
    • The interconnect cable runs under the battery on the bottom right side. Make sure not to damage the cable during the following procedure.

    • Insert the wide edge of an opening pick on the bottom left corner into the gap between the battery and the frame.

    • Slide the opening pick at a flat angle as far under the battery as possible. Be careful not to deform the battery.

  19. Huawei P8 Lite (2017) Battery Replacement: step 19, image 1 of 3 Huawei P8 Lite (2017) Battery Replacement: step 19, image 2 of 3 Huawei P8 Lite (2017) Battery Replacement: step 19, image 3 of 3
    • Once the battery has slightly lifted, insert a second opening pick at the bottom left corner.

    • Slide the opening pick along the edge to the left center and slide it under the battery.

    • In case you're having trouble to cut the adhesive, reapply the iOpener for another minute to loosen it.

    • Insert a third opening in the center of the right edge and slide it under the battery to cut the remaining adhesive.

    • Make sure not to damage the interconnect cable that runs on the right side underneath the battery.

  20. Huawei P8 Lite (2017) Battery Replacement: step 20, image 1 of 1
    • Remove the battery.

    • Do not reinstall a damaged or deformed battery, as doing so is a potential safety hazard.

    • Before installing a new battery, remove any remaining adhesive from the phone, and clean the glued areas with isopropyl alcohol and a lint-free cloth.

    • Secure the new battery with pre-cut adhesive or double-sided adhesive tape. In order to position it correctly, apply the new adhesive into the device at the places where the old adhesive was located, not directly onto the battery. Press the new battery firmly into place.

    Bad time removing the battery, it’s very well glued.

    Elia Mazzon - Reply

Conclusion

If possible, turn on your device and test your repair before installing new adhesive and resealing.

To reassemble your device, follow these instructions in reverse order. Apply new adhesive where necessary after cleaning the relevant areas with isopropyl alcohol (>90%).

For optimal performance, calibrate your newly installed battery: Charge it to 100% and keep charging it for at least 2 more hours. Then use your device until it shuts off due to low battery. Finally, charge it uninterrupted to 100%.

Take your e-waste to an R2 or e-Stewards certified recycler.

Repair didn’t go as planned? Try some basic troubleshooting, or ask our Answers community for help.

5 other people completed this guide.

Adriana Zwink

Member since: 12/18/19

48,052 Reputation

167 Guides authored

Team

iFixit Member of iFixit

Staff

135 Members

16,722 Guides authored

4 Comments

Hi there, thank you for this guide. I was just wondering what adhesive/ adhesive tape to use when re assembling the phone as I’m not familiar with what is suitable? Also, is there a particular brand of isopropyl alcohol to get? All the best, Ruari.

Ruari Graham - Reply

Hi Ruari, take a look at our store. You will find a range of different adhesives there. For the attachment of your battery I recommend these stretch battery adhesive. For the reassembly you can use this tape or another thin double-sided tape. For removing any remaining adhesive you can use this adhesive remover or remove large chunks of adhesives with your fingers, spudger, plastic opening tool, or tweezers. Good luck and have fun with your repair!

Adriana Zwink -

Hi ! Thanks for this really good tutorial. I changed my battery and everything seems to work until now, I hope it will continue for a long time! My only trouble is maybe that I have the double-sided adhesive tape from iFixit and only this material to "glue" the new battery. So, I hope this one will stick like the original one, we will see (:

Thanks a lot again, and have a good day. Tested on Huawei P8 Lite 2017, Model: PRA-LX1 Avril 2022

Rai - Reply

Hi @Rai, thanks for sharing your experience! We're glad to hear that your repair was successful. Normally the battery should be held in place with double sided tape.

Adriana Zwink -

Add Comment

View Statistics:

Past 24 Hours: 4

Past 7 Days: 18

Past 30 Days: 69

All Time: 2,745