
Huawei P20 Pro Screen Replacement

What you need

  1. Huawei P20 Pro Screen Replacement, Rear Glass Replacement: step 1, image 1 of 1
    • Switch off your phone.

    • Use an iOpener to loosen the adhesive beneath the rear glass. Apply the iOpener for at least two minutes. You might want to repeat this step several times during the back cover removal.

    • The adhesive of the Huawei P20 Pro is of moderate strength, however a hair dryer, heat gun, or hot plate may also be used if you aren't able to open the device with the iOpener. Be careful not to overheat the phone—the OLED display and internal battery are both susceptible to heat damage.

    Ich hatte keinen iOpener. Daher hab ich das P20 Pro für ein paar Minuten auf eine Wärmflasche gelegt. Die Klebeschicht konnte relativ schnell gelöst werden.

    David T. - Reply

  2. Huawei P20 Pro Screen Replacement: step 2, image 1 of 3 Huawei P20 Pro Screen Replacement: step 2, image 2 of 3 Huawei P20 Pro Screen Replacement: step 2, image 3 of 3
    • If the phone's rear glass is cracked, a suction cup may not stick very well. Try lifting it with strong tape, or superglue the suction cup in place and allow it to cure so you can proceed.

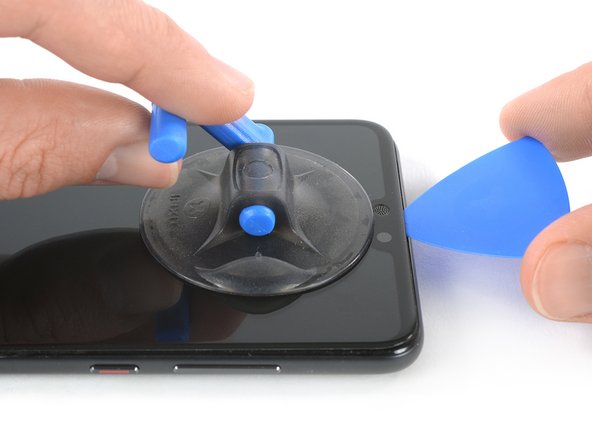
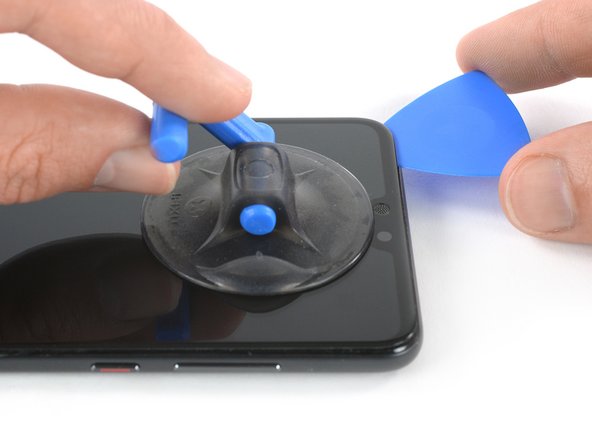
    • Press a suction cup onto the rear glass close to the bottom edge of the phone.

    • Lift the bottom edge with the suction cup, opening a slight gap between the rear glass and the frame.

    • Insert an opening pick in the gap and slide it to the bottom right corner. Leave it there to prevent the adhesive from resealing.

    if the back cover is not broken, i’d suggest NOT to use an opening pick as if the phone was not heated enough, you may crack the glass on the edges. better use the iPlastix, it is thinner and less stressful for the glass.

    Stefano Restuccia - Reply

    It is better to put a peak on the side because the side opens first than the bottom of the phone.

    이정일 - Reply

    I have to agree that is is much easier to start opening from the side. Do read the rest of the guide though, to make sure you won’t hit something when opening it from the side.

    Jacob Cain - Reply

  3. Huawei P20 Pro Screen Replacement: step 3, image 1 of 2 Huawei P20 Pro Screen Replacement: step 3, image 2 of 2
    • Insert a second opening pick and slide it to the bottom left corner. Leave it there to prevent the adhesive from resealing.

  4. Huawei P20 Pro Screen Replacement: step 4, image 1 of 3 Huawei P20 Pro Screen Replacement: step 4, image 2 of 3 Huawei P20 Pro Screen Replacement: step 4, image 3 of 3
    • Insert a third opening pick at the bottom left corner.

    • Slide the tip of the opening pick along the left edge of the phone to cut the adhesive.

    • Leave the opening pick in the top left corner of the phone to prevent the adhesive from resealing.

  5. Huawei P20 Pro Screen Replacement: step 5, image 1 of 2 Huawei P20 Pro Screen Replacement: step 5, image 2 of 2
    • In case you're having trouble to cut the adhesive, reapply the iOpener for another minute to loosen it.

    • Insert a fourth opening pick at the top left corner of the phone.

    • Slide the opening pick along the upper edge of the phone to cut the adhesive beneath the rear glass and leave it in the top right corner.

  6. Huawei P20 Pro Screen Replacement: step 6, image 1 of 3 Huawei P20 Pro Screen Replacement: step 6, image 2 of 3 Huawei P20 Pro Screen Replacement: step 6, image 3 of 3
    • Insert a fifth opening pick at the top right corner of the rear glass.

    • Slide the opening pick along the right edge of the phone to cut the remaining adhesive.

    • Don't open the phone all the way yet. The proximity sensor flex cable is still connected to the motherboard.

  7. Huawei P20 Pro Screen Replacement: step 7, image 1 of 3 Huawei P20 Pro Screen Replacement: step 7, image 2 of 3 Huawei P20 Pro Screen Replacement: step 7, image 3 of 3
    • Carefully lift the rear glass until you can reach the connector of the proximity sensor flex cable next to the rear camera assembly.

  8. Huawei P20 Pro Screen Replacement: step 8, image 1 of 2 Huawei P20 Pro Screen Replacement: step 8, image 2 of 2
    • Use the flat end of a spudger to pry up and disconnect the proximity sensor flex cable.

  9. Huawei P20 Pro Screen Replacement: step 9, image 1 of 2 Huawei P20 Pro Screen Replacement: step 9, image 2 of 2
    • Remove the rear glass.

    • Before installing fresh adhesive and reassembly, remove any remaining adhesive from the phone, and clean the glued areas with isopropyl alcohol and a lint-free cloth.

    Das mit den Klebstreifen funktioniert nicht. Ich habe die Tube E6000 in die Dichtungen eingeklebt und so das Smartphone wieder zusammengesetzt.

    yellowlonghair ylh - Reply

  10. Huawei P20 Pro Screen Replacement, Motherboard Cover and NFC: step 10, image 1 of 1
    • Remove the nine Phillips #00 screws (3.4 mm length).

  11. Huawei P20 Pro Screen Replacement: step 11, image 1 of 3 Huawei P20 Pro Screen Replacement: step 11, image 2 of 3 Huawei P20 Pro Screen Replacement: step 11, image 3 of 3
    • Insert an opening pick under the left side of the motherboard cover that includes the NFC.

    • Slide the opening pick towards the top left corner of the phone and twist it to pry the cover out of its plastic clamps.

  12. Huawei P20 Pro Screen Replacement: step 12, image 1 of 2 Huawei P20 Pro Screen Replacement: step 12, image 2 of 2
    • Repeat the previous process on the right side and twist the opening pick to pry up the motherboard cover.

  13. Huawei P20 Pro Screen Replacement: step 13, image 1 of 1
    • Remove the motherboard cover.

    Porque cuando desconectas el nfc no vuelve a funcionar?

    Vanesa Gutierrez - Reply

    a teraz to zopakuj po vychodňarsky

    Lukas Franko - Reply

  14. Huawei P20 Pro Screen Replacement, Battery Disconnect: step 14, image 1 of 2 Huawei P20 Pro Screen Replacement, Battery Disconnect: step 14, image 2 of 2
    • Use the flat end of a spudger to pry up and disconnect the battery flex cable.

    Das Flachbandkabel kann einen Zentimeter zu lange sein. Ich musste ihn 2 mal falten, um beim Einbau die Steckerbuchse wieder zu treffen.

    yellowlonghair ylh - Reply

  15. Huawei P20 Pro Screen Replacement, Interconnect Cable with Charging Port: step 15, image 1 of 1
    • Remove the five Phillips #00 screws (3.4 mm length).

  16. Huawei P20 Pro Screen Replacement: step 16, image 1 of 3 Huawei P20 Pro Screen Replacement: step 16, image 2 of 3 Huawei P20 Pro Screen Replacement: step 16, image 3 of 3
    • Use a pair of tweezers to disconnect the antenna cable.

    • Use a pair of tweezers to pull the antenna cable out of its routing.

  17. Huawei P20 Pro Screen Replacement: step 17, image 1 of 3 Huawei P20 Pro Screen Replacement: step 17, image 2 of 3 Huawei P20 Pro Screen Replacement: step 17, image 3 of 3
    • Slide an opening pick under the left side of the daughterboard cover and start to pry it up until you can get a good grip.

    • Remove the daughterboard cover.

  18. Huawei P20 Pro Screen Replacement: step 18, image 1 of 1
    • Remove the two Phillips #00 screws (3.4 mm length) on both sides of the USB C port.

  19. Huawei P20 Pro Screen Replacement: step 19, image 1 of 2 Huawei P20 Pro Screen Replacement: step 19, image 2 of 2
    • Use the flat end of a spudger to pry up and disconnect the upper end of the interconnect and charging port flex cable from the motherboard.

  20. Huawei P20 Pro Screen Replacement: step 20, image 1 of 3 Huawei P20 Pro Screen Replacement: step 20, image 2 of 3 Huawei P20 Pro Screen Replacement: step 20, image 3 of 3
    • Use the flat end of a spudger to pry up and disconnect the bottom end of the interconnect and charging port flex cable from the daughterboard.

    • Use a pair of tweezers to move the antenna cable out of the way.

  21. Huawei P20 Pro Screen Replacement: step 21, image 1 of 3 Huawei P20 Pro Screen Replacement: step 21, image 2 of 3 Huawei P20 Pro Screen Replacement: step 21, image 3 of 3
    • Use a pair of tweezers to pull the charging port out of its recess.

    • Remove the interconnect cable including the charging port.

  22. Huawei P20 Pro Screen Replacement, Battery: step 22, image 1 of 3 Huawei P20 Pro Screen Replacement, Battery: step 22, image 2 of 3 Huawei P20 Pro Screen Replacement, Battery: step 22, image 3 of 3
    • Use an iOpener to loosen the adhesive beneath the battery. Apply the iOpener on the display for at least two minutes.

    • In the following step, only apply the spudger in the areas marked in red, which is where the battery adhesive is located.

    • Avoid the orange area where the display flex cable is running.

  23. Huawei P20 Pro Screen Replacement: step 23, image 1 of 3 Huawei P20 Pro Screen Replacement: step 23, image 2 of 3 Huawei P20 Pro Screen Replacement: step 23, image 3 of 3
    • In case you have trouble to pry up the battery the adhesive may not be loose enough. You can apply some isopropyl alcohol under each corner of the battery and allow it to penetrate for about two minutes to help weaken the adhesive.

    • Try your best not to deform the battery during the following removal process. Soft-shell lithium-ion batteries can leak dangerous chemicals, catch fire, or even explode if damaged. Do not use excessive force or pry at the battery with metal tools.

    • Insert the flat end of a spudger at the top left corner of the battery and start to pry it up.

    • Work your way down the left side of the battery and loosen the adhesive with the spudger.

  24. Huawei P20 Pro Screen Replacement: step 24, image 1 of 3 Huawei P20 Pro Screen Replacement: step 24, image 2 of 3 Huawei P20 Pro Screen Replacement: step 24, image 3 of 3
    • Insert the spudger at the top right corner of the battery and start to pry it up.

    • Work your way down to the bottom end of the battery to loosen all the adhesive.

  25. Huawei P20 Pro Screen Replacement: step 25, image 1 of 2 Huawei P20 Pro Screen Replacement: step 25, image 2 of 2
    • Remove the battery.

    • Do not reinstall a damaged or deformed battery, as doing so is a potential safety hazard. Replace it with a new battery.

    • Before installing a new battery remove any remaining adhesive from the phone, and clean the glued areas with isopropyl alcohol and a lint-free cloth.

    • Secure the new battery with pre-cut adhesive or double-sided adhesive tape. In order to position it correctly, apply the new adhesive into the phone at the places where the old adhesive was located, not directly onto the battery. Press the new battery firmly into place for 5-10 seconds.

  26. Huawei P20 Pro Screen Replacement, Screen: step 26, image 1 of 2 Huawei P20 Pro Screen Replacement, Screen: step 26, image 2 of 2
    • Use the flat end of a spudger to pry up and disconnect the display flex cable at the bottom left of the motherboard.

  27. Huawei P20 Pro Screen Replacement: step 27, image 1 of 1
    • Prepare an iOpener and apply it to the display for at least two minutes to loosen the adhesive beneath.

    • You may need to reheat and reapply the iOpener several times to get the phone warm enough on all sides. Follow the iOpener instructions to avoid overheating.

    • If your display glass is cracked, keep further breakage contained and prevent bodily harm during your repair by taping over the glass.

    • Lay overlapping strips of clear packing tape over the display until the whole face is covered.

    • This will keep glass shards contained and provide structural integrity when prying and lifting the display.

    • Wear safety glasses to protect your eyes from any glass shaken free during the repair.

  28. Huawei P20 Pro Screen Replacement: step 28, image 1 of 3 Huawei P20 Pro Screen Replacement: step 28, image 2 of 3 Huawei P20 Pro Screen Replacement: step 28, image 3 of 3
    • Once the screen is warm to the touch, apply a suction cup to the upper edge of the phone.

    • Pull the suction cup upwards and insert an opening pick in the gap between the display glass and the plastic bezel. Start to cut the adhesive by sliding the opening pick to the top left corner.

    • Make sure you get in the right gap between the display and the plastic bezel. Do not pry between the bezel and the midframe.

    There will be 2 gaps one under the screen glass(the one you should open) the secod notch down is where a fragile plastic frame is. Stay away from it and use the upper notch

    Abdulrahman Alzahrani - Reply

  29. Huawei P20 Pro Screen Replacement: step 29, image 1 of 2 Huawei P20 Pro Screen Replacement: step 29, image 2 of 2
    • Insert a second opening pick and slide it to the top right corner of the phone.

    • Leave the picks in their places to prevent the adhesive from resealing.

  30. Huawei P20 Pro Screen Replacement: step 30, image 1 of 3 Huawei P20 Pro Screen Replacement: step 30, image 2 of 3 Huawei P20 Pro Screen Replacement: step 30, image 3 of 3
    • Insert a third opening pick at the top right corner of the phone.

    • Slide the opening pick down to the bottom right corner to cut all the adhesive. Leave it at the bottom right corner to prevent the adhesive from resealing.

    • If cutting becomes too difficult, reheat and reapply the iOpener.

  31. Huawei P20 Pro Screen Replacement: step 31, image 1 of 2 Huawei P20 Pro Screen Replacement: step 31, image 2 of 2
    • Insert a fourth opening pick at the bottom right corner.

    • Only slide the tip of the opening pick along the bottom edge of the phone to not damage the home button.

    • Leave the opening pick in the bottom left corner to prevent the adhesive from resealing.

  32. Huawei P20 Pro Screen Replacement: step 32, image 1 of 2 Huawei P20 Pro Screen Replacement: step 32, image 2 of 2
    • Insert a fifth opening pick and slide it along the left edge of the phone to cut the remaining adhesive.

    • Try not to remove the display all the way yet, the display cable is still threaded through the frame and adhered on the opposite side.

  33. Huawei P20 Pro Screen Replacement: step 33, image 1 of 2 Huawei P20 Pro Screen Replacement: step 33, image 2 of 2
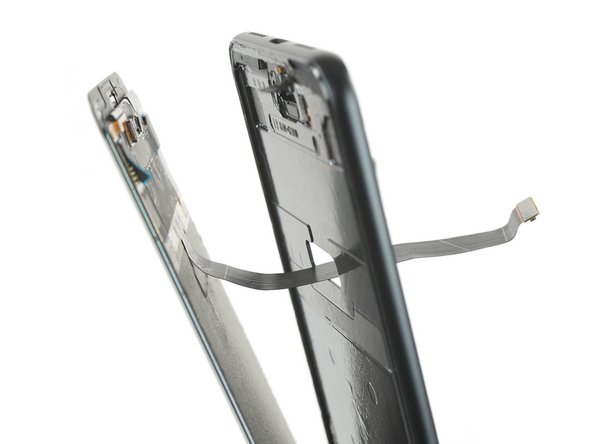
    • Use a pair of tweezers to peel the display flex cable free from the frame.

    • Thread the display flex cable through the gap in the frame and remove the display.

    after this part, even after heating the screen it didn’t come apart in one shot, i had my digitizer, led, and protective all apart and still no access to remove the display flex cable, tore a cable connecting to the screen and now my phone is trash. somehow you managed to bypass this part and magically go to the part where you can see the home button? not happy. “Remove Display” you make it seem so easy yet this is the part that destroyed my phone. Please include the step 33b that we need, thanks

    Bruce Chartrand - Reply

  34. Huawei P20 Pro Screen Replacement, Home button including the fingerprint sensor: step 34, image 1 of 2 Huawei P20 Pro Screen Replacement, Home button including the fingerprint sensor: step 34, image 2 of 2
    • Use an opening pick to open the black flap of the home button ZIF connector.

  35. Huawei P20 Pro Screen Replacement: step 35, image 1 of 2 Huawei P20 Pro Screen Replacement: step 35, image 2 of 2
    • Use a pair of tweezers to gently pull the home button flex cable out of its ZIF connector.

  36. Huawei P20 Pro Screen Replacement: step 36, image 1 of 1
  37. Huawei P20 Pro Screen Replacement: step 37, image 1 of 3 Huawei P20 Pro Screen Replacement: step 37, image 2 of 3 Huawei P20 Pro Screen Replacement: step 37, image 3 of 3
    • Apply a spudger to the backside of the home button and push it out towards the front until it comes off the screen.

    • Carefully grab the home button and thread its flex cable through the gap in the screen.

    • Remove the home button.

    • Before installing a new display, it's important to remove all traces of the old adhesive from the frame, and clean the glued areas with isopropyl alcohol (>90%) and a lint-free cloth.

Conclusion

Compare your new replacement part to the original part—you may need to transfer remaining components or remove adhesive backings from the new part before installing.

The best way to secure the new screen is with adhesive glue. Apply the glue to the plastic frame, then carefully feed the display cable through its gap, align the screen and press it into place.

To reassemble your device, follow these instructions in reverse order.

If possible, turn on your phone and test your repair before installing new adhesive and resealing the phone.

Take your e-waste to an R2 or e-Stewards certified recycler.

Repair didn’t go as planned? Check out our Answers community for troubleshooting help.

40 other people completed this guide.

Dominik Schnabelrauch

Member since: 11/23/16

202,809 Reputation

682 Guides authored

Team

iFixit Member of iFixit

Staff

135 Members

16,732 Guides authored

11 Comments

Most detailed guide I’ve personally seen. And I love the detailed gif like steps, which are positively the best way to explain something. Hands down. Love it. Only the important stuff without the fluff easily accessible for back and forth.

Can’t stress enough how much I want you to keep using this formula.

*Throws happiness at screen* Here you go man

Ion Ion - Reply

I need some help - I have the new LCD but it’s already in its housing. I am confused how to transfer all the existing parts (cameras, boards etc) onto the new frame! CL

Cameron Lawther - Reply

Bonjour,

L’introduction du tuto stipule : “Ouvrir le Huawei P20 Pro endommagera les joints étanches de l'appareil. Si vous ne les remplacez pas, votre téléphone continuera à fonctionner normalement, mais ne sera plus étanche à l'eau. “

Comment remplacer ces joints ? Un produit en particulier ? Est-ce la colle qui fait office de joint étanche ?

Merci pour les infos,

Aurélien C - Reply

ma compagne a cassé son p20 pro.On annoncait 340 € à réparer.Je trouvais ca beaucoup, mais avec la pièce à 220 €, et 1 à 3h de travail, ca s’explique…+ le cout des outils …Il se trouve à 300 € en 2e main ou fin de série….Mais si on est bricoleur, ca peut etre drole. Courage, et merci pour ce tuto !

gilou gilou - Reply

Hello

I have a question.

We done everthing like it is explained. (Thank you for the amazing instruction!)

But now we want to instal the new lcd screen but there is no fixation for the home button (silver thing). And we can remove the old one. Any suggestions?

Illyris Van Der Meer - Reply

Hey, did you ever find a solution for this??

Alex -

The silver bit that looks like it's part of the chassis, does actually pop out. Make sure not to bend it!!

Alex -

Impresionante tutorial. Lo he seguido tal y como se indicaba, y he podido sustituir perfectamente la pantalla y la batería. Un 10. Gracias

Miguel Angel Lafarga - Reply

Hello,

I´ve just replace the battery and the phone doesn´t not turn on. The screen works and the phone is charging ( i can see the percentage in the screen)

any suggestion? Thanks,

iñigo Diaz - Reply

Hey, did you find a solution for this?

My phone is half assembled to test before sealing, and the screen comes on and I can see it charging, including the percentages, however the power button appears to do nothing?

Alex -

Okay, not certain on this however I got it to work.

There appears to be an anti-tamper or open back sensor switch on the main board, located between the screen ribbon cable connection, and the the flash module, right next to the top of the battery. This is a metal clip looking thing, which I pressed down with a blue plastic spudger to make contact with the board, while holding the power button, the phone turned on.

I also had to do this again in order to turn the phone off.

Alex -

Add Comment

View Statistics:

Past 24 Hours: 18

Past 7 Days: 151

Past 30 Days: 680

All Time: 99,657