Introduction
Shucking an external hard drive involves disassembling the external enclosure and harvesting the bare hard drive inside. From there, you can use the drive in your home server, NAS, or PC. This procedure shows you how to remove the hard drive while keeping the enclosure intact.
Shucking external hard drives is a great way to get a lot of storage at a better price. Many external hard drives use server-grade hard drives that cost nearly twice as much if you were to purchase them standalone without the external enclosure.
This guide demonstrates shucking a WD Elements 12TB external hard drive from Western Digital, model WDBWLG0120HBK-NESN, but the procedure can apply to any WD Elements 3.5” external drive.
Note: Before shucking, be sure to boot up the external drive and run a deepscan for bad sectors using a program like HD Tune Pro or Stablebit Scanner. If any errors are detected, return the drive to the retailer or manufacturer.
What you need
-
-
The external enclosure cover is attached to the vented frame with four plastic clips from the inside. Note their locations before moving on to the next step.
-
-
-
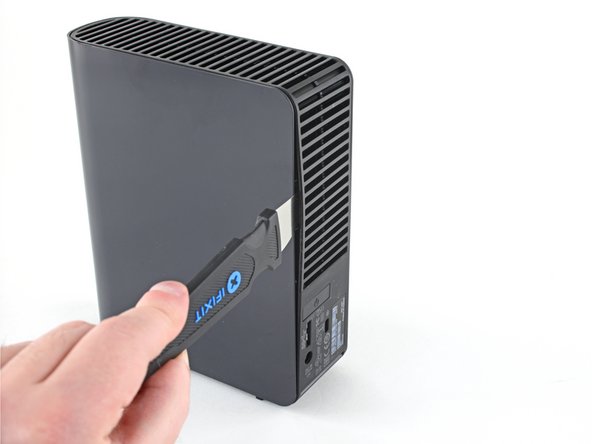
Insert a Jimmy into the seam between the frame and the cover on one side of the drive, roughly halfway between the top and bottom.
-
-
-
With the Jimmy inserted in between the frame and cover, pry the frame outward to release the bottom clip.
-
-
-
Slide the Jimmy up along the seam and pry the frame outward to release the top plastic clip.
-
-
-
Repeat steps 2-4 on the other side of the enclosure.
-
-
-
-
Slide the cover straight off the frame to remove it.
-
-
-
Slide the LED light guide out of the LED slot on the drive's controller board.
-
-
-
Use your hands to push on the four rubber blocks in the corners to unseat the hard drive from the frame.
Wtf. How? This doesn’t work.
Ok, got it, but these directions are terrible. You don’t want to push the blocks out, like the illustration and directions say, because they literally can’t be pushed out. They need to be lifted up while the plastic shell is manipulated until the drive is loosened.
Thanks, Feddy!
-
-
-
Use a Phillips screwdriver to remove the 8.5 mm-long screw securing the small controller board metal bracket to the hard drive.
-
Remove the metal bracket.
-
-
-
Use a Phillips screwdriver to remove the 8.5 mm-long screw securing the controller board to the hard drive.
-
Slide the controller board straight off the end of the hard drive to remove it.
-


Be sure to keep the enclosure—as well as all the parts and screws that accompany it—until the warranty has expired. After that, take them to an R2 or e-Stewards certified recycler. You can also offer them to folks on r/DataHoarder to be reused.
To reassemble the drive and enclosure, follow these instructions in reverse order.
Cancel: I did not complete this guide.
52 other people completed this guide.

15 Comments
I have a question. Is it possible to take a similar drive but smaller capacity like this about and turn it into a portable drive from it having to have a power supply?
It is not possible. The problem is that a 3.5” disk drive (as used in the Elements drive) needs 12 V as well as 5 V, and they need more power than a USB socket can typically deliver. 2.5” disk drives operate from just a 5 V supply, and, having smaller disks inside, they use less power to start up, so they can be run completely through USB.
Hi Craig! My PC sees it as Local Disc (E:) and wants to format it. Can’t do that! Is there a workaround? This was due to a power surge and I think it was just the adaptor power supply that got damaged. Running W10Home21H1 on Lenovo DESKTOP-699CIMO. Intel(R) Core(TM) i7-4790 CPU @ 3.60GHz 3.60 GHz 16,0GB 64bits Any ideas would be greatly appreciated! Cheers, Marco
On Step 14, you see there are no screws to take the HDD cover off. How do you take the cover off the HDD to get inside?
lol + other characters to allow comment
I have a WD element 4T and it will not power up. New cable and power adapter. It was stabilized in one spot for over a year, powered up just to store my movies. Plug it up after two weeks of none use and would not power up, no light inside. What can be done? My other storage drives work fine. By the way, you have the best directions on the web.
I just wrote you about WD Element, it is a 5.0TB Sata/64MB Cache, WD50EZRZ
WDBlue PC Hard Drive. It will not power up. I wonder if I can get a new USB controller board for it? I am only interested in getting information off of the hard drive. Can an "WEme USB 3.0 to SATA Converter Adapter for 2.5 3.5 Inch Hard Drive Disk SSD HDD" work to power it up to retrieve the Data?
Hey Tim, yeah so if you already tried a new power adapter, then it could be a bad controller board. If the drive is already shucked (or you don't mind shucking it), then you can get a SATA to USB adapter to see if the drive will boot up. That will at least rule out the USB controller board.
Very informative explenation wih clear pictures that show EXACLY in which direction to move the tool to safely detach the casing from the clips without breaking them, much better than most YouTube video's.
Only, I've used two old bank cards. That is i.m.o. much safer than using a metal knife or "Jimmy". With two plastic credit- or bank cards or two guitar picks it's almost impossible to damage the case.
Thank you for the guide!
I found that I had a 3 TB Toshiba hdd lying around which I put in one of WD Elements enclosures I was about to recycle. Now I have a fully stacked NAS as well as an external hdd :)
And I'm keeping a controller board + wall wart to be used as simple usb-to-sata device.
Hi.
Is possible on this box, change the HDD. For example. I have WD Elements to 4Tb and have another ( Seagate ) 12Tb and I thinking to change the HDD 4Tb for 12Tb using the same case.
Is possible?
Thanks a lot
Did it successfully with fairly limited experience of taking electronics apart (other than joycons a few times), didn't even break any clips. Worked fine for me installing it in a PC without taping over anything.
Can I remove the drive and install in a new enclosure? My WD 8tb no longer mounts on my mac. I think it's probably the usb port or whatever communicates with the port.