
How to Shorten Cordless Blinds to Fit a Window

What you need

  1. How to Shorten Cordless Blinds to Fit a Window, How to Shorten Cordless Blinds to Fit a Window: step 1, image 1 of 2 How to Shorten Cordless Blinds to Fit a Window, How to Shorten Cordless Blinds to Fit a Window: step 1, image 2 of 2
    • Extend the blinds to their full length.

  2. How to Shorten Cordless Blinds to Fit a Window: step 2, image 1 of 3 How to Shorten Cordless Blinds to Fit a Window: step 2, image 2 of 3 How to Shorten Cordless Blinds to Fit a Window: step 2, image 3 of 3
    • Figure out exactly how long you want the blinds to be in the window.

    • Cut the blind off below the very last blind that you want in the window using your scissors and continue cutting the excess blinds off until you reach the bottom rail.

    • Be very careful not to cut any of the strings while you cut off the blinds or you could ruin your blinds.

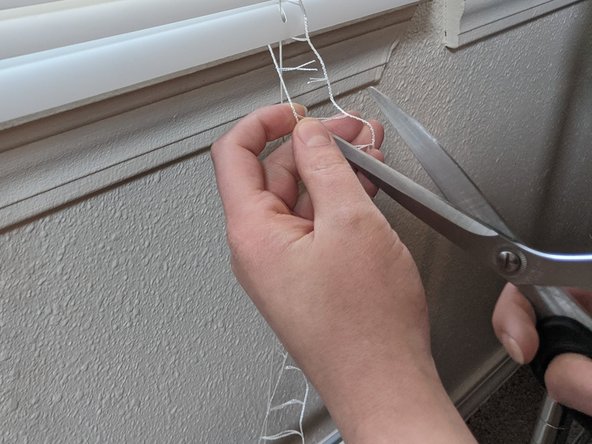
    • You should now have a single, tight string in the middle, and loose strings in the shape of a ladder.

    • There will only be a tight string in the sections where there was a hole in the blinds; the other sections will only have the loose ladder strings.

  3. How to Shorten Cordless Blinds to Fit a Window: step 3, image 1 of 3 How to Shorten Cordless Blinds to Fit a Window: step 3, image 2 of 3 How to Shorten Cordless Blinds to Fit a Window: step 3, image 3 of 3
    • Cut the center of the horizontal strings connecting the ladder that were holding the excess blinds in place, essentially splitting the ladder in half but still avoiding the tight center string attached to the plug.

    • For the sections that don't have the tight center string connected to the plug, you still need to cut the ladder but don't need to worry about cutting the string connected to the plug since there isn't one.

  4. How to Shorten Cordless Blinds to Fit a Window: step 4, image 1 of 3 How to Shorten Cordless Blinds to Fit a Window: step 4, image 2 of 3 How to Shorten Cordless Blinds to Fit a Window: step 4, image 3 of 3
    • Using a flathead screwdriver, gently pull the plugs out of the bottom rail to release the rest of the ladder.

    • Finish cutting the ladder that was inside of the plug in half until it is completely separated.

    • The tight string attached to the plug will now be the only thing keeping the bottom rail attached to the blinds.

    • Any sections that do not have the tight center string will have a loose plug, so you will need to set those plugs off to the side for later.

  5. How to Shorten Cordless Blinds to Fit a Window: step 5, image 1 of 1
    • Raise the bottom rail up to the bottom of the last blind, keeping the loose front pieces of the ladder strings in front and the loose back pieces of the ladder strings in the back.

  6. How to Shorten Cordless Blinds to Fit a Window: step 6, image 1 of 2 How to Shorten Cordless Blinds to Fit a Window: step 6, image 2 of 2
    • Using your scissors, cut the excess string off of both sides of the loose ladder strings, leaving about 2-3 inches of string (or 2-3 segments of the ladder) hanging off both sides.

  7. How to Shorten Cordless Blinds to Fit a Window: step 7, image 1 of 2 How to Shorten Cordless Blinds to Fit a Window: step 7, image 2 of 2
    • Hold the plug between your fingers to keep the center tight center string attached to the plug out of the way.

    • Grab both sides of the shortened ladder strings, pinching them with two fingers using the same hand that you are holding the plug so that they are evenly aligned.

  8. How to Shorten Cordless Blinds to Fit a Window: step 8, image 1 of 2 How to Shorten Cordless Blinds to Fit a Window: step 8, image 2 of 2
    • Using your other hand, grab both sides of the loose ladder strings and twist them together next to the hole the plug was in.

    • Stuff the twisted strings inside of the hole that the plug was in.

  9. How to Shorten Cordless Blinds to Fit a Window: step 9, image 1 of 2 How to Shorten Cordless Blinds to Fit a Window: step 9, image 2 of 2
    • Allow the plug to slide back in the hole to lock the twisted strings in place.

    • For the sections that don't have the tight center string attached to the plug, you just need to take the loose plug that you set to the side in step 4 and push that in the hole to lock everything in place.

    • If you struggle to get the plug back into the hole with your fingers, you can use the handle of your flathead screwdriver to push it in.

Finish Line

Krista Carnaroli

Member since: 11/17/21

169 Reputation

1 Guide authored

One Comment

Is there any limit to the number of horizontal slats that can be removed? I have a 48" long 21 1/2" bind that I want to shorten to 22"

Cliff Blondes - Reply

Add Comment

View Statistics:

Past 24 Hours: 7

Past 7 Days: 69

Past 30 Days: 247

All Time: 4,722