Introduction
Does your Instant Pot show the dreaded C6 error while making sad, alarming beeps? Follow this guide to diagnose what’s wrong and learn how to fix it!
The C6, C6L, and C6H errors means that one of the pressure sensors isn’t working. Most of the time, it’s due to a buildup on the sensor contacts. Cleaning the contacts will likely fix the problem.
This guide was written with an Instant Pot DUO80, but the general procedure can be applied to many electric pressure cookers because most use similar electronics and sensors.
What you need
-
-
Flip the Instant Pot upside down.
-
Use a T15 Torx driver to remove the screw securing the bottom plate.
-
Twist and remove the bottom plate.
-
-
-
The T6L (low pressure) sensor and its connector. Some models may not have this.
-
The T6H (high pressure) sensor and its connectors.
-
The screws underneath the white resin are calibration screws.
-
-
-
Use a spudger or your finger to firmly press the top of a sensor. You should hear a loud click, signifying that the bimetal strips in the sensor are flexing properly.
-
Repeat for the second sensor.
-
If you don't hear a click, the contacts may be fused together, or the bimetal material is worn out. If they are worn, you'll need to replace the sensor.
-
-
-
Use pliers or your fingers to lift and disconnect one of the sensor's spade connectors from the circuit board.
-
These connectors can be stubborn. Gently wiggle the connector as you pull to loosen it.
-
-
-
-
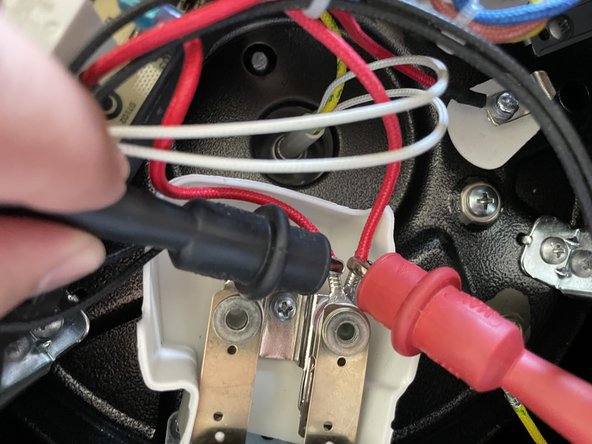
Attach a multimeter lead to both exposed ends of the sensor wires, making sure the leads don't touch each other.
-
Set your multimeter/ohmmeter to resistance mode, or continuity mode.
-
-
-
If the meter shows a high resistance or no continuity, it could mean that the sensor contacts are dirty. Double-check your meter contacts and make sure they're grasping onto the wires.
-
Use a spudger or your finger to firmly press on the top of the sensor until it clicks.
-
The meter should change to show no continuity (0L, in my meter's case). If it doesn't, there is a potential electrical short—the contacts may be fused, or you may need to replace the sensor.
-
-
-
Disconnect the low pressure sensor by squeezing its circuit board connector to disengage the lock, then pull straight up.
-
Attach a multimeter lead to both exposed ends of the sensor wires, making sure the leads don't touch each other.
-
Set the meter to resistance/continuity and test for continuity, when the sensor is resting, and when it's depressed.
-
-
-
If your tests suggest that you may have dirty contacts, or you suspect the contacts have fused, follow the next steps to remove the sensors to clean them.
-
Use a Phillips screwdriver to remove the screw securing the sensors to the Instant Pot.
-
Lift the sensor assembly out of its recess.
-
-
-
Press down on the sensor to open the contacts.
-
Use some sandpaper, a file, or electrical contact cleaner to clean the contacts. Be sure to clean both mating surfaces.
-
-
-
Use a multimeter to test the sensors for proper operation before you reassemble your Instant Pot.
-