Introduction
Not sure what to do with all the adhesive strips in your back cover kit? You’ve come to the right place! This guide shows how to use the back cover adhesive kit for phones with glass backs (S7 and newer). It also includes instructions on how to transfer and install various back cover components, such as the rear bezel and fingerprint sensor.
You may not need to use all the adhesive strips included in the kit. If you are transferring the fingerprint sensor, you may need some double-sided tape such as Tesa tape.
For a list of adhesive strips for the Galaxy S phone, [[ invalid parts link ]].
When applying adhesive strips like these, here are some general tips:
- Generally, adhesives strips have a colored side and a non-colored (paper or clear plastic) side. The non-colored side determines which surface the strip should be applied to first.
- To make adhesive application easier, you can align an unexposed strip to its intended position on the phone, then tape one edge down to hold the strip in place. This will allow you to peel away the plastic liners and expose the adhesive without losing alignment.
What you need
-
-
To install the battery adhesive, follow this guide.
-
To transfer and install the fingerprint sensor and gasket, start with the next step.
-
To transfer and install the rear bezel, skip to step 5.
-
To install the back cover support adhesive, skip to step 9.
-
To install the back cover perimeter adhesive, skip to step 13.
-
-
-
Heat an iOpener and apply it to the fingerprint sensor for one minute.
-
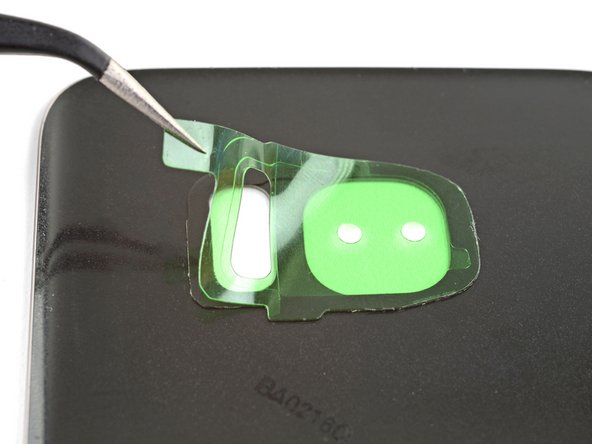
Use an opening tool to gently pry the fingerprint sensor at the lower seam, where it contacts the back cover.
-
Do not pry at the upper seam, which is the fingerprint gasket seam.
-
-
-
Use an opening tool to pry the fingerprint sensor off of the gasket.
-
Remove the colored plastic liner on the replacement gasket to expose the adhesive.
-
Carefully align and lay the fingerprint sensor onto the sticky side of the gasket.
-
Once aligned, press down firmly with your finger to bond the adhesive.
-
-
-
To affix the fingerprint sensor to the new back cover, use a custom cut adhesive, or line the perimeter of the sensor with double-sided tape such as Tesa tape.
-
Align the fingerprint sensor in the back cover cutout and press down firmly with your finger to bond the adhesive.
-
-
-
Heat an iOpener and apply it to the rear bezel for a minute.
-
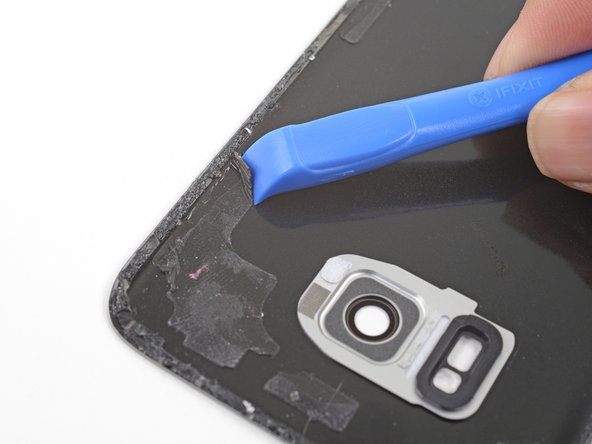
Starting from the outward-facing side of the back cover, push the bezel inwards with a finger to loosen the bezel from its cutout.
-
Alternatively, you can pry around the bezel with an opening tool to loosen it from the back cover.
-
-
-
-
Remove the bezel.
-
Use an opening tool and some high concentration isopropyl alcohol to remove any remaining adhesive residue on the bezel.
-
-
-
Peel away the clear plastic liner from the bezel adhesive strip to expose the adhesive.
-
Carefully align the adhesive to the back cover's cutout.
-
Once aligned, press the adhesive in place with your finger.
-
Peel away the colored plastic liner from the adhesive to expose its surface.
-
-
-
Carefully align and set the bezel over the adhesive.
-
Squeeze the bezel perimeter with your fingers to set the adhesive.
-
Clean the bezel glass with a microfiber cloth.
-
-
-
Figure out how the support strip aligns with the surfaces by matching the adhesive strip's contours with the adhesive residue and the phone frame.
-
Use an opening tool and high concentration isopropyl alcohol to remove all adhesive residue from the phone frame.
-
If you are re-using the back cover, remove all adhesive residue from the back cover.
-
-
-
Peel the clear liner off of the support adhesive strip to expose the adhesive.
-
Carefully lay the strip sticky side up on top of the phone frame, being careful not to touch the sticky surface.
-
Align the adhesive strip on the phone frame so that the adhesive contours matches the frame's.
-
If you have two small support strips, repeat the process for both strips.
-
-
-
Carefully lower the back cover onto the exposed support strips. This ensures that the adhesive is transferred onto the back cover in its proper position.
-
-
-
Remove the back cover.
-
Use fingers to press the support adhesive firmly onto the back cover.
-
Peel away the colored liner to expose the adhesive.
-
-
-
The remaining steps show how to install the back cover perimeter adhesive.
-
Use an opening tool and high concentration isopropyl alcohol to remove all adhesive residue from the phone frame.
-
If you are re-using the back cover, remove all adhesive residue from the back cover.
-
-
-
Peel away the clear liner from the perimeter adhesive strip to expose the adhesive.
-
Hold the strip by its tabs and carefully line up a long edge of the adhesive to the edge of the back cover.
-
Set the adhesive onto the back cover and press it onto the cover with your fingers.
-
Peel away the colored liner from the perimeter adhesive strip to expose the adhesive.
-
-
-
To seal the phone, align and set the back cover onto the phone frame.
-
Apply pressure to the phone perimeter with your fingers.
-
Place some books on top of the back cover for half an hour to help the adhesive bond.
-