
Honda Rear Tine Tiller FRC800K1A Inner Belt Cover Replacement

Prerequisite Only
This guide is only intended to be used as a prerequisite for other guides. It's incomplete by itself.

What you need

  1. Honda Rear Tine Tiller FRC800K1A Inner Belt Cover Replacement, Disconnect the spark plug wire: step 1, image 1 of 2 Honda Rear Tine Tiller FRC800K1A Inner Belt Cover Replacement, Disconnect the spark plug wire: step 1, image 2 of 2
    • Before you begin the repair, disconnect the spark plug wire.

    • Firmly grip the base of the connector and pull it away from the spark plug to disconnect it.

  2. Honda Rear Tine Tiller FRC800K1A Inner Belt Cover Replacement, Turn off the fuel valve: step 2, image 1 of 1
    • Flip the fuel valve switch to the off position.

  3. Honda Rear Tine Tiller FRC800K1A Inner Belt Cover Replacement, Remove outer belt cover: step 3, image 1 of 1
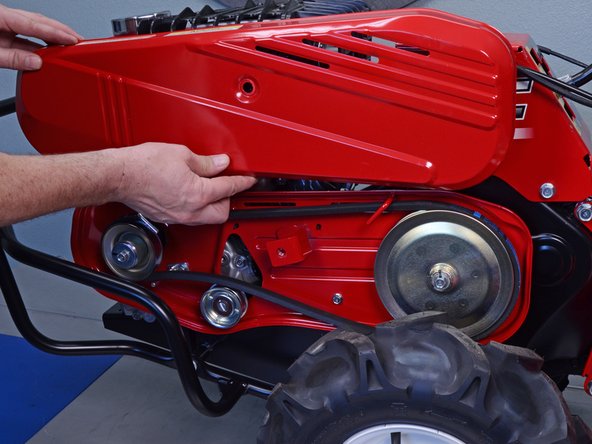
    • Use a 14 mm socket to remove the bolt securing the outer belt cover.

  4. Honda Rear Tine Tiller FRC800K1A Inner Belt Cover Replacement: step 4, image 1 of 3 Honda Rear Tine Tiller FRC800K1A Inner Belt Cover Replacement: step 4, image 2 of 3 Honda Rear Tine Tiller FRC800K1A Inner Belt Cover Replacement: step 4, image 3 of 3
    • Tilt the outer belt cover down and pull it off of the lip on the inner belt cover to remove it.

  5. Honda Rear Tine Tiller FRC800K1A Inner Belt Cover Replacement, Loosen the transmission pulley bolt: step 5, image 1 of 3 Honda Rear Tine Tiller FRC800K1A Inner Belt Cover Replacement, Loosen the transmission pulley bolt: step 5, image 2 of 3 Honda Rear Tine Tiller FRC800K1A Inner Belt Cover Replacement, Loosen the transmission pulley bolt: step 5, image 3 of 3
    • This step may require two people.

    • Pull the tine engagement lever to put belt tension on the transmission pulley.

    • With the belt taut, use a 12 mm socket to loosen the transmission pulley bolt without fully removing it.

    • The pulley will rotate with the bolt and the bolt will not be able to be removed if belt tension is not applied.

  6. Honda Rear Tine Tiller FRC800K1A Inner Belt Cover Replacement, Remove the V-belt: step 6, image 1 of 3 Honda Rear Tine Tiller FRC800K1A Inner Belt Cover Replacement, Remove the V-belt: step 6, image 2 of 3 Honda Rear Tine Tiller FRC800K1A Inner Belt Cover Replacement, Remove the V-belt: step 6, image 3 of 3
    • Push the V-belt towards the transmission pulley to release tension.

    • Slip the V-belt off of the groove in the pulley.

  7. Honda Rear Tine Tiller FRC800K1A Inner Belt Cover Replacement: step 7, image 1 of 3 Honda Rear Tine Tiller FRC800K1A Inner Belt Cover Replacement: step 7, image 2 of 3 Honda Rear Tine Tiller FRC800K1A Inner Belt Cover Replacement: step 7, image 3 of 3
    • Pull the V-belt down and out of the way of the two-prong belt guide.

    • Push the V-belt around and off of the motor pulley to remove.

  8. Honda Rear Tine Tiller FRC800K1A Inner Belt Cover Replacement, Remove the belt guides: step 8, image 1 of 1
    • Use a 12 mm socket to remove the two bolts securing the belt guides to the inner belt cover.

    • Use a 10 mm socket to remove the bolt securing the inner belt cover to the frame.

  9. Honda Rear Tine Tiller FRC800K1A Inner Belt Cover Replacement, Lower the guard: step 9, image 1 of 2 Honda Rear Tine Tiller FRC800K1A Inner Belt Cover Replacement, Lower the guard: step 9, image 2 of 2
    • Use a 14 mm socket to loosen the two bolts securing the guard to the frame.

    • These bolts have corresponding 14 mm nuts on their opposite ends. You will need to keep the bolts steady with a wrench or socket for the nuts to become loose.

    • Remove both nuts, but do not remove the bolts yet.

  10. Honda Rear Tine Tiller FRC800K1A Inner Belt Cover Replacement: step 10, image 1 of 2 Honda Rear Tine Tiller FRC800K1A Inner Belt Cover Replacement: step 10, image 2 of 2
    • Remove the frontmost guard bolt.

  11. Honda Rear Tine Tiller FRC800K1A Inner Belt Cover Replacement: step 11, image 1 of 2 Honda Rear Tine Tiller FRC800K1A Inner Belt Cover Replacement: step 11, image 2 of 2
    • Grab the guard and lower it to the ground, pivoting it on the rear guard bolt.

  12. Honda Rear Tine Tiller FRC800K1A Inner Belt Cover Replacement, Remove the pulley bolts: step 12, image 1 of 1
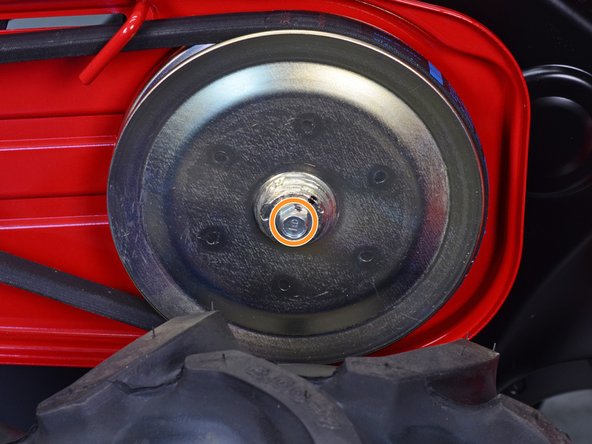
    • Use a 12 mm socket to remove the motor and transmission pulley bolts.

    • Hold the pulleys steady to more easily remove the bolts.

  13. Honda Rear Tine Tiller FRC800K1A Inner Belt Cover Replacement, Remove the motor pulley: step 13, image 1 of 2 Honda Rear Tine Tiller FRC800K1A Inner Belt Cover Replacement, Remove the motor pulley: step 13, image 2 of 2
    • Remove the motor pulley.

    • Keep track of the key—which may fall out on its own—and keep it with the motor pulley.

  14. Honda Rear Tine Tiller FRC800K1A Inner Belt Cover Replacement, Remove the transmission pulley: step 14, image 1 of 3 Honda Rear Tine Tiller FRC800K1A Inner Belt Cover Replacement, Remove the transmission pulley: step 14, image 2 of 3 Honda Rear Tine Tiller FRC800K1A Inner Belt Cover Replacement, Remove the transmission pulley: step 14, image 3 of 3
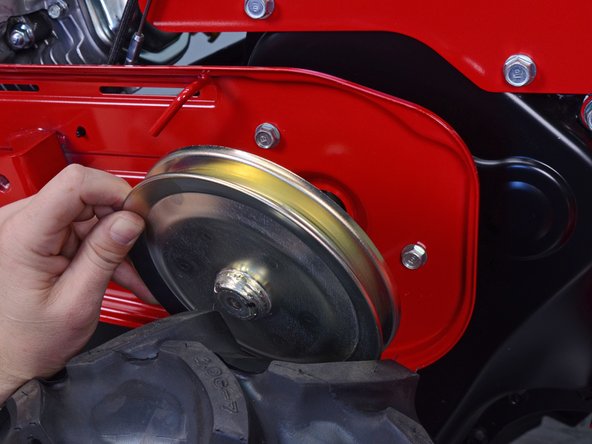
    • Pull the transmission pulley straight off of the splined shaft to remove.

  15. Honda Rear Tine Tiller FRC800K1A Inner Belt Cover Replacement, Remove the tensioner pulley: step 15, image 1 of 3 Honda Rear Tine Tiller FRC800K1A Inner Belt Cover Replacement, Remove the tensioner pulley: step 15, image 2 of 3 Honda Rear Tine Tiller FRC800K1A Inner Belt Cover Replacement, Remove the tensioner pulley: step 15, image 3 of 3
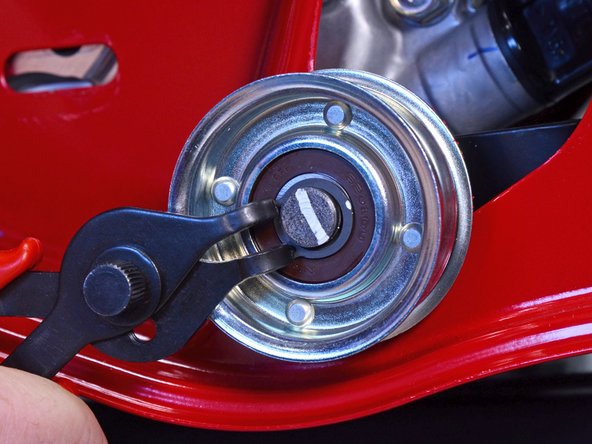
    • Use snap ring pliers to remove the snap ring securing the tensioner pulley to its shaft.

  16. Honda Rear Tine Tiller FRC800K1A Inner Belt Cover Replacement: step 16, image 1 of 2 Honda Rear Tine Tiller FRC800K1A Inner Belt Cover Replacement: step 16, image 2 of 2
    • Remove the tensioner pulley.

  17. Honda Rear Tine Tiller FRC800K1A Inner Belt Cover Replacement, Remove the wire clips: step 17, image 1 of 3 Honda Rear Tine Tiller FRC800K1A Inner Belt Cover Replacement, Remove the wire clips: step 17, image 2 of 3 Honda Rear Tine Tiller FRC800K1A Inner Belt Cover Replacement, Remove the wire clips: step 17, image 3 of 3
    • Use needle nose pliers to remove the three wire clips securing various cables to the back of the inner belt cover.

  18. Honda Rear Tine Tiller FRC800K1A Inner Belt Cover Replacement: step 18, image 1 of 1
    • Use a 12 mm socket to remove the two remaining inner belt cover bolts behind the transmission pulley.

  19. Honda Rear Tine Tiller FRC800K1A Inner Belt Cover Replacement, Remove the inner belt cover: step 19, image 1 of 3 Honda Rear Tine Tiller FRC800K1A Inner Belt Cover Replacement, Remove the inner belt cover: step 19, image 2 of 3 Honda Rear Tine Tiller FRC800K1A Inner Belt Cover Replacement, Remove the inner belt cover: step 19, image 3 of 3
    • Pull the inner belt cover clear of the motor and transmission shafts.

    • Remove the inner belt cover.

Conclusion

To reassemble your device, follow these instructions in reverse order.

Carsten Frauenheim

Member since: 03/10/20

112,854 Reputation

338 Guides authored

Team

iFixit Member of iFixit

Staff

135 Members

16,732 Guides authored

0 Comments

Add Comment

View Statistics:

Past 24 Hours: 0

Past 7 Days: 0

Past 30 Days: 0

All Time: 38