
HP ZBook 15 Fan and Heatsink Replacement

What you need

  1. HP ZBook 15 Fan and Heatsink Replacement, Battery: step 1, image 1 of 2 HP ZBook 15 Fan and Heatsink Replacement, Battery: step 1, image 2 of 2
    • Flip the laptop over.

    • Slide the lever with the battery symbol beside it firmly until the battery pops out.

    • Remove the battery from the laptop.

  2. HP ZBook 15 Fan and Heatsink Replacement, Back Cover: step 2, image 1 of 1
    • Slide the right lever firmly to the right.

    • Slide the cover towards yourself to remove it.

  3. HP ZBook 15 Fan and Heatsink Replacement, Keyboard: step 3, image 1 of 1
    • Remove the two 16mm screws with a Phillips #0 screwdriver.

    • There are two sets of threads to get past. Once unscrewed from the first thread, lift the screw up until it hits the next set and begin unscrewing again.

  4. HP ZBook 15 Fan and Heatsink Replacement: step 4, image 1 of 3 HP ZBook 15 Fan and Heatsink Replacement: step 4, image 2 of 3 HP ZBook 15 Fan and Heatsink Replacement: step 4, image 3 of 3
    • Do not try to pry the keyboard from the bottom. The keyboard is attached by clips on the left, top, and right side. Metal inserts on the bottom side lock the keyboard in place until they are slid up and out.

    • Be careful not to scratch or chip the computer when prying. If you have a plastic tool that is long enough to gain leverage, use that instead of a metal tool.

    • There are ribbons secured underneath so be careful not to pull the keyboard out too hard, breaking the connections to the ribbons.

    • Flip the laptop over so the keyboard is visible.

    • Insert the spudger under the left side of the keyboard.

    • Carefully raise the side of the keyboard and firmly pull the left corner of the keyboard until it pops up.

    • Run your fingers under the edges of the keyboard along the top edge of the keyboard, from the top left to the top right, to separate it from the remaining clips.

    • Carefully slide the keyboard up toward the screen and out of the case.

  5. HP ZBook 15 Fan and Heatsink Replacement: step 5, image 1 of 3 HP ZBook 15 Fan and Heatsink Replacement: step 5, image 2 of 3 HP ZBook 15 Fan and Heatsink Replacement: step 5, image 3 of 3
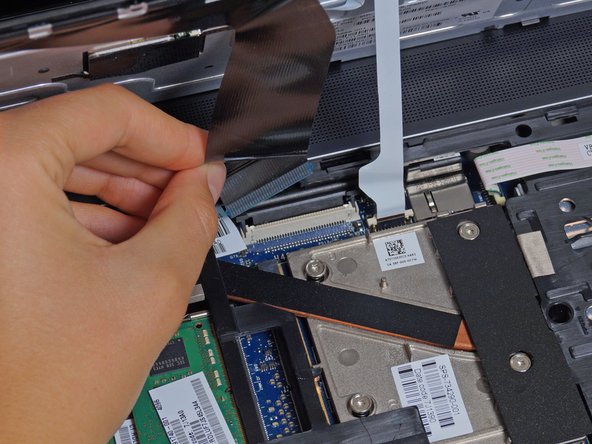
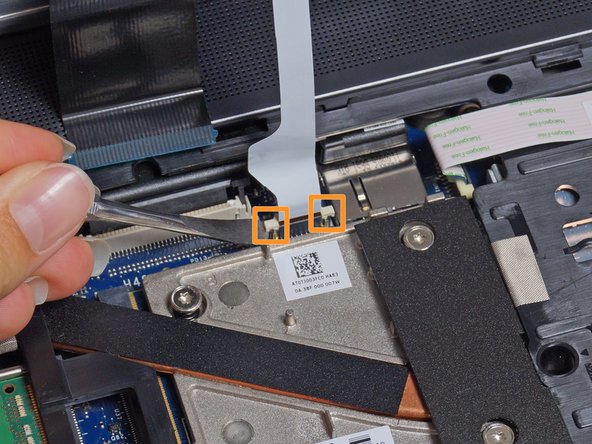
    • Gently lift the two tabs on either side of the black ribbon with a spudger until the ribbon comes loose.

    • Disconnect the black ribbon by pulling the blue tab hanging off of it.

    • Repeat with the white ribbon.

  6. HP ZBook 15 Fan and Heatsink Replacement, Optical Drive: step 6, image 1 of 1
    • Unscrew the captive screw shown near the battery compartment with a Phillips #0 screwdriver.

    • The screw does not come out all the way and stays attached to the computer.

  7. HP ZBook 15 Fan and Heatsink Replacement: step 7, image 1 of 3 HP ZBook 15 Fan and Heatsink Replacement: step 7, image 2 of 3 HP ZBook 15 Fan and Heatsink Replacement: step 7, image 3 of 3
    • Push outward on the metal optical drive tab with a metal spudger to unlock the drive from its position in the case.

    • Once the drive is protruding from the side of the computer, pull it the rest of the way out.

  8. HP ZBook 15 Fan and Heatsink Replacement, HP ZBook 15 Hard Drive Disassembly: step 8, image 1 of 1
    • Unscrew the three captive screws holding the drive in place with a Phillips #0 screwdriver.

    • The screws will remain inside the springs of the hard drive caddy cover.

  9. HP ZBook 15 Fan and Heatsink Replacement: step 9, image 1 of 2 HP ZBook 15 Fan and Heatsink Replacement: step 9, image 2 of 2
    • Pull the green tab away from the metal casing and lift the drive out.

  10. HP ZBook 15 Fan and Heatsink Replacement, Fan and Heatsink: step 10, image 1 of 1
    • Unscrew two 3mm screws from the hard drive bay with a Phillips #0 screwdriver.

  11. HP ZBook 15 Fan and Heatsink Replacement: step 11, image 1 of 1
    • Remove the eight 6mm screws with a T8 Torx screwdriver.

  12. HP ZBook 15 Fan and Heatsink Replacement: step 12, image 1 of 1
    • Rotate the laptop so the battery compartment is in front of you.

    • Remove the four 4 mm screws under the battery with a T8 Torx screwdriver.

  13. HP ZBook 15 Fan and Heatsink Replacement: step 13, image 1 of 1
    • Remove three more 4mm screws from the optical drive compartment with a T8 Torx screwdriver.

  14. HP ZBook 15 Fan and Heatsink Replacement: step 14, image 1 of 1
    • Flip the laptop so it is keyboard side up.

    • Remove the 6mm screw with a T8 Torx screwdriver.

  15. HP ZBook 15 Fan and Heatsink Replacement: step 15, image 1 of 1
    • Use a spudger to lift the edges of the connector up so the white ribbon can slide out.

    • Pull the ribbons out by the blue plastic tab on the cable at each connector site.

  16. HP ZBook 15 Fan and Heatsink Replacement: step 16, image 1 of 1
    • There are still ribbons that need to be removed before the top cover separates completely; do not yank the cover off after it is separated to prevent ripping the cables out.

    • Start at the front of the latop and run a plastic spudger between the top cover and the case to undo the clips holding it together

    • If there is difficulty separating the top cover from the computer, do not force it. You might have missed a screw.

  17. HP ZBook 15 Fan and Heatsink Replacement: step 17, image 1 of 2 HP ZBook 15 Fan and Heatsink Replacement: step 17, image 2 of 2
    • Angle the top cover so you can see the white ribbons shown in the picture.

    • Carefully slide the top cover toward you to expose the white ribbon connectors.

    • Use a spudger to lift the connectors and slide out both ribbons.

  18. HP ZBook 15 Fan and Heatsink Replacement: step 18, image 1 of 1
    • Unscrew the eight captive screws with a T9 Torx screwdriver.

    • Undo the screws in the order represented by the small numbers next to the screw on the heat sink assembly. Repeat this while reassembling to prevent damage to the components underneath.

    • These screws will also not unscrew all the way.

  19. HP ZBook 15 Fan and Heatsink Replacement: step 19, image 1 of 1
    • Gently pull up on the 4 pin fan power connector cable to unplug it from the system.

  20. HP ZBook 15 Fan and Heatsink Replacement: step 20, image 1 of 1
    • Gently lift the fan and heatsink assembly straight up and out so you do not smear the thermal paste.

    • Thermal paste is a heat conductive gel applied to the underside of the heatsinks. Be careful not to wipe any off or else the components within the laptop will not cool properly and could become damaged. It also makes a big sticky mess if it smears or gets on any other components.

Grant Terris

Member since: 01/30/15

2,828 Reputation

12 Guides authored

Team

Cal Poly, Team 8-43, Amido Winter 2015 Member of Cal Poly, Team 8-43, Amido Winter 2015

CPSU-AMIDO-W15S8G43

4 Members

15 Guides authored

View Statistics:

Past 24 Hours: 4

Past 7 Days: 26

Past 30 Days: 123

All Time: 28,979