
HP Stream 11-d008TU Battery Replacement

What you need

  1. HP Stream 11-d008TU Battery Replacement, Rubber Feet Removal: step 1, image 1 of 3 HP Stream 11-d008TU Battery Replacement, Rubber Feet Removal: step 1, image 2 of 3 HP Stream 11-d008TU Battery Replacement, Rubber Feet Removal: step 1, image 3 of 3
    • Use a prying tool to pry the 2 rubber feet off closest to the hinge of the device

    • Repeat this process for the other side of the device

    • The bottom rubber feet do not have hidden screws underneath them, and as such, they are unnecessary to remove

  2. HP Stream 11-d008TU Battery Replacement, Screw removal: step 2, image 1 of 2 HP Stream 11-d008TU Battery Replacement, Screw removal: step 2, image 2 of 2
    • Remove the 11x 5mm Phillips PH-0 screws (circled)

  3. HP Stream 11-d008TU Battery Replacement, Keyboard Unclipping: step 3, image 1 of 3 HP Stream 11-d008TU Battery Replacement, Keyboard Unclipping: step 3, image 2 of 3 HP Stream 11-d008TU Battery Replacement, Keyboard Unclipping: step 3, image 3 of 3
    • Use your finger to pry the outer blue shell over the keyboard

    • Continue this process around the edges of the device

    • You may have to use a prying tool to pry the harder edges such as around the I/O ports

    • Do not lift the keyboard once all the clips are undone, as there are still various cables connected

  4. HP Stream 11-d008TU Battery Replacement, Keyboard removal: step 4, image 1 of 3 HP Stream 11-d008TU Battery Replacement, Keyboard removal: step 4, image 2 of 3 HP Stream 11-d008TU Battery Replacement, Keyboard removal: step 4, image 3 of 3
    • Disconnect the power button connector by peeling back the protective tape, using your fingernail to flip the white retaining clip back, and pulling the ribbon cable out

    • Disconnect the touchpad connector by using your fingernail to flip the black retaining clip back, and pulling the ribbon cable out

    • Disconnect the keyboard connector by using your fingernail to flip the black retaining clip back, and pulling the ribbon cable out

    • Your keyboard assembly is now safe to remove

  5. HP Stream 11-d008TU Battery Replacement, Battery Connector: step 5, image 1 of 3 HP Stream 11-d008TU Battery Replacement, Battery Connector: step 5, image 2 of 3 HP Stream 11-d008TU Battery Replacement, Battery Connector: step 5, image 3 of 3
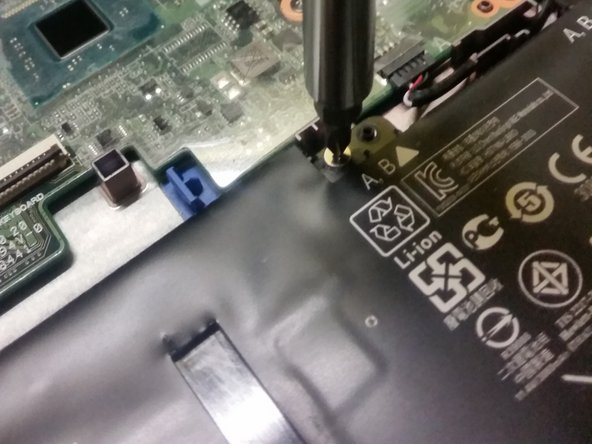
    • Locate the white plastic connector on the motherboard

    • Peel back the black tape holding the cable's wires in place

    • Pull the white connector out by puling the white plastic away from the connector

    • Do not grab the connector by the wires

  6. HP Stream 11-d008TU Battery Replacement, Unscrew Battery: step 6, image 1 of 2 HP Stream 11-d008TU Battery Replacement, Unscrew Battery: step 6, image 2 of 2
    • Remove 4x PH-0 Philips head 3mm screws (circled)

  7. HP Stream 11-d008TU Battery Replacement: step 7, image 1 of 3 HP Stream 11-d008TU Battery Replacement: step 7, image 2 of 3 HP Stream 11-d008TU Battery Replacement: step 7, image 3 of 3
    • Lift the battery out of the case vertically

Conclusion

To reassemble your device, follow these instructions in reverse order.

One other person completed this guide.

CONVERSION

Member since: 03/07/20

1,227 Reputation

8 Guides authored

Team

Australia Member of Australia

Community

3 Members

11 Guides authored

0 Comments

Add Comment

View Statistics:

Past 24 Hours: 0

Past 7 Days: 2

Past 30 Days: 11

All Time: 231