HP Pavilion x360 m3-u001dx Fan Replacement

What you need

  1. HP Pavilion x360 m3-u001dx Fan Replacement, Keyboard: step 1, image 1 of 1
    • Shut down the computer.

    • Disconnect the power and all external devices connected to the computer.

    • Working on your device while it is turned on may result in electric shock.

  2. HP Pavilion x360 m3-u001dx Fan Replacement: step 2, image 1 of 2 HP Pavilion x360 m3-u001dx Fan Replacement: step 2, image 2 of 2
    • Use a Metal Spudger and remove the rubber foot closet from the bottom of the laptop.

  3. HP Pavilion x360 m3-u001dx Fan Replacement: step 3, image 1 of 1
    • Remove all of the screws located on the bottom of the laptop:

    • 5 Phillips 2.4 x 5.7 mm screws

    • 5 Phillips 2.0 x 5.0 mm screws

    • Make special note of each screw and screw lock size and location during removal and replacement.

  4. HP Pavilion x360 m3-u001dx Fan Replacement: step 4, image 1 of 1
    • Turn the computer over onto its base, with the computer open and the keyboard facing upward.

  5. HP Pavilion x360 m3-u001dx Fan Replacement: step 5, image 1 of 2 HP Pavilion x360 m3-u001dx Fan Replacement: step 5, image 2 of 2
    • The keyboard is attached internally by clips. Use a small amount of force when removing the keyboard.

    • Use the Plastic Opening Tool to separate the keyboard from the base of the laptop.

  6. HP Pavilion x360 m3-u001dx Fan Replacement: step 6, image 1 of 1
    • Raise the keyboard slightly to access the touch pad and keyboard cables.

    • Raising the keyboard too far or with excessive force may cause damage to the keyboard, touch pad cables, or their connectors.

  7. HP Pavilion x360 m3-u001dx Fan Replacement: step 7, image 1 of 1
    • Disconnect the ribbon cables attaching the touch pad and keyboard to the system board (motherboard).

    • Using the Heavy-Duty Spudger lift up the plastic locks connecting the ribbon cable to the motherboard.

    • Use the blue plastic tab on the ribbon cable to pull it out from the lock on the motherboard.

  8. HP Pavilion x360 m3-u001dx Fan Replacement: step 8, image 1 of 1
    • Lift the keyboard away from the base of the laptop.

  9. HP Pavilion x360 m3-u001dx Fan Replacement, Battery: step 9, image 1 of 1
    • Using the Phillips 00 Screwdriver, remove 6 Phillips 2.0 x 4.6 mm screws from the perimeter of the battery.

    • Make special note of each screw and screw lock size and location during removal and replacement.

  10. HP Pavilion x360 m3-u001dx Fan Replacement: step 10, image 1 of 1
    • Carefully lift the battery up from lower right corner and disconnect it from the motherboard.

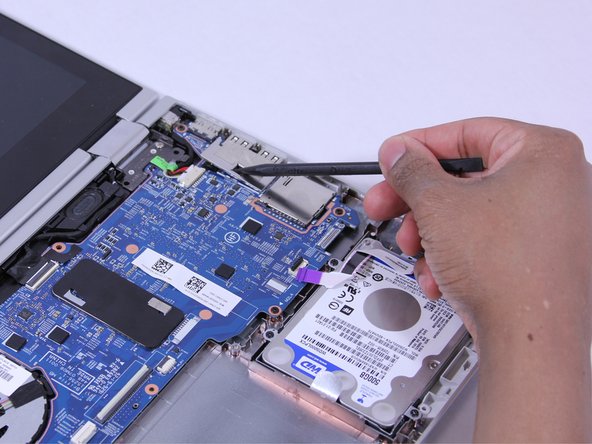
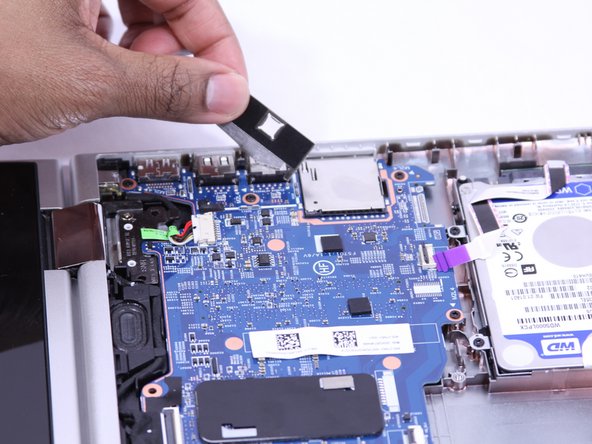
  11. HP Pavilion x360 m3-u001dx Fan Replacement, USB Port Shield: step 11, image 1 of 3 HP Pavilion x360 m3-u001dx Fan Replacement, USB Port Shield: step 11, image 2 of 3 HP Pavilion x360 m3-u001dx Fan Replacement, USB Port Shield: step 11, image 3 of 3
    • (You don't NEED to remove this shielding as you can remove the board with it still there.)

    • Remove the adhesive strip.

    • Lift the shield away from the base of the laptop.

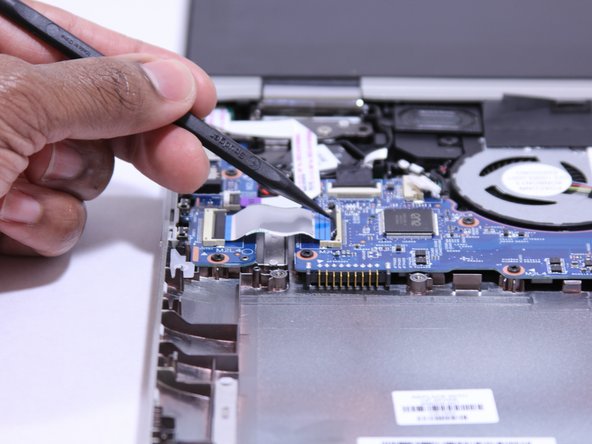
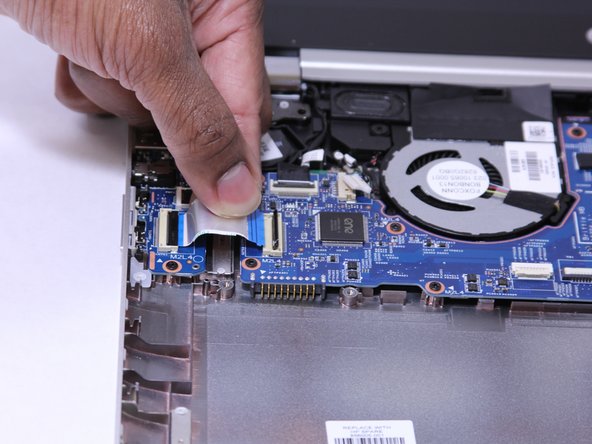
  12. HP Pavilion x360 m3-u001dx Fan Replacement, System Board (Motherboard): step 12, image 1 of 3 HP Pavilion x360 m3-u001dx Fan Replacement, System Board (Motherboard): step 12, image 2 of 3 HP Pavilion x360 m3-u001dx Fan Replacement, System Board (Motherboard): step 12, image 3 of 3
    • Disconnect the ribbon cables attached to the system board (motherboard).

    • Using the Heavy-Duty Spudger lift up the plastic locks connecting the ribbon cable to the motherboard.

    • Use the plastic tab on the ribbon cable to pull it out from the lock on the motherboard.

  13. HP Pavilion x360 m3-u001dx Fan Replacement: step 13, image 1 of 2 HP Pavilion x360 m3-u001dx Fan Replacement: step 13, image 2 of 2
    • Disconnect the fastened cables from the system board (motherboard) by carefully pushing the cable's plastic edges using the Heavy Duty Spudger.

  14. HP Pavilion x360 m3-u001dx Fan Replacement: step 14, image 1 of 2 HP Pavilion x360 m3-u001dx Fan Replacement: step 14, image 2 of 2
    • Pull the clipped cables from system board (motherboard).

  15. HP Pavilion x360 m3-u001dx Fan Replacement: step 15, image 1 of 3 HP Pavilion x360 m3-u001dx Fan Replacement: step 15, image 2 of 3 HP Pavilion x360 m3-u001dx Fan Replacement: step 15, image 3 of 3
    • Remove the system board (motherboard).

    • Using the Phillips 00 Screw Driver, remove 9 Phillips 2.0 x 4.7 mm screws with "M2L4" next to them.

    • Using the Phillips 00 Screw Driver, remove the silver screw.

    • Make special note of each screw and screw lock size and location during removal and replacement.

  16. HP Pavilion x360 m3-u001dx Fan Replacement: step 16, image 1 of 1
    • Carefully lift the front side of the system board (motherboard).

  17. HP Pavilion x360 m3-u001dx Fan Replacement: step 17, image 1 of 1
    • Using a Heavy Duty Spudger, disconnect the black and red RTC battery cable on the left side of the system board (motherboard).

  18. HP Pavilion x360 m3-u001dx Fan Replacement: step 18, image 1 of 1
    • Release the system board (motherboard) from the base enclosure.

    • Place the motherboard somewhere safe since it is the most delicate and expensive part of the laptop.

  19. HP Pavilion x360 m3-u001dx Fan Replacement, Fan: step 19, image 1 of 1
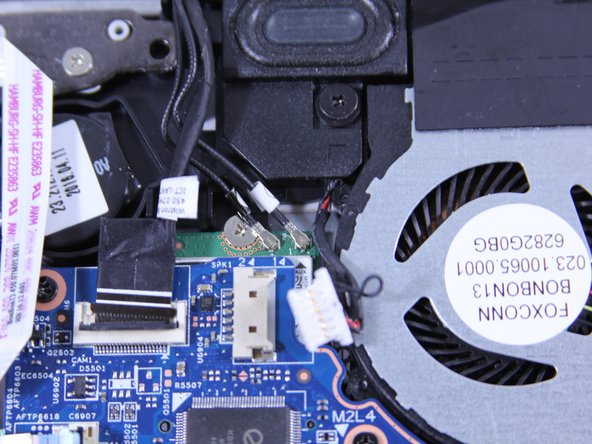
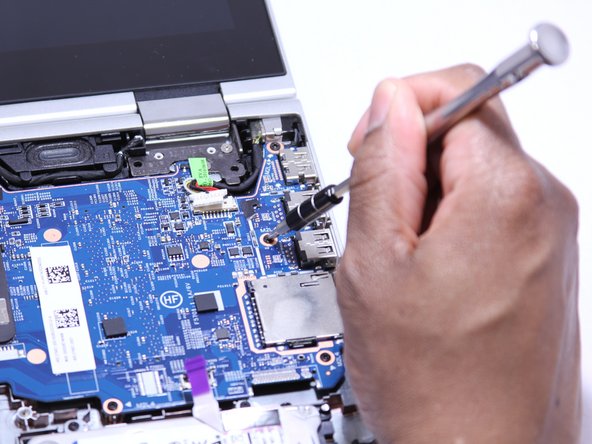
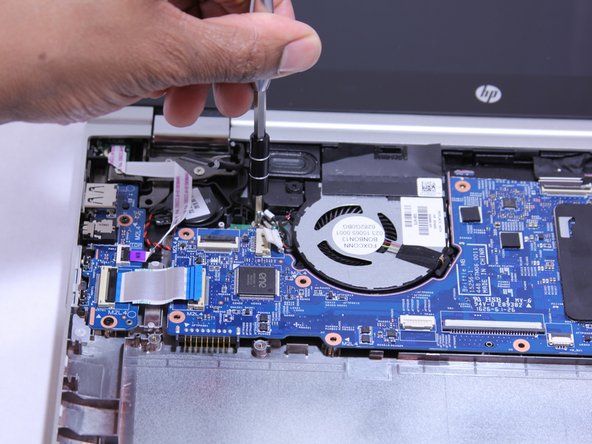
    • Disconnect the fastened cables from the system board (motherboard) by carefully pushing the cable's plastic edges using the Heavy Duty Spudger.

  20. HP Pavilion x360 m3-u001dx Fan Replacement: step 20, image 1 of 1
    • Using the Phillips 00 Screw Driver. remove 4 screws from the heat sink.

    • Make special note of each screw and screw lock size and location during removal and replacement.

  21. HP Pavilion x360 m3-u001dx Fan Replacement: step 21, image 1 of 1
    • Remove any adhesive tape attaching the fan/heat sink to the system board (motherboard).

    • The grey paste under the fan/heat sink is thermopaste, it keeps the processor cool. To replace it, use our How to Apply Thermal Paste guide.

    • Detach the fan/heat sink.

Conclusion

Follow these instructions in reverse order to reassemble your device.

8 other people completed this guide.

Jonathan

Member since: 02/01/17

245 Reputation

1 Guide authored

Team

UW Tacoma, Team 1-6, Rose Winter 2017 Member of UW Tacoma, Team 1-6, Rose Winter 2017

UWT-ROSE-W17S1G6

4 Members

8 Guides authored

3 Comments

Great step-by-step instructions. Thank you

mistyjohn - Reply

While it took us much longer than 7-9 minutes, the guide was fantastic and we were able to fix our computer. Thank you!

Bronwyn Dasher - Reply

Took me way longer than 7-9 minutes and would’ve been cool if that heat paste was mentioned in the ‘Tools’ or ‘Parts’ sections at the top. Granted I probably should’ve read the guide completely before beginning, I got all the way to the end and realized I didn’t have the paste and couldn’t finish the job. I also would’ve liked to see something about removing the black part from the fan or actually putting the new fan in. Overall, the guide was very helpful and easy to follow and for that, I do thank you.

Allison Lewis - Reply

Add Comment

View Statistics:

Past 24 Hours: 0

Past 7 Days: 0

Past 30 Days: 8

All Time: 6,136