Introduction
These units are notorious for running at very high temperatures. This shows you how to get at the heat sink, graphics card, processor, and all other goodies associated with it.
What you need
-
-
The model number of this particular laptop is DV7-4078ca - it features a first-generation i7 processor, has beats audio, and due to the placement of the vents, is susceptible to getting uncomfortably warm.
-
There are multiple hardware versions of the popular DV7 model, so depending on the specifics of yours, you may find small differences in location of screws, etc.
-
-
-
Start by flipping the laptop on its front cover. As you can see from mine, it's not difficult to scratch up the surface so I'd recommend putting a cloth or cupboard protector underneath
-
The first step is to remove the middle section housing the hard drive, wireless card, and ram
-
There are 5 anchored screws (they don't come all the way out) that need to be loosened
-
There is a small ridge just below the battery that helps in removing the cover. I used a spudger but if you don't have one, a small flathead screwdriver will work. Or a hard guitar pick.
-
Pry from the top - you'll notice small clips on the edges that hold it in place. They may require a little bit of force. Once you get to the bottom, just pull north as the clips on the bottom are larger.
-
-
-
Next we need to remove the hard drive, DVD drive and wireless card
-
There are 4 standard-sized screws holding the hard drive in its mount
-
The screw that is holding the DVD drive in the case is slightly smaller than the standard screw
-
There are two screws holding in the wireless card. Remove them and it will easily come out. Also remove the white and black antenna cables from the card
-
When the hard drive mount is removed, pull the hard drive cable away from the hard drive connectors. May take some wiggling.
-
-
-
Time to remove the majority of screws from the casing. Depending on what you're trying to accomplish, you may not need all of them. But for the sake of this guide, let's assume you do
-
On the outside of the bottom casing, we have 10 screws, all the same size
-
Inside the unit there are 4 normal screws
-
There are 2 black, large-headed screws inside the hard drive bay on the left
-
-
-
Underneath where the DVD drive used to be, remove the 3 exposed large-headed screws
-
Also remove the 3 large-headed screws from where the battery used to be
-
Slightly more difficult to see, there are 2 normal-sized screws in the battery bay
-
This is the KEYBOARD RELEASE switch which helps in the next step with popping the keyboard out. Make note of where it is.
-
-
-
-
After removing the screws securing the keyboard, you will need to flip the keyboard release switch to the left (in previous step). You should feel the release slightly make the switch less springy
-
There are still clips on the sides of the keyboard holding it in, so you may need a prying tool to remove the keyboard (eg. spudger, guitar pick). This shouldnt be too hard
-
Don't completely pull out the keyboard as there is a large ribbon cable connecting the keyboard to the case. To remove this, flip the black part of the motherboard connector UP. This will allow easy removal of the ribbon cable
-
-
-
Flip the computer so that it is now sitting on its base
-
There are 3 newly-exposed ribbon cables that need to be removed from the motherboard
-
Instead of flipping the black/blue part, flip the white part of these smaller connectors
-
Remove the 2 standard screws securing the casing pieces together
-
-
-
At this point, all of the screws holding the two halves of the case should be removed. Time to pry the bottom and top half of the case from each other
-
Once the back is separated, just use your hands to pry from the sides. Move towards the bottom. Once at the bottom, pull north and it should separate the top case from the bottom half
-
-
-
Finally - a full look at the motherboard! Some connectors left, but we're getting there
-
To start, remove the 2 screws at the bottom of the motherboard holding it in
-
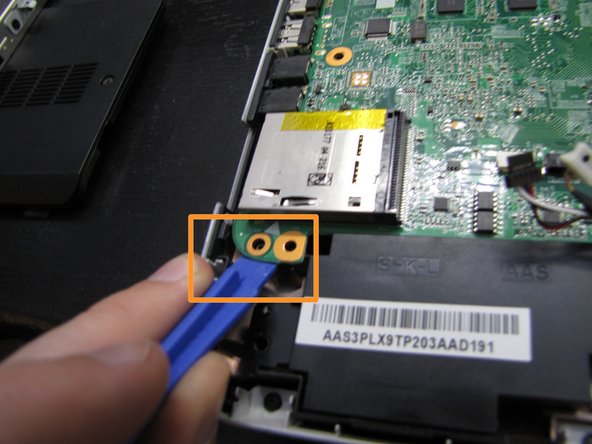
Remove the snap connector that connects to the motherboard by pulling straight up on the tab
-
On the far right of the motherboard, there is a right-facing connector that runs to the wireless card. Wiggle the connector out, to the right.
-
-
-
We are almost done with the top of the motherboard - just slide the two opposite-colored connectors south. May need a little wiggle to convince them fully.
-
Start by putting your lifting tool between the casing and the bottom of the motherboard - you have to "lift" it off this peg to be able to move it further
-
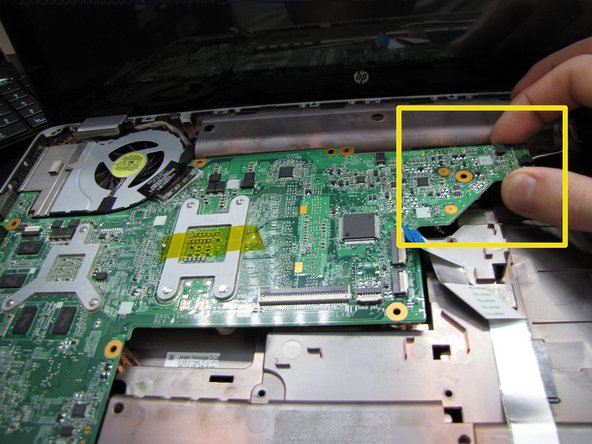
Grab the far right side of the board and start lifting straight up about a "quarter-inch" - it will expose the bottom motherboard connections
-
-
-
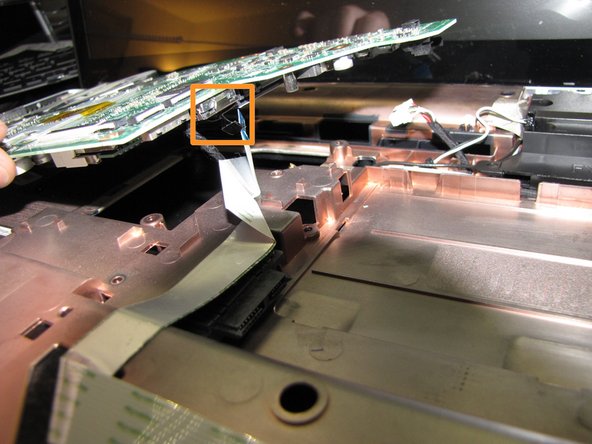
Underneath the far right side of the motherboard, you'll see another slide connector - pull it to the right
-
I originally forgot to pull out the other end of the hard drive connector - to simplify matters, pull straight down from the motherboard using the pull tab
-
That's all that should be securing the motherboard - now to remove, slowly wiggle motherboard while pulling it right - the left-side accessory plugs need to clear the side of the case. Once they are far enough away, use your left hand to pull the left side of the motherboard up - eventually it should just freely pull off of the case.
-
-
-
I've flipped over the motherboard to expose the main components that I'll be working with - take note of specific locations that might be worth a close look:
-
Processor
-
Graphics card
-
Fan / Heat sink assembly
-
If you plan on removing the fan/heat sink, just keep in mind that there is still a power connection for the fan to remove - pull straight up.
-
-
-
Since you've come this far, no matter what your reason is for taking your laptop apart, I highly recommend a thorough fan cleaning which actually requires disassembly of the fan
-
There are 4 small screws holding the top of the fan cover on - Don't be surprised if they are very tight. Just hold the other side of the fan with your other hand so you don't put too much pressure on the motherboard itself.
-
Once these 4 screws are removed, you'll be able to remove the top plate. Your work isn't done - you'll also notice that there's a piece of glued foam between the heat sink grille and the fan. Remove it as best you can, or simply cut it off (won't drastically affect results)
-
You should now be able to pull the grill away from the fan - you'll probably notice a thick rope of dust sandwiched inside the two - do your best to remove all of it
-
-
-
Since cooling is such an issue with this notebook, if you take the heat sink off of the processor and the graphics card, use fresh thermal paste and remove the old thermal paste on the two parts. It's that greyish residue on the chips. It's not unreasonably expensive and it can really help with cooling issues
-
You may want to look at a separate guide for applying and removing thermal paste, it's not entirely complicated but you don't want to make a mess of your work and need to redo it later
-
Hopefully once you put it all back together, your DV7 provides you with years of valuable service. Just remember not to over-tighten screws so that if you have to do it again, there's still enough thread to pull them out again!
-


To reassemble your device, follow these instructions in reverse order.
To reassemble your device, follow these instructions in reverse order.
Cancel: I did not complete this guide.
17 other people completed this guide.
9 Comments
Thanks for the very helpful guide. I used it to fix the heating problem on my HP Pavilion DV7-4159EG.
I have one addition: Leave the upper left and upper right screw in place until you open the laptop to remove the keyboard (Step 5 to Step 6). To clarify: If the laptop is lying on the back like on the first pictures. I mean the most upper left and right screws, right below the display hinges. These two screws are on my model a bit bigger and "shinyer" than the rest of the screws.
Why? The hinges are mounted by one screw into the plastic casing. This is very flimsy. In addition, the hinges are hold in place by the two screws holding the casing together. If you remove theses screws too early it may happen that the hinges will rip out of the casing if you open the laptop. At least this happened with my notebook on the left hinge. It isn't usually a problem, because you can bend them right when you put the DV7 together. But it is one mount point less for the display.
Great strategy. Make sure to take out those supporting screws before you pry the bottom from the top though, otherwise you're facing a similarly bad situation.
HOWEVER, if you do manage to break/strip a screw post, it may not be the end of the world. You can use materials such as JB weld (decent) and specific purpose plastic weld (excellent if the right kind for the plastic) which could potentially make it stronger than the original.
Mark -
My laptop was overheating and shutting down under load. I followed the guide, and the laptop is running cool. I was amazed how much dirt I removed out of the fan alone. I found the guide easy to follow, a couple of points I got stuck and that was more due to me not following the guide as described. One minor suggestion, is to describe the various screws and say remove 4 of type A,B,C etc. So that when you are reversing the instructions it's easier to know what screws go where. If I did something like this again, I'd get one those medicine boxes, and put screws from step 1 in container 1, step 2 in container 2 etc. Overall excellent guide. Thanks.
Thank you Nigel. Separate boxes are a good idea, so are magnetic mats.
These guides take quite a long time to build well, so I avoid some of that by not being overly specific with screw sizes. My hope is that people following the guides will realize that putting them in the exact order they come out will ensure perfect replacement afterwards.
Mark -
Question: Is it possible to just replace the fan assembly without replacing the whole set including the "pipes" etc to the GPU and CPU. I have been looking for the parts and I notice that some sites offer just the fan. Thanks a lot, this is a great guide.