
HP Pavilion 14-q020nr Battery and Speakers Replacement

What you need

  1. HP Pavilion 14-q020nr Battery and Speakers Replacement, Keyboard & Touchpad Panel: step 1, image 1 of 2 HP Pavilion 14-q020nr Battery and Speakers Replacement, Keyboard & Touchpad Panel: step 1, image 2 of 2
    • Turn the laptop over.

    • Remove all nine 3mm screws on back panel with a Phillips Head 1 driver.

  2. HP Pavilion 14-q020nr Battery and Speakers Replacement: step 2, image 1 of 3 HP Pavilion 14-q020nr Battery and Speakers Replacement: step 2, image 2 of 3 HP Pavilion 14-q020nr Battery and Speakers Replacement: step 2, image 3 of 3
    • Pry off the four rubber bumpers, located at the top corners and center of the back panel, off with a pair of tweezers.

    • Bumpers are delicate and can be easily ripped.

    • Unscrew the four 3mm screws under the bumpers using a Phillips Head 1 screwdriver.

  3. HP Pavilion 14-q020nr Battery and Speakers Replacement: step 3, image 1 of 2 HP Pavilion 14-q020nr Battery and Speakers Replacement: step 3, image 2 of 2
    • Flip the laptop right side up and open the clamshell.

    • Starting at the bottom right corner, slide the opening tool into the crevice between the blue and silver panels.

    • Carefully pry the top casing up around the edges, moving counterclockwise.

    • Keep the tool steady throughout, as prying in a rough manner can break the casing.

    • You will hear audible clicking sounds as the clips connecting the two halves disconnect from each other.

  4. HP Pavilion 14-q020nr Battery and Speakers Replacement: step 4, image 1 of 1
    • Close the laptop and orient it on its side (clamshell hinge up), carefully holding it steady to ensure its safety.

    • Insert the opening tool inside of the hinge and pry with an even amount of force to disconnect the keyboard panel from the fan grate.

  5. HP Pavilion 14-q020nr Battery and Speakers Replacement: step 5, image 1 of 3 HP Pavilion 14-q020nr Battery and Speakers Replacement: step 5, image 2 of 3 HP Pavilion 14-q020nr Battery and Speakers Replacement: step 5, image 3 of 3
    • Reorient the laptop in an upright fashion and open the clamshell.

    • If needed, continue to pry the silver keyboard panel from the rest of the hardware with minimal force.

    • Slowly slide the silver keyboard panel towards you while lifting gently to separate the halves.

    • The panel is still connected by a series of delicate connectors glued to the mainframe, so do not pull the panel right off.

  6. HP Pavilion 14-q020nr Battery and Speakers Replacement: step 6, image 1 of 3 HP Pavilion 14-q020nr Battery and Speakers Replacement: step 6, image 2 of 3 HP Pavilion 14-q020nr Battery and Speakers Replacement: step 6, image 3 of 3
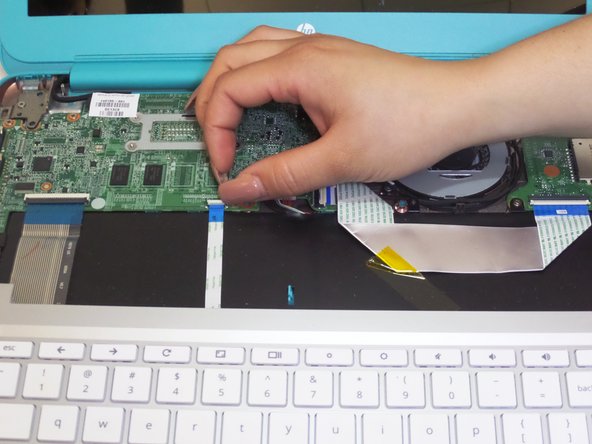
    • While keeping silver keyboard panel hovering above the laptop, locate the touchpad connector ribbon attached to both the silver panel and motherboard.

    • With your finger, flip up the white clasp that holds the connector, releasing the connector ribbon.

    • Unpeel the connector ribbon from its position on the motherboard.

  7. HP Pavilion 14-q020nr Battery and Speakers Replacement: step 7, image 1 of 3 HP Pavilion 14-q020nr Battery and Speakers Replacement: step 7, image 2 of 3 HP Pavilion 14-q020nr Battery and Speakers Replacement: step 7, image 3 of 3
    • With your finger, flip up the white clasp that connects the larger keyboard connector to the motherboard, releasing the connector ribbon.

    • Gently pull the connector ribbon from the clasp.

  8. HP Pavilion 14-q020nr Battery and Speakers Replacement: step 8, image 1 of 1
    • Lift the keyboard panel up and away from the CPU, completely revealing the mainframe.

  9. HP Pavilion 14-q020nr Battery and Speakers Replacement, Battery and Speakers: step 9, image 1 of 1
    • With the internal hardware exposed, disconnect the battery cable from the motherboard.

    • If tightly fastened, gently wiggle the plug out of the jack.

  10. HP Pavilion 14-q020nr Battery and Speakers Replacement: step 10, image 1 of 1
    • Remove the three 4mm screws around the perimeter of the battery pack with a Phillips Head 1 screwdriver.

  11. HP Pavilion 14-q020nr Battery and Speakers Replacement: step 11, image 1 of 3 HP Pavilion 14-q020nr Battery and Speakers Replacement: step 11, image 2 of 3 HP Pavilion 14-q020nr Battery and Speakers Replacement: step 11, image 3 of 3
    • Flip up the two white clasps that hold the connector ribbon to the battery to release the ribbon.

    • Remove the 'motherboard to USB board' connector ribbon from its place.

  12. HP Pavilion 14-q020nr Battery and Speakers Replacement: step 12, image 1 of 1
    • Detach the speaker cable from its fastener on the motherboard by pulling it out with your fingers or using a spudger.

  13. HP Pavilion 14-q020nr Battery and Speakers Replacement: step 13, image 1 of 3 HP Pavilion 14-q020nr Battery and Speakers Replacement: step 13, image 2 of 3 HP Pavilion 14-q020nr Battery and Speakers Replacement: step 13, image 3 of 3
    • Using your fingers, gently pry out the two L-shaped speaker panels from between the external casing and battery pack.

    • Be sure to apply an evenly distributed upwards force on the speaker when lifting it out

    • Both speaker components (located adjacent to each other) will remain connected by a red cable after removal

  14. HP Pavilion 14-q020nr Battery and Speakers Replacement: step 14, image 1 of 1
    • Lift out battery pack.

Conclusion

To reassemble your device, follow these instructions in reverse order.

One other person completed this guide.

Danica Dunville

Member since: 09/11/17

349 Reputation

3 Guides authored

Team

One Comment

Thank you for your instructions!!! HP and Chromebook sites had nothing!!! Sure they had instructions but nothing regarding how to remove the battery. The only instruction read- -remove battery!!!! Drrrrrr

Liza Bonsall - Reply

Add Comment

View Statistics:

Past 24 Hours: 0

Past 7 Days: 0

Past 30 Days: 0

All Time: 349