
HP Omen 15-ax243dx Keyboard Replacement

What you need

  1. HP Omen 15-ax243dx Keyboard Replacement, Battery: step 1, image 1 of 2 HP Omen 15-ax243dx Keyboard Replacement, Battery: step 1, image 2 of 2
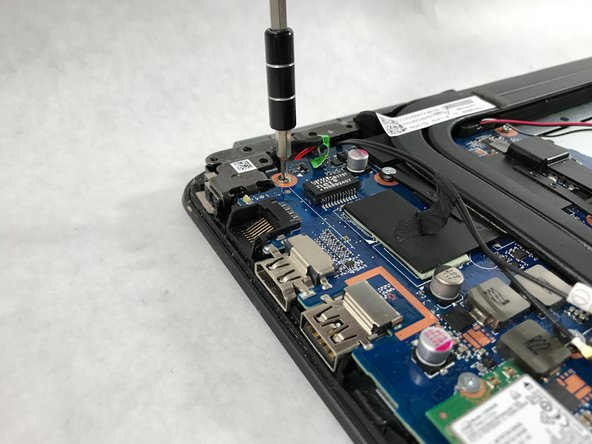
    • The rear panel is secured by 10 screws. Using a #00 Phillips Screwdriver, remove the ten 1.2 mm screws.

    • The screwdriver should be inserted at the same angle as the screws.

    • Be sure to keep track of the screws and where they came from. Some only fit in to one spot.

    Isn’t the plastic plug toward the center, and screw beneath it, a problem?

    risorcurt - Reply

    There is no screw under the center plug, the bottom is just held on by clips after all 10 screws have been removed

    Nigel Bancroft -

  2. HP Omen 15-ax243dx Keyboard Replacement: step 2, image 1 of 2 HP Omen 15-ax243dx Keyboard Replacement: step 2, image 2 of 2
    • Insert a plastic opening tool between the rear panel and the top case. Pry the opening tool upwards to separate the top case from the bottom case.

    • Slide the opening tool along the case perimeter to loosen the bottom case.

    • Gently pull the bottom case away from the laptop.

  3. HP Omen 15-ax243dx Keyboard Replacement: step 3, image 1 of 2 HP Omen 15-ax243dx Keyboard Replacement: step 3, image 2 of 2
    • Remove the four 1.2 mm Phillips #00 screws around the battery.

  4. HP Omen 15-ax243dx Keyboard Replacement: step 4, image 1 of 2 HP Omen 15-ax243dx Keyboard Replacement: step 4, image 2 of 2
    • Pull the battery cable out from its motherboard socket.

    • Pull parallel to the motherboard, not straight up.

    • Remove the battery.

    • Disconnect the power cord from the battery and transfer it to your replacement battery.

  5. HP Omen 15-ax243dx Keyboard Replacement, Hard-Drive: step 5, image 1 of 1
    • After the battery is removed, the hard drive will be easier to access in the top right hand corner.

  6. HP Omen 15-ax243dx Keyboard Replacement: step 6, image 1 of 3 HP Omen 15-ax243dx Keyboard Replacement: step 6, image 2 of 3 HP Omen 15-ax243dx Keyboard Replacement: step 6, image 3 of 3
    • With a opening tool, flip open the switch that locks in the hard drive ribbon cable into the device.

    • When lifting the cable out, lift straight up and out to prevent damage to the connector or cable.

  7. HP Omen 15-ax243dx Keyboard Replacement: step 7, image 1 of 1
    • Lift the hard drive up to remove from the device

  8. HP Omen 15-ax243dx Keyboard Replacement: step 8, image 1 of 3 HP Omen 15-ax243dx Keyboard Replacement: step 8, image 2 of 3 HP Omen 15-ax243dx Keyboard Replacement: step 8, image 3 of 3
    • Remove the rubber guards on the side of the hard drive.

    • Gently pull the plastic connector out from the hard drive.

    • The hard drive can now be disposed of if needed.

    • Save the guards and connectors from this hard drive, they will be used on the replacement part.

  9. HP Omen 15-ax243dx Keyboard Replacement, Screen: step 9, image 1 of 2 HP Omen 15-ax243dx Keyboard Replacement, Screen: step 9, image 2 of 2
    • Unscrew the six 1.2 mm screws connecting the screen to the body using the #00 Phillips screwdriver head.

    • Be cautious of where the screws come out from, some will only fit in the same location.

  10. HP Omen 15-ax243dx Keyboard Replacement: step 10, image 1 of 3 HP Omen 15-ax243dx Keyboard Replacement: step 10, image 2 of 3 HP Omen 15-ax243dx Keyboard Replacement: step 10, image 3 of 3
    • Remove the tape holding the wires down

    • Disconnect the wires from the wifi chip

    • When removing the wires from the wifi chip, be careful to not damage the connectors.

  11. HP Omen 15-ax243dx Keyboard Replacement: step 11, image 1 of 3 HP Omen 15-ax243dx Keyboard Replacement: step 11, image 2 of 3 HP Omen 15-ax243dx Keyboard Replacement: step 11, image 3 of 3
    • Flip the switch up that holds the screen cable in place

    • Lift up and pull back the cable from the insert

  12. HP Omen 15-ax243dx Keyboard Replacement: step 12, image 1 of 2 HP Omen 15-ax243dx Keyboard Replacement: step 12, image 2 of 2
    • Lift the base of the device up to separate the hinges from the body of the device

  13. HP Omen 15-ax243dx Keyboard Replacement: step 13, image 1 of 1
    • Slide the base of the device out from under the hinges

    • The screen can now be replaced

  14. HP Omen 15-ax243dx Keyboard Replacement, Ventilation Fans: step 14, image 1 of 1
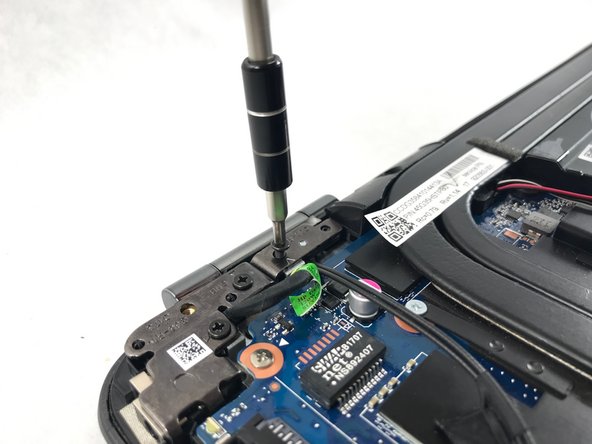
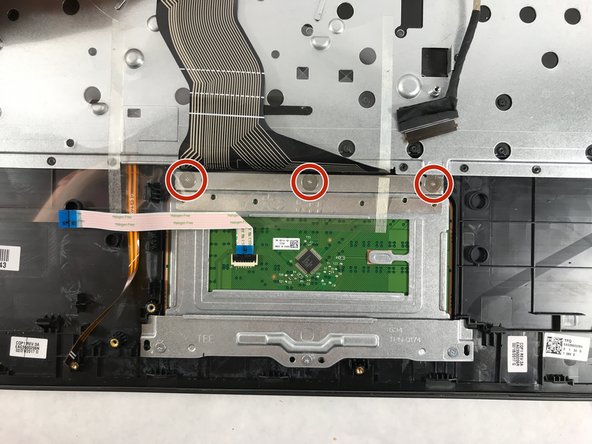
    • The two ventilation fans are secured with the system by 5 screws. Unscrew these five 1.2 mm screws using the Phillips #0 screwdriver.

    • When removing the screws, use a magnetic screwdriver to prevent the screws from falling behind the motherboard

  15. HP Omen 15-ax243dx Keyboard Replacement: step 15, image 1 of 2 HP Omen 15-ax243dx Keyboard Replacement: step 15, image 2 of 2
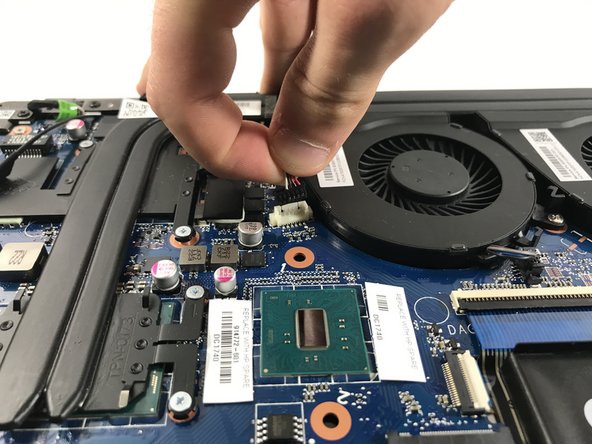
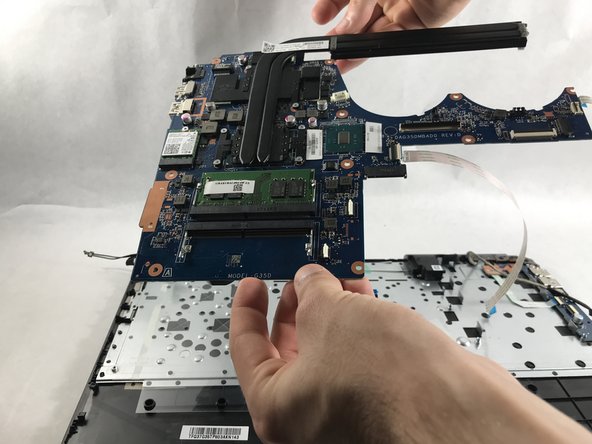
    • After removing all 5 screws, the fans are still connected with the system through 2 cables.

    • Carefully pull the fan cables out of the connectors on the motherboard.

    • Be cautious when pulling by the wires, this can permanently damage the fans beyond repair.

    I'm facing difficulties when trying to disconnect the fan cable from the motherboard .. It does seem like it's stuck .. How can I take it apart, do I need noose pliers or other tools ?’

    Hamza AF - Reply

  16. HP Omen 15-ax243dx Keyboard Replacement: step 16, image 1 of 1
    • The fans can now be removed from the device.

  17. HP Omen 15-ax243dx Keyboard Replacement, Speaker: step 17, image 1 of 3 HP Omen 15-ax243dx Keyboard Replacement, Speaker: step 17, image 2 of 3 HP Omen 15-ax243dx Keyboard Replacement, Speaker: step 17, image 3 of 3
    • Disconnect all the ribbon cables highlighted.

    • Be sure to use the plastic opening tool when flipping the switches up on the cable connectors.

  18. HP Omen 15-ax243dx Keyboard Replacement: step 18, image 1 of 3 HP Omen 15-ax243dx Keyboard Replacement: step 18, image 2 of 3 HP Omen 15-ax243dx Keyboard Replacement: step 18, image 3 of 3
    • Unplug the wire the connects to the speakers.

  19. HP Omen 15-ax243dx Keyboard Replacement: step 19, image 1 of 2 HP Omen 15-ax243dx Keyboard Replacement: step 19, image 2 of 2
    • Unscrew the six 1.2 mm screws connecting the screen to the body using the #0 Phillips screwdriver.

    • Be cautious of where the screws come out from, some will only fit in the same location.

  20. HP Omen 15-ax243dx Keyboard Replacement: step 20, image 1 of 3 HP Omen 15-ax243dx Keyboard Replacement: step 20, image 2 of 3 HP Omen 15-ax243dx Keyboard Replacement: step 20, image 3 of 3
    • Remove the tape holding the wires down

    • Disconnect the wires from the wifi chip

    • When removing the wires from the wifi chip, be careful to not damage the connectors.

  21. HP Omen 15-ax243dx Keyboard Replacement: step 21, image 1 of 2 HP Omen 15-ax243dx Keyboard Replacement: step 21, image 2 of 2
    • Unscrew the two 1.2 mm screws holding the motherboard to the front panel using the same screwdriver.

  22. HP Omen 15-ax243dx Keyboard Replacement: step 22, image 1 of 1
    • Lift the back of the motherboard up then slide the audio cable out between the heatsink and motherboard

  23. HP Omen 15-ax243dx Keyboard Replacement: step 23, image 1 of 2 HP Omen 15-ax243dx Keyboard Replacement: step 23, image 2 of 2
    • Lift the back of the motherboard up again and remove the charging adapter.

    • This wire is located in a tight spot. Pull it straight out and do not bend it, this will cause irreparable damage to the device.

  24. HP Omen 15-ax243dx Keyboard Replacement: step 24, image 1 of 3 HP Omen 15-ax243dx Keyboard Replacement: step 24, image 2 of 3 HP Omen 15-ax243dx Keyboard Replacement: step 24, image 3 of 3
    • Slowly lift up the back of the motherboard.

    • The board is friction fit at the rotation point. Be careful to lift the board around this point.

    • The board will now lift out of the device.

  25. HP Omen 15-ax243dx Keyboard Replacement: step 25, image 1 of 3 HP Omen 15-ax243dx Keyboard Replacement: step 25, image 2 of 3 HP Omen 15-ax243dx Keyboard Replacement: step 25, image 3 of 3
    • Lift up the keyboard panel of the device and set it back down.

    • The speaker in the top left hand corner can be taken out of its place.

  26. HP Omen 15-ax243dx Keyboard Replacement: step 26, image 1 of 2 HP Omen 15-ax243dx Keyboard Replacement: step 26, image 2 of 2
    • Remove the tape between the two speakers

    • The left speaker can now be removed.

    • The speakers can be disposed of if needed now.

  27. HP Omen 15-ax243dx Keyboard Replacement, Keyboard: step 27, image 1 of 3 HP Omen 15-ax243dx Keyboard Replacement, Keyboard: step 27, image 2 of 3 HP Omen 15-ax243dx Keyboard Replacement, Keyboard: step 27, image 3 of 3
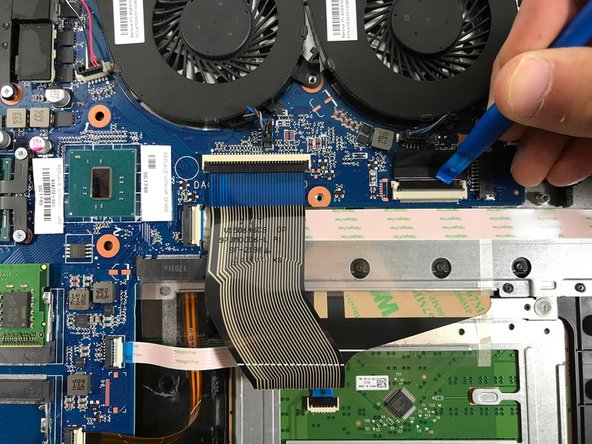
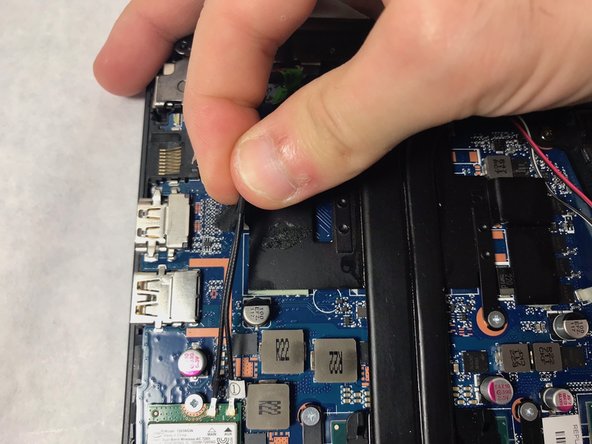
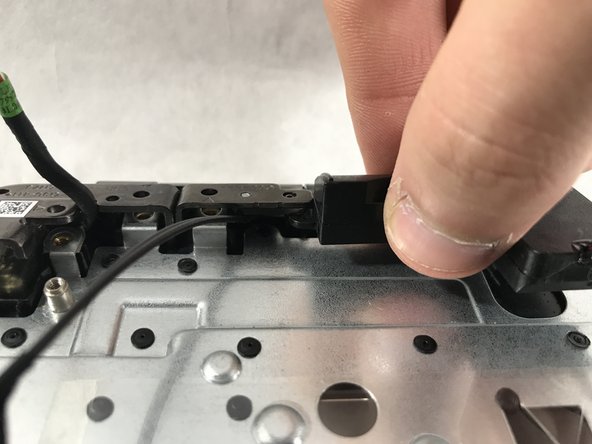
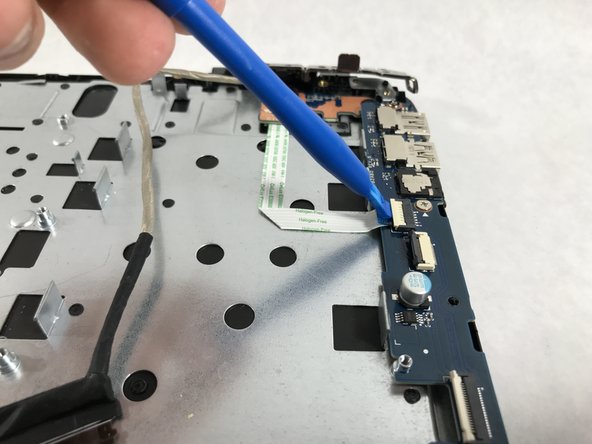
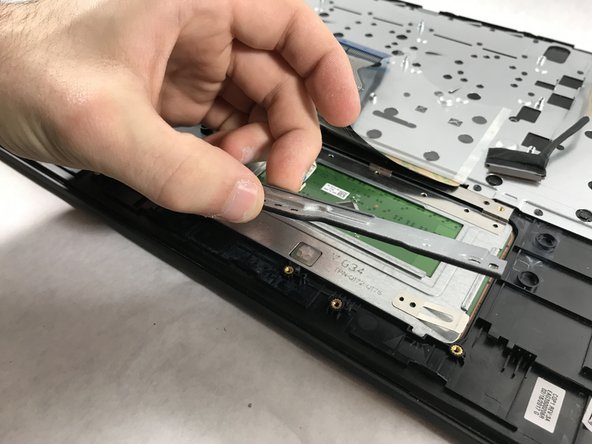
    • Use the opening tool to flip the switch that holds the cable to the power button.

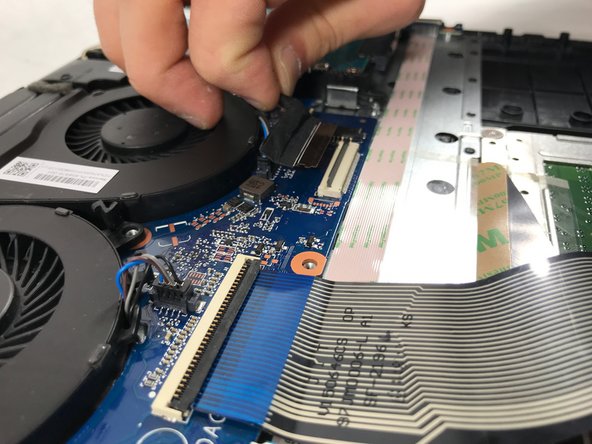
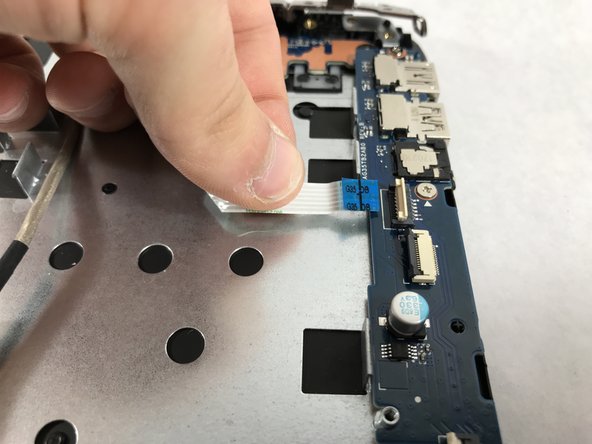
    • Lift the cable out of the connector

  28. HP Omen 15-ax243dx Keyboard Replacement: step 28, image 1 of 3 HP Omen 15-ax243dx Keyboard Replacement: step 28, image 2 of 3 HP Omen 15-ax243dx Keyboard Replacement: step 28, image 3 of 3
    • Unscrew the two 1.2 mm #00 Phillips head screws that hold the board in.

    • This can now be lifted straight out of the device.

  29. HP Omen 15-ax243dx Keyboard Replacement: step 29, image 1 of 2 HP Omen 15-ax243dx Keyboard Replacement: step 29, image 2 of 2
    • Unscrew the 1.2 mm #00 Phillips head screw that holds the power button into place.

    • This can be lifted out of the device

  30. HP Omen 15-ax243dx Keyboard Replacement: step 30, image 1 of 3 HP Omen 15-ax243dx Keyboard Replacement: step 30, image 2 of 3 HP Omen 15-ax243dx Keyboard Replacement: step 30, image 3 of 3
    • Unscrew the three 1.2 mm #00 Phillips head screws that hold in the plate below the trackpad.

    • This can be lifted out of the device.

  31. HP Omen 15-ax243dx Keyboard Replacement: step 31, image 1 of 3 HP Omen 15-ax243dx Keyboard Replacement: step 31, image 2 of 3 HP Omen 15-ax243dx Keyboard Replacement: step 31, image 3 of 3
    • Lift up the clear plastic that covers the top three screws

    • Use a size #00 Phillips head screw driver to remove the three 1.2 mm screws

    • The trackpad can now be removed from the device.

  32. HP Omen 15-ax243dx Keyboard Replacement: step 32, image 1 of 2 HP Omen 15-ax243dx Keyboard Replacement: step 32, image 2 of 2
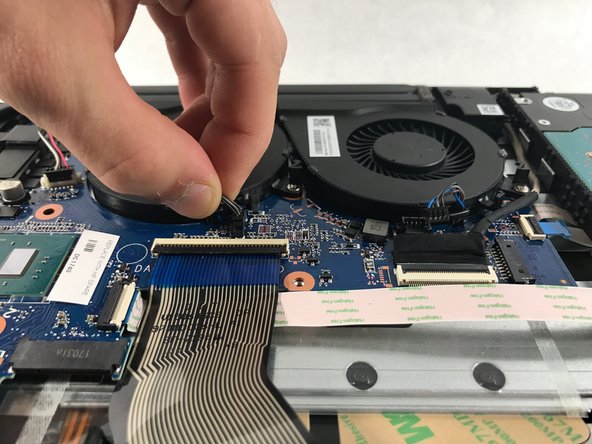
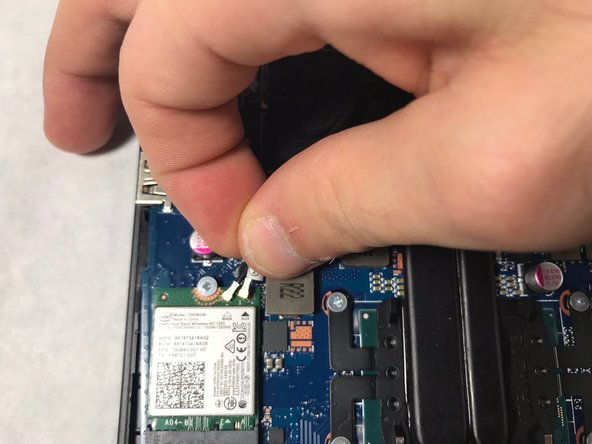
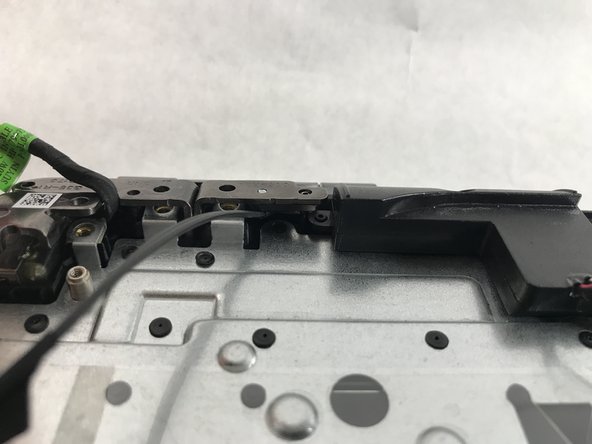
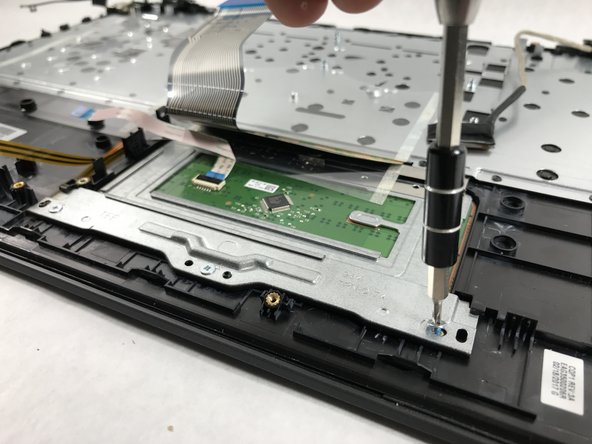
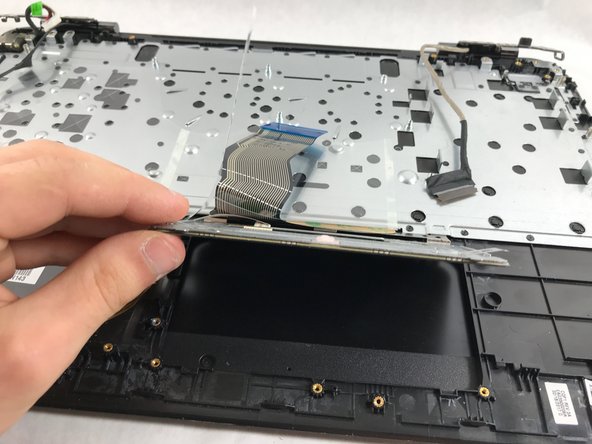
    • The keyboard can now be slid from underneath the hinges.

    • The keyboard can be disposed of is needed.

    I don't understand how the keyboard comes out.

    Jennifer James - Reply

Conclusion

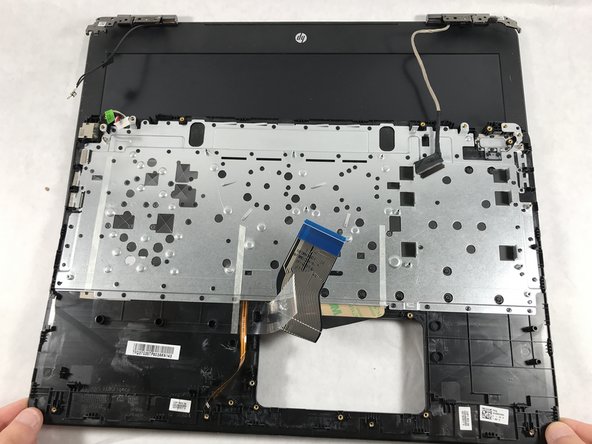
To reassemble your device, follow these instructions in reverse order.

3 other people completed this guide.

Dean Lee

Member since: 10/19/17

360 Reputation

2 Guides authored

Team

6 Comments

Do you have a link to buy the replacement keyboard?

Seth Norton - Reply

How do you take apart the keyboard compartment to replace the keyboard?

corbycobb - Reply

Very useful tutorial, thanks !

Hugo - Reply

Very useful tutorial, thanks you so much.


Ata Akkaya - Reply

If you didn't buy a keyboard yet, DON'T!

I followed this guide only to learn at the end that you CANNOT replace just the keyboard (but you CAN put a new keyboard in; keep reading). I specifically bought a keyboard after seeing this guide, and when I got it all taken apart, I learned I wasted my money and time.

This guide should make a correction at the beginning saying that you need MORE than just the keyboard!!!

You can install a new keyboard, but you need to REPLACE THE ENTIRE KEYBOARD COVER as one entire unit: speaker grill, touchpad, etc.

HP routinely designs things to screw customers, and this is a perfect example of it.

The part you need is #859735-001 (red backlit) or #905118-001 (green backlit). Depending where you buy it and how long you want to wait, it'll cost you probably 50 to 100 bucks (China-sourced). There is an unlit keyboard part, IDK the number. Or, buy the HP official part for a lot more, if you can find it.

Good luck!

Eric - Reply

omg i did this too. this was such a waste of time. it should be called the keyboard + cover disposal guide.

Stekstrom -

Add Comment

View Statistics:

Past 24 Hours: 3

Past 7 Days: 11

Past 30 Days: 74

All Time: 12,637