
HP Laptop 15-g000sl Hardisk Replacement

What you need

  1. HP Laptop 15-g000sl Hardisk Replacement, Hard Disk: step 1, image 1 of 2 HP Laptop 15-g000sl Hardisk Replacement, Hard Disk: step 1, image 2 of 2
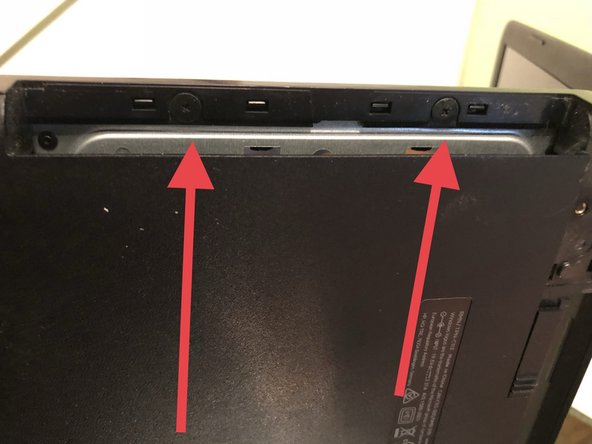
    • Remove the battery by moving the points marked with an arrow towards the inside.

  2. HP Laptop 15-g000sl Hardisk Replacement: step 2, image 1 of 2 HP Laptop 15-g000sl Hardisk Replacement: step 2, image 2 of 2
    • Remove the glued rear rubber feet , optionally use a heat source such as a hair dryer

    • Using a Phillips screwdriver, remove the 2 screws underneath the rubber stopper

  3. HP Laptop 15-g000sl Hardisk Replacement: step 3, image 1 of 1
    • Remove all visible screws at the bottom.

  4. HP Laptop 15-g000sl Hardisk Replacement: step 4, image 1 of 3 HP Laptop 15-g000sl Hardisk Replacement: step 4, image 2 of 3 HP Laptop 15-g000sl Hardisk Replacement: step 4, image 3 of 3
    • Remove the keyboard with the help of a thin tool.

    • Be careful because it is connected to the cable, then unhook the connector.

  5. HP Laptop 15-g000sl Hardisk Replacement: step 5, image 1 of 1
    • Unhook the 2 connectors and remove the 4 screws.

  6. HP Laptop 15-g000sl Hardisk Replacement: step 6, image 1 of 2 HP Laptop 15-g000sl Hardisk Replacement: step 6, image 2 of 2
    • Extract DVD player.

    • Remove the 2 screws indicated in the second picture.

  7. HP Laptop 15-g000sl Hardisk Replacement: step 7, image 1 of 1
    • It is possible to remove the upper cover which is free of screws and only hooked by a joint with the help of a thin tool.

  8. HP Laptop 15-g000sl Hardisk Replacement: step 8, image 1 of 3 HP Laptop 15-g000sl Hardisk Replacement: step 8, image 2 of 3 HP Laptop 15-g000sl Hardisk Replacement: step 8, image 3 of 3
    • Remove the 2 hard disk fastening screws.

    • Remove the disc sideways.

    • Take away the support by removing the 2 screws to place it on the new hard disk

Conclusion

To reassemble the device, follow the steps of this guide in reverse order.

8 other people completed this guide.

Special thanks to these translators:

it en

100%

These translators are helping us fix the world! Want to contribute?
Start translating ›

Smilzo

Member since: 11/09/13

11,267 Reputation

39 Guides authored

2 Comments

I did a similar clone hd to ssd replacement on Hewlett Packard 15-bs058ca Laptop. It was a full bottom removal with the components attached to the bottom of the keyboard and screen combo. There were hidden screws under the rubber feet. A lot of finicky spludger work all around the outer shell was needed to pry the bottom from the top. The good thing was there are no cables between the bottom shell and the rest of the laptop.

After that the hard-disk change was similar to the one above.

HP does have a manual (http://h10032.www1.hp.com/ctg/Manual/c05...) but it does not mention the care needed to pry apart the shell.

Next time I do this I will take photos and up load them.

A Prosaic Hacker - Reply

OK merci ! ça m'a bien servi pour ouvrir un modèle un peu différent (HP 15")

Pascalou - Reply

Add Comment

View Statistics:

Past 24 Hours: 0

Past 7 Days: 15

Past 30 Days: 55

All Time: 1,979