Introduction
The left third of my Display had stripes which appear and disappear when I press various parts of the Laptop. After opening up the laptop it became apparent, that the LCD Panel was to blame. I replaced it.
What you need
Video Overview
-
-
Remove one screw to access the service port.
-
Remove the Hard Drive and the Little cable, connecting the HD to the Motherboard.
-
-
-
Remove the two rubber feet on the front.
-
Remove eight screws. The Manual says seven, but in my Laptop there was an additional screw hidden under a sticker on the lower side.
-
Remove seven 1,6x2 screws from the battery compartment.
-
Remove three 2,5x3 screws from the HD area
-
Remove two screws: One near the small backup battery, the other one from the left part of the service bay.
-
-
-
Disconnect the black and white cable of the WLAN antenna. The position of the two cables is marked on the antenna PCB. Then remove both cables from their clips.
-
Disconnect the Display Cable and remove it from the clips.
-
Disconnect the cable from the camera and remove it from any clips.
-
-
-
-
First remove two 2.5x4 screws from the left hinge.
-
Then remove one 2.5x6 and one 2.5x4 screw from the right hinge.
-
-
-
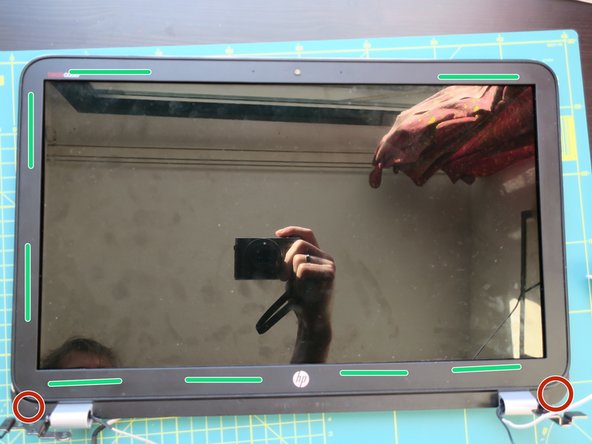
Under the plastic of the bezel are two hidden screws: One is in the lower left corner, the other in the lower right corner. Bend the plastic up a bit and remove these screws.
-
The bezel is glued to the display using double-sided tape. Be careful while lifting the plastic. When re-assembling the lid, place new double-sided tape on these places.
-
-
-
Remove four screws which hold the LCD panel in the Display Lid.
-
The LCD cable goes through one hinge. Remove the two screws, pull the LCD cable out and replace the hinge and the screws. So they will not get lost, you have enough screws already to care about.
-
-
-
The cause of the flickering are these wires, which are bonded to the small PCB. The PCB takes the LVDS-Signals and de-multiplexes them into the 1900x1000 (or so) lines which drives the display. There are three of these connections below the Do not Touch-Area. One seems to be defect, so one third of the display is broken.
-
-
-
After your new display arrives remove the LVDS-wire from your old display and connect it to the new one. The display cable is secured with a sticker. Transfer this sticker from the old panel to the new one.
-
Do a quick sanity test. You onle need to connect the LVDS-cable and the power wire, then switch on the laptop.
-
If everythings works, re-assemble the laptop.
-


To reassemble your device, follow these instructions in reverse order. Take care to glue the bezel to the display on the green marked places in step 5.
To reassemble your device, follow these instructions in reverse order. Take care to glue the bezel to the display on the green marked places in step 5.
Cancel: I did not complete this guide.
6 other people completed this guide.