Introduction
This guide will go through the replacement of the touchscreen/LCD display unit on HP 15-r136wm. The digitizer and LCD are a single unit on this device.
What you need
-
-
Remove the battery. Any time you're working on laptop hardware, the battery should be removed.
-
Push both latches toward the inside with index fingers and slide battery back and out with thumbs.
-
-
-
Remove the screws on the bottom front of the dsiplay.
-
First, remove the screw covers with a plastic tool or your fingernail.
-
Unscrew the screws with PH0 screwdriver.
-
-
-
Start removing the back from the screen assembly.
-
On this model, the front bezel is actually part of the display assembly.
-
Find the seam on the side, and insert a plastic spudger or separator. Begin working around both sides and top.
-
Be careful around the camera. Do not insert your tool too far when you get to the top center or you can damage it.
-
-
-
After separating the top and sides, close the laptop to separate the hinge covers and bottom seam.
-
I know it seems a bit counter-intuitive to close the laptop after separating 3/4 of the back, but it really is easier to start the bottom after the sides are separated.
-
-
-
-
Holding on to the screen assembly, open the laptop and slowly separate them enough to look inside.
-
Be very careful here. The screen cable is still attached at the bottom, and you don't want to damage it.
-
-
-
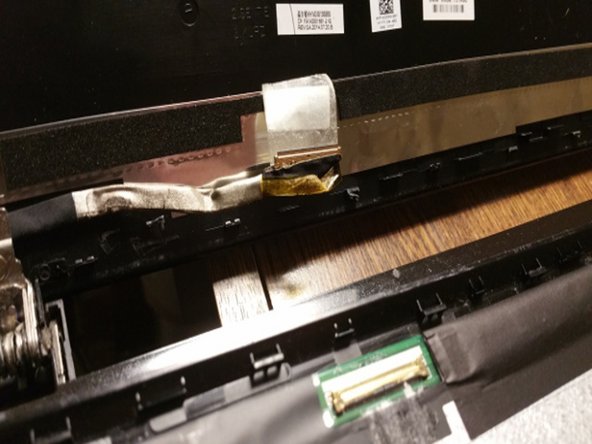
Disconnect the screen cable.
-
Patience and care win the day!
-
With your thumbnail or a very thin plastic tool, pry up the tape holding the cable to the display.
-
You will also find that the gray part of the cable is adhered to the sceen. Gently separate that part of the cable from the screen, being careful not to bend the pins of the connector.
-
Push the connector down until it separates from the display. You will find more tape at the bottom, which will also need to be peeled away.
-
-
-
Separate the display.
-
Lean the display forward, as if closing the laptop.
-
It may take a little wiggling to get the hinge covers to separate fully. If necessary, help them along with a plastic pry tool.
-
-
-
Separate the display from the bezel.
-
The display is glued to the bezel. Using your plastic tool, carefully go around the bezel to separate.
-
HP didn't use screws on these. Instead, they used plastic from the bezel and melted it to cover the holes. These plastic dots will need to shaved off. It will take a metal edge to do it.
-
Use caution while separating the screen from the bezel. The bezel is made from very thin plastic, and will crack easily if too much pressure is applied.
-
-
-
The adhesive used to attach the display may or may not be re-usable. I prefer to replace adhesive, most of the time.
-
Peel off the adhesive.
-
Use double-stick tape to replace the adhesive around the bezel. (I left the backing on the new tape for the picture so it would be visible. Don't forget to remove the backing.)
-
-
-
A couple of notes on re-assembly:
-
Test the screen before peeling the backing off the double-sided tape. Connect the screen to the cable and turn on the machine. This way, you can still return the screen if it arrived DOA. Some companies don't like to take them back after they've been fully installed.
-
After you get the connector in place, and you are sure it's completely seated, tape it down with clear packing tape. They do have a tendency to walk themselves back out of the socket.
-
Make sure that the display cable does not pinched when closing the back.
-
Save yourself some frustration and test the screen again before closing up, so you know the connector is fully connected and the screen comes on.
-
Don't forget to remove the protective film on the new screen before re-assembly.
-


To reassemble your device, follow these instructions in reverse order.
To reassemble your device, follow these instructions in reverse order.
