
HMDX Jam Plus Micro USB Jack Replacement

What you need

  1. HMDX Jam Plus  Micro USB Jack Replacement, Battery: step 1, image 1 of 3 HMDX Jam Plus  Micro USB Jack Replacement, Battery: step 1, image 2 of 3 HMDX Jam Plus  Micro USB Jack Replacement, Battery: step 1, image 3 of 3
    • Flip the device over so the bottom is facing up.

    • Use the large plastic opening tool to gently pry the rubber base from the device.

    • Slowly move the plastic opening tool around the edge of the rubber base to separate it from the plastic.

  2. HMDX Jam Plus  Micro USB Jack Replacement: step 2, image 1 of 2 HMDX Jam Plus  Micro USB Jack Replacement: step 2, image 2 of 2
    • Use a Phillips #1 screwdriver to remove the four black 9mm screws from the device.

  3. HMDX Jam Plus  Micro USB Jack Replacement: step 3, image 1 of 2 HMDX Jam Plus  Micro USB Jack Replacement: step 3, image 2 of 2
    • Gently separate the base from the rest of the device to reveal the battery and the main board.

  4. HMDX Jam Plus  Micro USB Jack Replacement: step 4, image 1 of 3 HMDX Jam Plus  Micro USB Jack Replacement: step 4, image 2 of 3 HMDX Jam Plus  Micro USB Jack Replacement: step 4, image 3 of 3
    • Carefully use the plastic opening tool to remove the glue around the battery and speaker connectors.

    • Pull gently on the connectors to separate each one from the main board.

    • The battery is connected to board in the red socket and the speaker is connected in the white socket.

  5. HMDX Jam Plus  Micro USB Jack Replacement: step 5, image 1 of 3 HMDX Jam Plus  Micro USB Jack Replacement: step 5, image 2 of 3 HMDX Jam Plus  Micro USB Jack Replacement: step 5, image 3 of 3
    • Batteries can be very dangerous if punctured. Use extra caution when using tools around the battery.

    • Use the plastic opening tool to gently pry the battery free from the rest of the device.

  6. HMDX Jam Plus  Micro USB Jack Replacement: step 6, image 1 of 2 HMDX Jam Plus  Micro USB Jack Replacement: step 6, image 2 of 2
    • Use new adhesive to secure battery back to the rest of the device.

  7. HMDX Jam Plus  Micro USB Jack Replacement, Micro USB Jack: step 7, image 1 of 2 HMDX Jam Plus  Micro USB Jack Replacement, Micro USB Jack: step 7, image 2 of 2
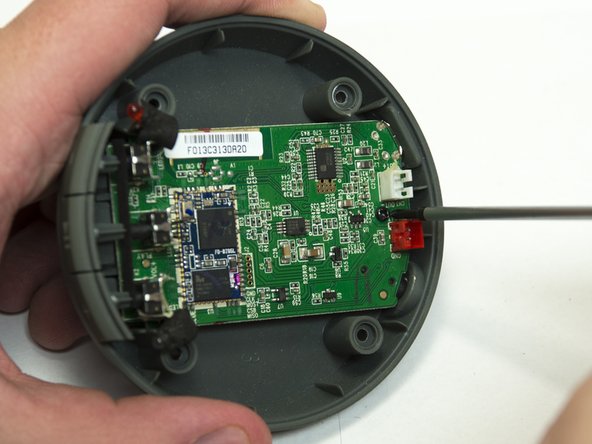
    • Remove the three black 6mm screws from the main board using a Philips #00 screwdriver.

  8. HMDX Jam Plus  Micro USB Jack Replacement: step 8, image 1 of 2 HMDX Jam Plus  Micro USB Jack Replacement: step 8, image 2 of 2
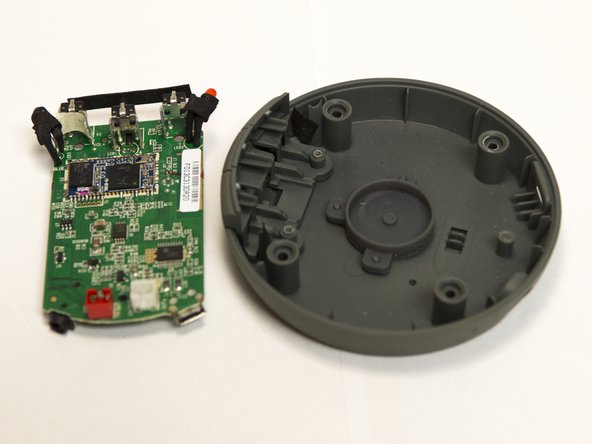
    • Carefully lift the main board away from the plastic.

    • Lift the side with the buttons first and be careful not to damage the Line In Jack or the Micro USB Jack.

  9. HMDX Jam Plus  Micro USB Jack Replacement: step 9, image 1 of 1
    • Use the Micro soldering iron to heat up each pad and use the desoldering wick to wick up the melted solder.

    • The surface mount jack should pull from the surface without much force. Use tweezers to apply upward pressure on on the jack.

    • Do not apply too much heat to the board as it may damage other portions of the board.

Maxwell Erickson

Member since: 10/22/15

587 Reputation

4 Guides authored

Team

Montana Tech, Team 10-3, Shirk Fall 2015 Member of Montana Tech, Team 10-3, Shirk Fall 2015

MTUM-SHIRK-F15S10G3

4 Members

4 Guides authored

View Statistics:

Past 24 Hours: 0

Past 7 Days: 1

Past 30 Days: 2

All Time: 719