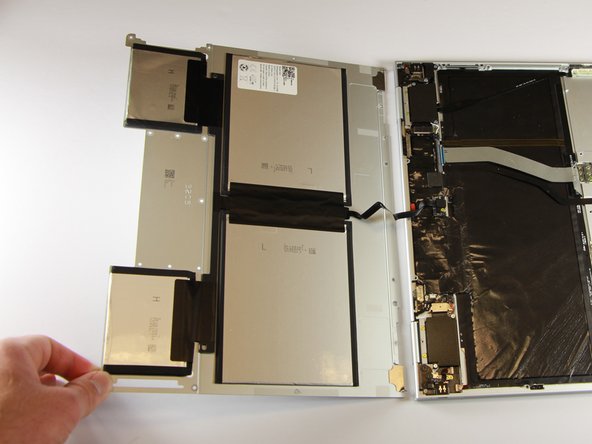
Google Pixelbook Battery (Back Panel) Replacement

What you need

  1. Google Pixelbook Battery (Back Panel) Replacement, Battery (Back Panel): step 1, image 1 of 3 Google Pixelbook Battery (Back Panel) Replacement, Battery (Back Panel): step 1, image 2 of 3 Google Pixelbook Battery (Back Panel) Replacement, Battery (Back Panel): step 1, image 3 of 3
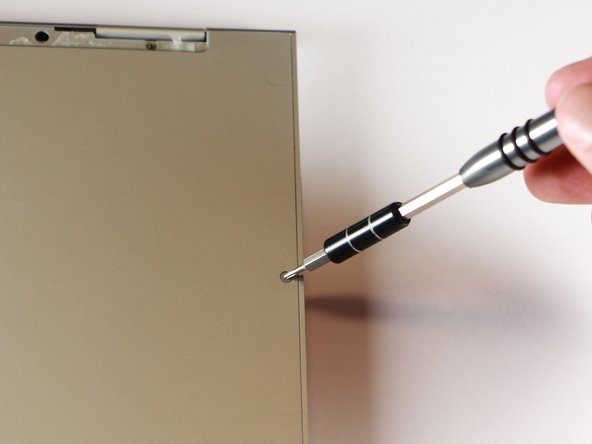
    • Use the iFixit opening tools or a metal spudger to pry the rubber covers off the back of your Pixelbook.

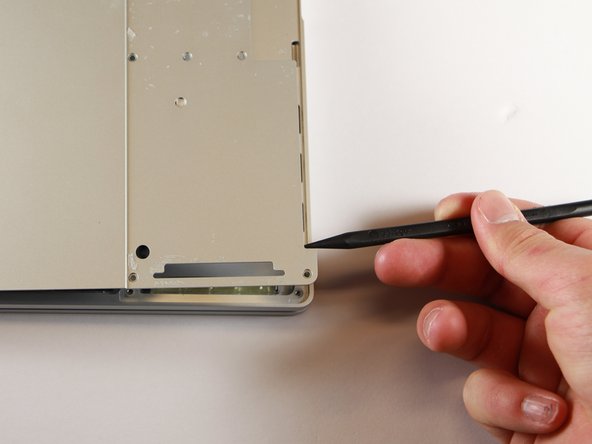
    • Peel the linings off completely until the back of the Pixelbook looks bare.

  2. Google Pixelbook Battery (Back Panel) Replacement: step 2, image 1 of 2 Google Pixelbook Battery (Back Panel) Replacement: step 2, image 2 of 2
    • Remove the two yellow 2.0mm screws by using a T3 Torx screwdriver.

  3. Google Pixelbook Battery (Back Panel) Replacement: step 3, image 1 of 3 Google Pixelbook Battery (Back Panel) Replacement: step 3, image 2 of 3 Google Pixelbook Battery (Back Panel) Replacement: step 3, image 3 of 3
    • Remove the seventeen 3.0mm T5 Torx screws from the bottom panel.

  4. Google Pixelbook Battery (Back Panel) Replacement: step 4, image 1 of 3 Google Pixelbook Battery (Back Panel) Replacement: step 4, image 2 of 3 Google Pixelbook Battery (Back Panel) Replacement: step 4, image 3 of 3
    • Use the nylon spudger to pry the edge of the Pixelbook up until you can grab the edge with your fingers.

    • Open the back panel completely and lay it flat so you see the whole inside of the computer.

  5. Google Pixelbook Battery (Back Panel) Replacement: step 5, image 1 of 2 Google Pixelbook Battery (Back Panel) Replacement: step 5, image 2 of 2
    • Remove the yellow 2.0mm screw from the middle of the panel by using the T3 Torx screwdriver to turn the screw counterclockwise.

  6. Google Pixelbook Battery (Back Panel) Replacement: step 6, image 1 of 2 Google Pixelbook Battery (Back Panel) Replacement: step 6, image 2 of 2
    • Remove the small, black casing by using the spudger to lift it up from its place.

  7. Google Pixelbook Battery (Back Panel) Replacement: step 7, image 1 of 1
    • Disconnect the flat, black cord from the main component by using a spudger to push it out of the slot, or by using your hand to carefully pull it out.

    • Your back panel is now free from the main component.

Conclusion

To reassemble your device, follow these instructions in reverse order.

28 other people completed this guide.

Megan Phillips

Member since: 01/24/18

885 Reputation

1 Guide authored

Team

Cal Poly, Team S18-G1, Livingston Winter 2018 Member of Cal Poly, Team S18-G1, Livingston Winter 2018

CPSU-LIVINGSTON-W18S18G1

4 Members

7 Guides authored

25 Comments

Question; with the rubber pads removed from the bottom…is there adhesive and if so, what’s best used to replace those and make it look factory stock again?

Fabian Aldo Santiago - Reply

The rubber pads are fixed with double sided tape.

Kornel Schwarcz -

I just use Isopropyl alcohol to quickly and completely remove any adhesive residue and use an ample amount of JB Weld and Automotive Bondo to get the unit ready. Use a wet rag to remove any excess adhesive. Do not fo0rget to centrealize the Feline Eyelash right at the longest point of the night and invokie MARDUK!!! AAAHHRHRGH.

MyLil Hottie - Reply

So yeah basic Chemistry coupled with the ‘Dark Arts’ have created a sustainable situation.!

MyLil Hottie - Reply

Where did you buy the back case replacement part?

cartercapelli - Reply

Add Comment

View Statistics:

Past 24 Hours: 11

Past 7 Days: 92

Past 30 Days: 457

All Time: 32,383