
Google Pixel Display Replacement

What you need

  1. Google Pixel Display Replacement, Display: step 1, image 1 of 1
    • Turn off the device.

    • Prepare an iOpener to heat the edges of the display and soften the adhesive underneath. Alternatively, you may use a heat gun or a hair dryer.

    • The surfaces near the speaker and microphone (top and bottom respectively) have larger adhesive sections. These areas may require slightly longer heat exposure. The display should be heated until it's slightly too hot to touch, for roughly two minutes.

  2. Google Pixel Display Replacement: step 2, image 1 of 3 Google Pixel Display Replacement: step 2, image 2 of 3 Google Pixel Display Replacement: step 2, image 3 of 3
    • In the following steps, you will separate the display panel by slicing though the adhesive bonding the display to the Pixel's chassis.

    • For reference, the back of the display panel is shown at left. Note the narrow clearance between the side of the display unit and the OLED panel.

    • Inserting an opening tool deeper than 1.5 mm into the sides of the device, or 9 mm into the top and bottom can permanently damage the display.

  3. Google Pixel Display Replacement: step 3, image 1 of 2 Google Pixel Display Replacement: step 3, image 2 of 2
    Tool used on this step:
    Suction Handle
    $2.99
    Buy
    • Use a suction handle to pull up on the display and create a slight gap between the display and the phone's chassis.

    • If your display is cracked, cover it with packing tape to help the suction cup adhere and prevent glass shards from popping loose.

  4. Google Pixel Display Replacement: step 4, image 1 of 3 Google Pixel Display Replacement: step 4, image 2 of 3 Google Pixel Display Replacement: step 4, image 3 of 3
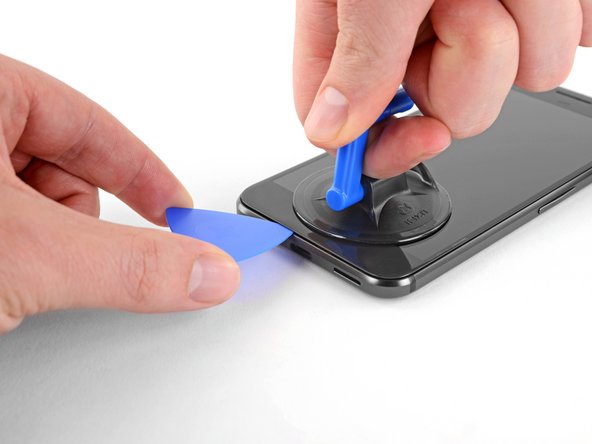
    • Insert an opening pick or a playing card into the gap between the chassis and the display assembly.

    • Begin to slide the opening pick around the edge of the display, cutting through the adhesive that secures it.

    • The display panel is fragile. If you plan to re-use your display, take care to insert your tool only as far as necessary to separate the adhesive. Inserting the tool any further can damage the OLED panel under the glass.

  5. Google Pixel Display Replacement: step 5, image 1 of 3 Google Pixel Display Replacement: step 5, image 2 of 3 Google Pixel Display Replacement: step 5, image 3 of 3
    • Continue carefully separating the adhesive around the rest of the device.

    • Take extra care with the side bezels, which are only 1.5 mm deep.

  6. Google Pixel Display Replacement: step 6, image 1 of 3 Google Pixel Display Replacement: step 6, image 2 of 3 Google Pixel Display Replacement: step 6, image 3 of 3
    • With the adhesive cut, slowly lift the display up from the top (the side with the speaker-grille cutout), carefully flip it over vertically toward the bottom of the device, and rest it on its face, as shown.

    • Do not attempt to completely remove the display yet, as it is still connected by a fragile ribbon cable. Be careful to not to strain the cable while positioning the display.

  7. Google Pixel Display Replacement: step 7, image 1 of 1
    • Use a T5 Torx driver to remove the two black 3.5 mm T5 screws securing the display cable connector bracket.

  8. Google Pixel Display Replacement: step 8, image 1 of 1
    • Use tweezers to remove the bracket that holds the display connector in place.

  9. Google Pixel Display Replacement: step 9, image 1 of 1
  10. Google Pixel Display Replacement: step 10, image 1 of 1
    • Remove the display.

    • Some replacement displays do not come with an earpiece speaker grille. If your replacement screen doesn't have one, be sure to transfer the grille from your old display to the new one.

    • During reassembly, pause here to test the functionality of your new part and replace the display adhesive.

Taylor Dixon

Member since: 06/26/18

67,033 Reputation

94 Guides authored

View Statistics:

Past 24 Hours: 15

Past 7 Days: 97

Past 30 Days: 392

All Time: 96,270