Introduction
Use this guide to remove or replace the front camera and sensors on your Google Pixel 4.
Caution: Google warns that further disassembly of this front laser assembly could result in hazardous exposure to invisible infrared laser emissions. Read their safety warnings here.
What you need
-
-
Insert a SIM eject tool, bit, or a straightened paper clip into the small hole on the SIM card tray on the left edge of the phone.
-
Press firmly to eject the tray.
-
Remove the SIM card tray.
-
-
-
Prepare an iOpener and apply it to the bottom edge of the back panel for one minute.
-
-
-
Apply a suction cup to the heated edge of the back panel by pressing down on it to create suction, as close to the edge as possible.
-
-
-
Pull up on the suction cup with strong, steady force to create a gap between the back panel and the frame.
-
Insert the point of an opening pick into the gap.
-
-
-
Slide the opening pick across the bottom towards the left corner to slice the adhesive.
-
With the pick still inserted, slide it from the bottom left corner over to the bottom right corner to completely slice the bottom side adhesive.
-
Leave the pick inserted in the bottom right corner to prevent the adhesive from re-sealing.
-
-
-
Prepare an iOpener and apply it on the left edge of the phone for one minute.
-
-
-
Insert a second opening pick underneath the back panel directly over the charge port.
-
Slide the opening pick to the bottom left corner of the phone.
-
-
-
Slide the opening pick around the bottom left corner and across the left side of the phone to slice the adhesive.
-
Stop when you reach the top left corner, near the camera, and leave the pick inserted.
-
-
-
Prepare an iOpener and apply it on the right edge of the phone for one minute.
-
-
-
-
With the first two opening picks still in place, insert a third pick on the lower part of the righthand side.
-
Slide the opening pick up towards the top of the phone, slicing the right side's adhesive.
-
Stop when you reach the top right corner, and leave the pick inserted.
-
-
-
Slide the third opening pick around the top right corner and across the top side of the phone, slicing the final strip of adhesive.
-
-
-
Once you have sliced around the perimeter of the phone, carefully lift the right edge of the back cover, opening it like a book.
-
Do not try to pull the panel all the way off yet, as it is still connected to the phone.
-
-
-
Continue swinging open the back panel until you can rest it on the left edge the phone, being careful not to put any stress on the attached ribbon cable.
-
-
-
Remove the five T3 Torx screws securing the battery connector shield:
-
Four 4.0 mm screws
-
One 2.1 mm screw
-
-
-
Using the pointed end of a spudger, pry the battery connector straight up from the motherboard to disconnect the battery.
-
-
-
Using the flat end of a spudger, gently fold the battery cable over so it doesn't accidentally make contact during the rest of your repairs.
-
-
-
Use a T3 Torx driver to remove the two 4 mm screws securing the back panel connector cover.
-
-
-
Use a T3 Torx driver to remove the four 4 mm screws securing the camera connector cover.
-
-
-
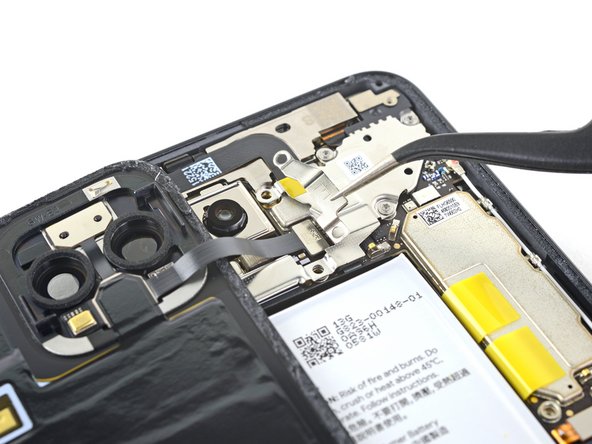
Using a pair of tweezers, tilt the camera cover up and slide it out of the retaining slot on the upper right corner of the phone to remove.
-
-
-
Using the pointed end of a spudger, pry the camera and sensor connectors straight up from the motherboard.
-
-
-
Use a T3 Torx driver to remove the two 2.4 mm screws securing the front camera and sensor assembly.
-