
Garmin StreetPilot c330 Screen Replacement

Prerequisite Only
This guide is only intended to be used as a prerequisite for other guides. It's incomplete by itself.

What you need

  1. Garmin StreetPilot c330 Screen Replacement, Outer Casing: step 1, image 1 of 3 Garmin StreetPilot c330 Screen Replacement, Outer Casing: step 1, image 2 of 3 Garmin StreetPilot c330 Screen Replacement, Outer Casing: step 1, image 3 of 3
    • At the top of the outer frame, insert the plastic spudger into the groove in the center.

    • Lever the frame gently until it pops out of the case.

  2. Garmin StreetPilot c330 Screen Replacement: step 2, image 1 of 3 Garmin StreetPilot c330 Screen Replacement: step 2, image 2 of 3 Garmin StreetPilot c330 Screen Replacement: step 2, image 3 of 3
    • Use a Phillips #00 screwdriver to remove the four screws around the screen.

  3. Garmin StreetPilot c330 Screen Replacement: step 3, image 1 of 2 Garmin StreetPilot c330 Screen Replacement: step 3, image 2 of 2
    • Gently pull from both ends of the casing to separate the front and back panels.

    • Do not force the pieces apart wider than the length of the connecting wires, or you will damage the wiring.

  4. Garmin StreetPilot c330 Screen Replacement: step 4, image 1 of 3 Garmin StreetPilot c330 Screen Replacement: step 4, image 2 of 3 Garmin StreetPilot c330 Screen Replacement: step 4, image 3 of 3
    • Gently unplug the white cable connector using either your fingers or tweezers.

  5. Garmin StreetPilot c330 Screen Replacement: step 5, image 1 of 1
    • Carefully expose both halves of the device.

    • Be sure not to pull the two halves apart further than the black wire can reach.

  6. Garmin StreetPilot c330 Screen Replacement, Screen: step 6, image 1 of 3 Garmin StreetPilot c330 Screen Replacement, Screen: step 6, image 2 of 3 Garmin StreetPilot c330 Screen Replacement, Screen: step 6, image 3 of 3
    • Locate the three screws holding the motherboard in place.

    • Remove screws.

    • Set screws aside in a safe place.

  7. Garmin StreetPilot c330 Screen Replacement: step 7, image 1 of 1
    • Use Spudger to lift up motherboard.

  8. Garmin StreetPilot c330 Screen Replacement: step 8, image 1 of 3 Garmin StreetPilot c330 Screen Replacement: step 8, image 2 of 3 Garmin StreetPilot c330 Screen Replacement: step 8, image 3 of 3
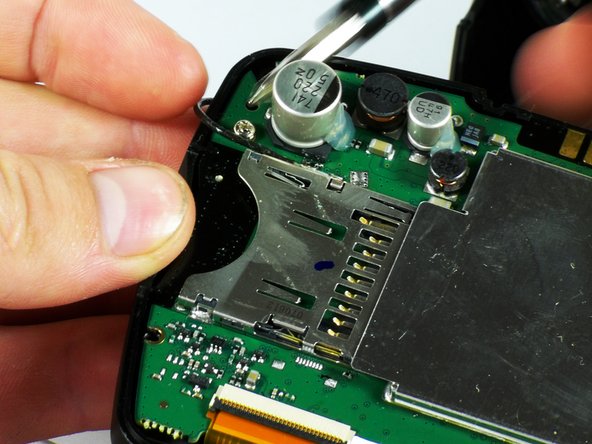
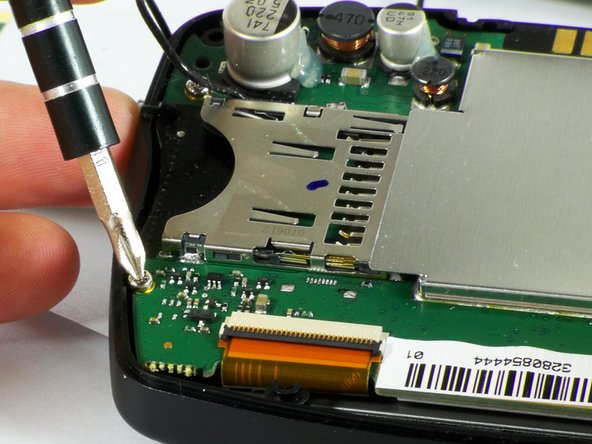
    • To remove the ribbon cable, lift the black latch using the spudger tool.

    • Separate the connection using either your fingers, tweezers, or the spudger.

  9. Garmin StreetPilot c330 Screen Replacement: step 9, image 1 of 2 Garmin StreetPilot c330 Screen Replacement: step 9, image 2 of 2
    • Slide the spudger tool under the first flexible tab located on the right side of the bottom of the screen.

    • The tab is denoted by a red box in the photo.

    • There are two tabs at the top of the screen that are not flexible

    • Rotate the spudger outward until the tab is no longer holding the screen.

    • Push the screen out from the front.

  10. Garmin StreetPilot c330 Screen Replacement: step 10, image 1 of 1
    • Find the second flexible tab near the screen's wires and slide spudger under tab.

    • The tab is denoted by a red box in the photo.

    • Rotate spudger outward until the tab is no longer holding the screen.

    • Push the screen out from the front.

  11. Garmin StreetPilot c330 Screen Replacement: step 11, image 1 of 1
    • Separate the screen from the front cover.

  12. Garmin StreetPilot c330 Screen Replacement: step 12, image 1 of 1
    • Have your new screen ready to insert, making sure it is fully unwrapped.

    • Find the tabs used to secure the screen as highlighted in the photo.

    • Slide the bottom of the screen under the permanent tabs.

    • The permanent tabs are denoted by blue boxes in the photo.

    • Use the spudger tool to raise the flexible tabs in order to reinsert the screen completely into the front cover.

  13. Garmin StreetPilot c330 Screen Replacement: step 13, image 1 of 2 Garmin StreetPilot c330 Screen Replacement: step 13, image 2 of 2
    • Reinsert the ribbon cable into the slot you removed it from.

    • Lower the black latch using the spudger tool.

  14. Garmin StreetPilot c330 Screen Replacement: step 14, image 1 of 1
    • Reattach the motherboard with the three screws you removed previously.

    • Use the silver screws.

  15. Garmin StreetPilot c330 Screen Replacement: step 15, image 1 of 3 Garmin StreetPilot c330 Screen Replacement: step 15, image 2 of 3 Garmin StreetPilot c330 Screen Replacement: step 15, image 3 of 3
    • Locate the white wire clip.

    • Plug it back in.

  16. Garmin StreetPilot c330 Screen Replacement: step 16, image 1 of 1
    • Screw the front panel back onto the base using the four screws you removed in step 2.

    • Use the black screws.

  17. Garmin StreetPilot c330 Screen Replacement: step 17, image 1 of 1
    • Gently pop the plastic frame back into place.

Adrian Leon

Member since: 10/07/10

173 Reputation

3 Guides authored

Team

Cal Poly, Team 22-1, Maness Fall 2010 Member of Cal Poly, Team 22-1, Maness Fall 2010

CPSU-MANESS-F10S22G1

3 Members

4 Guides authored

View Statistics:

Past 24 Hours: 0

Past 7 Days: 1

Past 30 Days: 3

All Time: 1,536