
Dell XPS 13 9350 Motherboard Replacement

Archived Guide
This guide is retained solely for historical purposes. Use the updated version of the guide to perform your repair.

What you need

  1. Dell XPS 13 9350 Motherboard Replacement, Back Cover: step 1, image 1 of 2 Dell XPS 13 9350 Motherboard Replacement, Back Cover: step 1, image 2 of 2
    • Remove the eight 4 mm T5 Torx screws from the bottom cover.

  2. Dell XPS 13 9350 Motherboard Replacement: step 2, image 1 of 2 Dell XPS 13 9350 Motherboard Replacement: step 2, image 2 of 2
    • Use a plastic opening tool to pry open the 'XPS' flap in the middle.

  3. Dell XPS 13 9350 Motherboard Replacement: step 3, image 1 of 1
    • Remove the single Phillips screw hidden beneath the flap.

  4. Dell XPS 13 9350 Motherboard Replacement: step 4, image 1 of 1
    • Use opening picks or a plastic pry tool to pry open the case clips, beginning from the back edge.

  5. Dell XPS 13 9350 Motherboard Replacement: step 5, image 1 of 1
    • Remove the bottom cover.

  6. Dell XPS 13 9350 Motherboard Replacement, Fan: step 6, image 1 of 3 Dell XPS 13 9350 Motherboard Replacement, Fan: step 6, image 2 of 3 Dell XPS 13 9350 Motherboard Replacement, Fan: step 6, image 3 of 3
    • Use tweezers to remove the little white connector by pulling it out and away from its socket.

  7. Dell XPS 13 9350 Motherboard Replacement: step 7, image 1 of 2 Dell XPS 13 9350 Motherboard Replacement: step 7, image 2 of 2
    • Remove the black standard flat connector by lifting the tab up with your hand.

  8. Dell XPS 13 9350 Motherboard Replacement: step 8, image 1 of 2 Dell XPS 13 9350 Motherboard Replacement: step 8, image 2 of 2
    • Remove the 4 mm Phillips #0 screw that connects the fan to the motherboard.

    • Remove the 4 mm Phillips #0 screw that connects the fan to the base of the computer.

  9. Dell XPS 13 9350 Motherboard Replacement: step 9, image 1 of 2 Dell XPS 13 9350 Motherboard Replacement: step 9, image 2 of 2
    • Use your right hand to lift up the larger section of the motherboard, closest to the fan.

    • Use your left hand to pull the fan at a 30-degree angle out from underneath the motherboard.

  10. Dell XPS 13 9350 Motherboard Replacement, Battery: step 10, image 1 of 2 Dell XPS 13 9350 Motherboard Replacement, Battery: step 10, image 2 of 2
    • Remove the four 3 mm Phillips #0 screws located on each corner of the battery.

  11. Dell XPS 13 9350 Motherboard Replacement: step 11, image 1 of 2 Dell XPS 13 9350 Motherboard Replacement: step 11, image 2 of 2
    • Pull the battery cable connector towards the battery to disconnect it from its socket.

    • Do not pull up.

  12. Dell XPS 13 9350 Motherboard Replacement: step 12, image 1 of 1
    • Peel up any tape securing the speaker cables to the battery.

    • You do not need to remove the speakers, only the tape, allowing the battery to be removed out under the speaker cables.

  13. Dell XPS 13 9350 Motherboard Replacement: step 13, image 1 of 1
    • Remove the battery.

  14. Dell XPS 13 9350 Motherboard Replacement, Motherboard: step 14, image 1 of 2 Dell XPS 13 9350 Motherboard Replacement, Motherboard: step 14, image 2 of 2
    • Remove the eight 4 mm Phillips #0 screws from the motherboard.

  15. Dell XPS 13 9350 Motherboard Replacement: step 15, image 1 of 3 Dell XPS 13 9350 Motherboard Replacement: step 15, image 2 of 3 Dell XPS 13 9350 Motherboard Replacement: step 15, image 3 of 3
    • Locate the red and black cable connector at the bottom right of the motherboard.

    • Use tweezers to slowly detach the cable connector from its socket by pulling it to the right and up.

  16. Dell XPS 13 9350 Motherboard Replacement: step 16, image 1 of 3 Dell XPS 13 9350 Motherboard Replacement: step 16, image 2 of 3 Dell XPS 13 9350 Motherboard Replacement: step 16, image 3 of 3
    • Use tweezers to flip open the Zero Insertion Force (ZIF) connector.

    • Use tweezers to detach the ribbon cable from the ZIF by pulling it towards yourself.

  17. Dell XPS 13 9350 Motherboard Replacement: step 17, image 1 of 3 Dell XPS 13 9350 Motherboard Replacement: step 17, image 2 of 3 Dell XPS 13 9350 Motherboard Replacement: step 17, image 3 of 3
    • Use tweezers to flip open the white ZIF connector.

    • Use tweezers to detach the ribbon connector from the ZIF by pulling it towards yourself.

  18. Dell XPS 13 9350 Motherboard Replacement: step 18, image 1 of 3 Dell XPS 13 9350 Motherboard Replacement: step 18, image 2 of 3 Dell XPS 13 9350 Motherboard Replacement: step 18, image 3 of 3
    • Use tweezers to flip open the ZIF connector.

    • Use tweezers to detach the orange ribbon connector from the ZIF by pulling it towards yourself.

  19. Dell XPS 13 9350 Motherboard Replacement: step 19, image 1 of 2 Dell XPS 13 9350 Motherboard Replacement: step 19, image 2 of 2
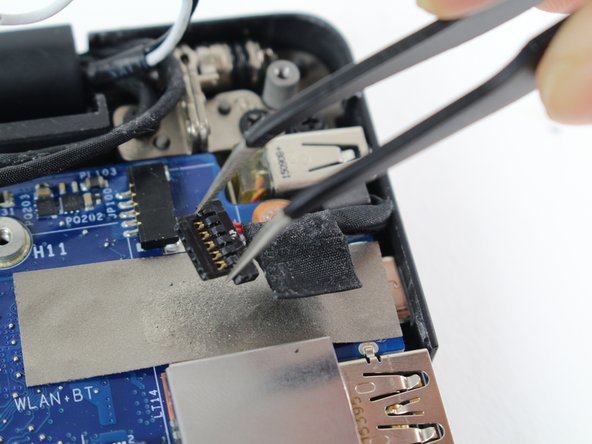
    • Use tweezers to detach the black cable connector out of its socket by pulling it to the right.

  20. Dell XPS 13 9350 Motherboard Replacement: step 20, image 1 of 3 Dell XPS 13 9350 Motherboard Replacement: step 20, image 2 of 3 Dell XPS 13 9350 Motherboard Replacement: step 20, image 3 of 3
    • Use tweezers to gently detach the black and white cable connector out of its socket by pulling it to the right.

  21. Dell XPS 13 9350 Motherboard Replacement: step 21, image 1 of 2 Dell XPS 13 9350 Motherboard Replacement: step 21, image 2 of 2
    • Locate the connector at the top right of the motherboard.

    • Use tweezers to detach the cable connector from its socket by pulling it to the right.

  22. Dell XPS 13 9350 Motherboard Replacement: step 22, image 1 of 3 Dell XPS 13 9350 Motherboard Replacement: step 22, image 2 of 3 Dell XPS 13 9350 Motherboard Replacement: step 22, image 3 of 3
    • Locate the last black cable connector.

    • Use tweezers to detach the black cable connector from its socket by pulling it to the right.

  23. Dell XPS 13 9350 Motherboard Replacement: step 23, image 1 of 1
    • Use your hands to lift up the motherboard.

Evan Shui

Member since: 04/26/17

320 Reputation

1 Guide authored

Team

Cal Poly, Team S21-G6, Livingston Spring 2017 Member of Cal Poly, Team S21-G6, Livingston Spring 2017

CPSU-LIVINGSTON-S17S21G6

5 Members

30 Guides authored

View Statistics:

Past 24 Hours: 5

Past 7 Days: 34

Past 30 Days: 214

All Time: 23,697