
Dell Venue 8 Display Replacement

What you need

  1. Dell Venue 8 Display Replacement, Rear Case/Midframe: step 1, image 1 of 1
    • Hold the device with the screen facing up. Gently wedge your plastic opening tool into the crease, and run it along the perimeter of the case

    • You will hear click sounds as the clips unhinge

    • Remove the back panel of the device.

  2. Dell Venue 8 Display Replacement: step 2, image 1 of 3 Dell Venue 8 Display Replacement: step 2, image 2 of 3 Dell Venue 8 Display Replacement: step 2, image 3 of 3
    • Remove the 14 screws with the T-5 Torx screwdriver. (11 black 3.6mm screws, and three 4.45mm screws)

    • The silver screws are marked with an "S" or a sticker [S1.6(Silver)] See the corrected image

    • 4.45mm Silver screws

    • 3.6mm Black screws

    • Gently snap the perimeter clips open, and remove the internal plastic case.

  3. Dell Venue 8 Display Replacement, Battery: step 3, image 1 of 1
    • Unclip the power clip from the motherboard by pulling down gently towards the bottom of the tablet.

  4. Dell Venue 8 Display Replacement: step 4, image 1 of 1
    • Gently pry the battery away from the device with the plastic opening tool to remove it.

    • The battery is held on to the tablet by a light adhesive

  5. Dell Venue 8 Display Replacement, Speaker: step 5, image 1 of 1
    • Using your plastic opening tool, unclip the speaker connection from the logic board.

    • Caution: Pull directly up, not out, on the connection

  6. Dell Venue 8 Display Replacement: step 6, image 1 of 1
    • Remove the speaker by placing using your plastic opening tool in the gap on the top of the speaker and prying it up.

    • The speaker is held on by light adhesive

  7. Dell Venue 8 Display Replacement, Display: step 7, image 1 of 2 Dell Venue 8 Display Replacement, Display: step 7, image 2 of 2
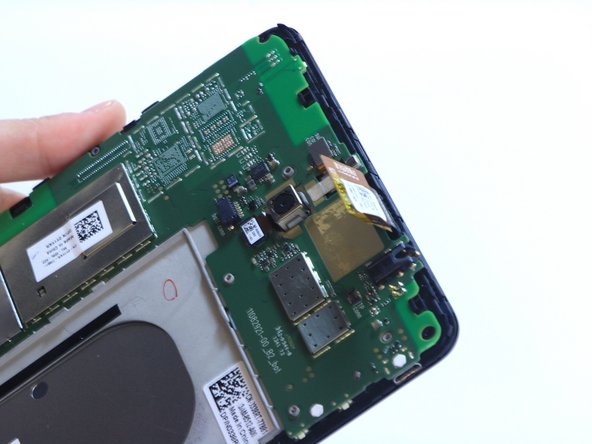
    • Disconnect the display clip found next to the speaker.

    • Disconnect the Display connection located at the top of the tablet.

  8. Dell Venue 8 Display Replacement: step 8, image 1 of 1
    • Unclip the logic board from the Display.

Mitul

Member since: 02/19/15

673 Reputation

1 Guide authored

Team

USF Tampa, Team 9-2, Leahy Winter 2015 Member of USF Tampa, Team 9-2, Leahy Winter 2015

USFT-LEAHY-W15S9G2

3 Members

12 Guides authored

View Statistics:

Past 24 Hours: 1

Past 7 Days: 4

Past 30 Days: 24

All Time: 7,116