
Dell Inspiron 11-3164 Keyboard Replacement

What you need

  1. Dell Inspiron 11-3164 Keyboard Replacement, Keyboard: step 1, image 1 of 2 Dell Inspiron 11-3164 Keyboard Replacement, Keyboard: step 1, image 2 of 2
    • Place laptop upside down to observe the first set of screws on the bottom cover. With the J1 Phillips head screwdriver bit, unscrew eight (8) size 60 mm screws.

    • With a metal spudger, remove the plastic cover to unveil the final screw.

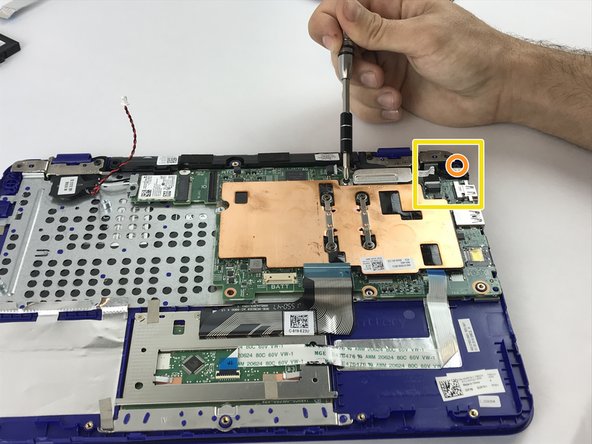
    • With the J1 Phillips head bit, remove remaining 60 mm screw.

  2. Dell Inspiron 11-3164 Keyboard Replacement: step 2, image 1 of 2 Dell Inspiron 11-3164 Keyboard Replacement: step 2, image 2 of 2
    • With a metal spudger, pry apart the bottom cover working around the edges.

    • While separating the halves of the bottom cover, carefully move the spudger up and down to avoid damaging the USB/Audio circuit board cable inside.

    • With tweezers, disconnect the USB/Audio circuit board cable.

    • Place the bottom cover off to the side.

  3. Dell Inspiron 11-3164 Keyboard Replacement: step 3, image 1 of 1
    • With the J1 screwdriver bit, unscrew three (3) size 40 mm battery screws.

  4. Dell Inspiron 11-3164 Keyboard Replacement: step 4, image 1 of 1
    • With tweezers, disconnect the battery cable.

    • Remove the battery pack.

  5. Dell Inspiron 11-3164 Keyboard Replacement: step 5, image 1 of 3 Dell Inspiron 11-3164 Keyboard Replacement: step 5, image 2 of 3 Dell Inspiron 11-3164 Keyboard Replacement: step 5, image 3 of 3
    • Remove the M2 x 3mm bracket screw.

    • Remove the metal bracket.

    • With tweezers, detach the white and black antenna cables connected to the Wireless WLAN Card.

    • Remove the Wireless WLAN Card.

  6. Dell Inspiron 11-3164 Keyboard Replacement: step 6, image 1 of 1
    • With tweezers, unplug the CMOS battery.

    • With tweezers, detach the CMOS battery.

  7. Dell Inspiron 11-3164 Keyboard Replacement: step 7, image 1 of 2 Dell Inspiron 11-3164 Keyboard Replacement: step 7, image 2 of 2
    • With tweezers, unplug the DC Jack cable.

    • With the Philips #0 Screwdriver, loosen the M2 x 3mm screw.

    • With tweezers, detach the DC Jack.

  8. Dell Inspiron 11-3164 Keyboard Replacement: step 8, image 1 of 2 Dell Inspiron 11-3164 Keyboard Replacement: step 8, image 2 of 2
    • With tweezers, disconnect the speaker cable.

    • With tweezers, detach the speaker.

  9. Dell Inspiron 11-3164 Keyboard Replacement: step 9, image 1 of 2 Dell Inspiron 11-3164 Keyboard Replacement: step 9, image 2 of 2
    • With the Philips #0 Screwdriver, unbolt the M2 x 3mm screw.

    • Remove the metal bracket.

    • With tweezers, disconnect the display cable.

  10. Dell Inspiron 11-3164 Keyboard Replacement: step 10, image 1 of 3 Dell Inspiron 11-3164 Keyboard Replacement: step 10, image 2 of 3 Dell Inspiron 11-3164 Keyboard Replacement: step 10, image 3 of 3
    • With the Philips #0 Screwdriver, unfasten the 2 - M2.5 x 5mm left and right hinge screws.

    • With the Philips #0 Screwdriver, unhinge the 2 - M2.5 x 5mm display cable bracket screw.

    • With tweezers, remove the LCD screen.

  11. Dell Inspiron 11-3164 Keyboard Replacement: step 11, image 1 of 1
    • With the Philips #0 Screwdriver, loosen the 4 screws supporting the copper plate.

    • With tweezers, remove the copper plate.

  12. Dell Inspiron 11-3164 Keyboard Replacement: step 12, image 1 of 2 Dell Inspiron 11-3164 Keyboard Replacement: step 12, image 2 of 2
    • With tweezers, disconnect the keyboard cable.

    • With tweezers, disconnect the touchpad cable.

    • With the Philips #00 Screwdriver, loosen the four (4) M2 x 2mm screws.

    • Gently remove the mouse touchpad. The fixer is left with the palm-rest and keyboard assembly.

Conclusion

To reassemble your device, follow these instructions in reverse order.

One other person completed this guide.

Michael Kendziora

Member since: 02/14/18

781 Reputation

5 Guides authored

Team

USF Tampa, Team S6-G4, Eyestone Spring 2018 Member of USF Tampa, Team S6-G4, Eyestone Spring 2018

USFT-EYESTONE-S18S6G4

4 Members

6 Guides authored

0 Comments

Add Comment

View Statistics:

Past 24 Hours: 0

Past 7 Days: 0

Past 30 Days: 1

All Time: 300