
Bose Wave Radio AWR1-1W Screen Replacement

What you need

  1. Bose Wave Radio AWR1-1W Screen Replacement, Base: step 1, image 1 of 2 Bose Wave Radio AWR1-1W Screen Replacement, Base: step 1, image 2 of 2
    • Remove the four 19mm Phillips #2 screws from the base of the device.

  2. Bose Wave Radio AWR1-1W Screen Replacement: step 2, image 1 of 3 Bose Wave Radio AWR1-1W Screen Replacement: step 2, image 2 of 3 Bose Wave Radio AWR1-1W Screen Replacement: step 2, image 3 of 3
    • Turn the device over, holding the base on with your thumbs.

    • Hold the device tightly to prevent the base from falling off.

  3. Bose Wave Radio AWR1-1W Screen Replacement: step 3, image 1 of 3 Bose Wave Radio AWR1-1W Screen Replacement: step 3, image 2 of 3 Bose Wave Radio AWR1-1W Screen Replacement: step 3, image 3 of 3
    • Gently lift the top off of the device.

    • Lift in the direction shown to avoid damaging the wires connecting the top and base of the device.

  4. Bose Wave Radio AWR1-1W Screen Replacement: step 4, image 1 of 3 Bose Wave Radio AWR1-1W Screen Replacement: step 4, image 2 of 3 Bose Wave Radio AWR1-1W Screen Replacement: step 4, image 3 of 3
    • Pinch and unplug the white connector from the device.

  5. Bose Wave Radio AWR1-1W Screen Replacement: step 5, image 1 of 3 Bose Wave Radio AWR1-1W Screen Replacement: step 5, image 2 of 3 Bose Wave Radio AWR1-1W Screen Replacement: step 5, image 3 of 3
    • Gently pinch and pull on the white ribbon cable to disconnect it from the base.

  6. Bose Wave Radio AWR1-1W Screen Replacement: step 6, image 1 of 1
    • The base should now be completely detached from the device.

  7. Bose Wave Radio AWR1-1W Screen Replacement, Front Grill: step 7, image 1 of 3 Bose Wave Radio AWR1-1W Screen Replacement, Front Grill: step 7, image 2 of 3 Bose Wave Radio AWR1-1W Screen Replacement, Front Grill: step 7, image 3 of 3
    • Wedge the spudger between the top and front panel on the right side of the device.

    • Push down on the spudger, lifting the front panel away from the top panel until it pops out of the right side.

    • Repeat for the left side of the device.

    • Too much pressure may break the panel, but it should flex slightly before it pops out.

  8. Bose Wave Radio AWR1-1W Screen Replacement: step 8, image 1 of 3 Bose Wave Radio AWR1-1W Screen Replacement: step 8, image 2 of 3 Bose Wave Radio AWR1-1W Screen Replacement: step 8, image 3 of 3
    • Once the panel is released on the left side, wedge the spudger between the top panel and front grill of the device as shown.

    • Apply pressure and move the spudger upward until the front grill pops out.

    • Repeat for the right side of the device.

  9. Bose Wave Radio AWR1-1W Screen Replacement: step 9, image 1 of 1
    • Lift the front grill away from the device.

  10. Bose Wave Radio AWR1-1W Screen Replacement, Button Panel: step 10, image 1 of 2 Bose Wave Radio AWR1-1W Screen Replacement, Button Panel: step 10, image 2 of 2
    • Turn the device around.

    • Wedge the spudger into the larger part of the gap under the back of the device.

  11. Bose Wave Radio AWR1-1W Screen Replacement: step 11, image 1 of 1
    • Move the spudger up until the button panel is loose.

    • Push forward on the back of the button panel to disconnect the panel from the top of the device.

  12. Bose Wave Radio AWR1-1W Screen Replacement: step 12, image 1 of 2 Bose Wave Radio AWR1-1W Screen Replacement: step 12, image 2 of 2
    • Turn the device around.

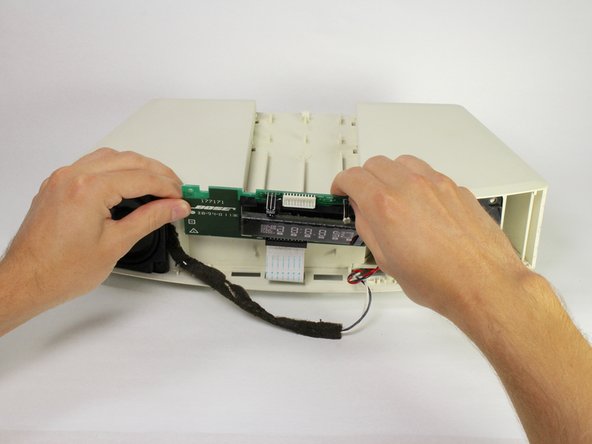
    • Pull the button panel forward with one hand and push the screen assembly into the device with the other to disconnect the button panel.

    Awesome Guide! Came apart easily and quickly. Thx so much for your support with this. This definitely makes me want to learn more from your DiY fix it site. Harley18

    Tammy Gray - Reply

  13. Bose Wave Radio AWR1-1W Screen Replacement, Screen: step 13, image 1 of 3 Bose Wave Radio AWR1-1W Screen Replacement, Screen: step 13, image 2 of 3 Bose Wave Radio AWR1-1W Screen Replacement, Screen: step 13, image 3 of 3
    • Gently pull the top of the screen assembly away from the device.

  14. Bose Wave Radio AWR1-1W Screen Replacement: step 14, image 1 of 2 Bose Wave Radio AWR1-1W Screen Replacement: step 14, image 2 of 2
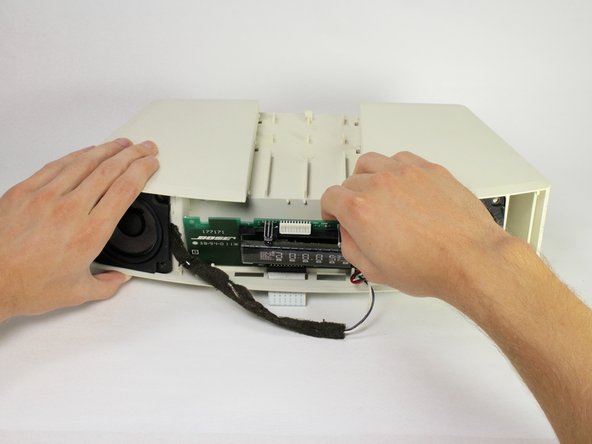
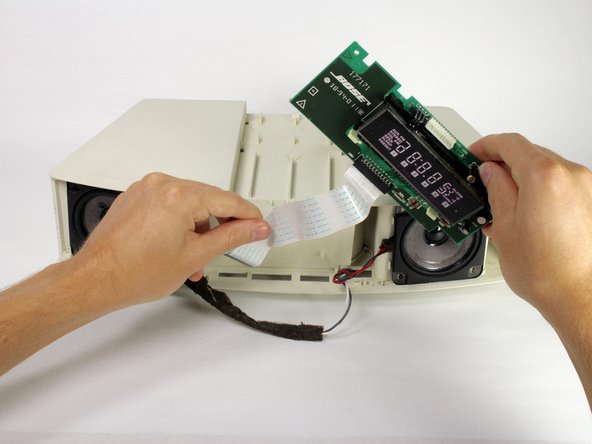
    • Lift the screen assembly upward and pull the white wire strip out of the device.

    Need to purchase white wire strip

    Bruce Ebneter - Reply

Conclusion

To reassemble your device, follow these instructions in reverse order.

4 other people completed this guide.

Cassie Harriman

Member since: 04/18/17

1,033 Reputation

5 Guides authored

Team

Cal Poly, Team S15-G2, Banghart Spring 2017 Member of Cal Poly, Team S15-G2, Banghart Spring 2017

CPSU-BANGHART-S17S15G2

4 Members

6 Guides authored

5 Comments

Great! This device is the best wave system in sound accurate. All frequencies sounds clear!!! Awesome!!!

srmrs - Reply

Nicely done.  Love the details.  Just one question - where can I get the replacement screen?

Patsy Hamilton - Reply

Instructions were PERFECT! Thank you. I found my replacement screen on ebay for $25, took a chance that it would work as stated by the seller. Otherwise I would have thrown the radio away.

John Stine - Reply

I performed the repair as directed. It was easy especially if you have a plastic spung to work with. Problem comes from the new display once installed shows all the characters? Unplugged it and re-plugged but still stuck in all character test mode?

plhamp - Reply

How to purchase White wire strip

Bruce Ebneter - Reply

Add Comment

View Statistics:

Past 24 Hours: 2

Past 7 Days: 31

Past 30 Days: 115

All Time: 10,014