
Asus X550ZA-SA100603E Motherboard Replacement

What you need

  1. Asus X550ZA-SA100603E Motherboard Replacement, Keyboard: step 1, image 1 of 1
    • Using the Phillips #0 screwdriver, remove the seven 14 mm screws on the bottom of the laptop.

    • Then use the Phillips #0 to remove the three 4 mm screws on the bottom of the laptop.

  2. Asus X550ZA-SA100603E Motherboard Replacement: step 2, image 1 of 3 Asus X550ZA-SA100603E Motherboard Replacement: step 2, image 2 of 3 Asus X550ZA-SA100603E Motherboard Replacement: step 2, image 3 of 3
    • Insert a plastic opening tool between the keyboard and base of the laptop to pry the keyboard away from the base. Do this around the entire perimeter of the laptop.

    • This disconnects the face of the keyboard. Gently lift the keyboard up to expose the motherboard.

    • There are still ribbon cables connecting the keyboard face to the motherboard. Do not pull the keyboard away roughly.

  3. Asus X550ZA-SA100603E Motherboard Replacement: step 3, image 1 of 3 Asus X550ZA-SA100603E Motherboard Replacement: step 3, image 2 of 3 Asus X550ZA-SA100603E Motherboard Replacement: step 3, image 3 of 3
    • Gently lift the keyboard to access the three ribbon cables connected to the motherboard

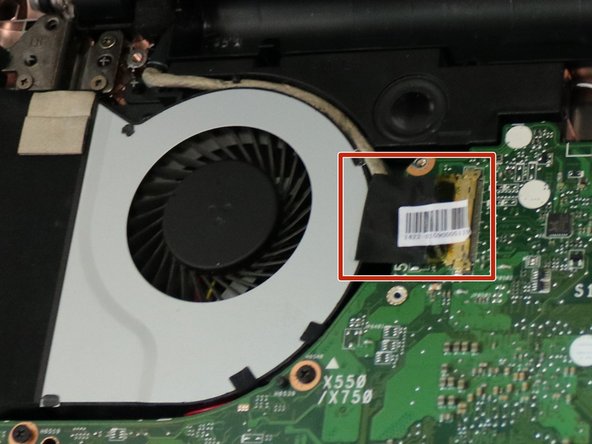
    • Using precision tweezers, flip up the white and black retaining flaps on the ZIF connectors that hold the two smaller ribbon cables in place.

    • Gently pull the ribbon cables from their sockets on the motherboard.

  4. Asus X550ZA-SA100603E Motherboard Replacement: step 4, image 1 of 3 Asus X550ZA-SA100603E Motherboard Replacement: step 4, image 2 of 3 Asus X550ZA-SA100603E Motherboard Replacement: step 4, image 3 of 3
    • Push the two white clamps on the large ZIF connector towards the screen.

    • Gently remove the track pad ribbon cable from its connector.

  5. Asus X550ZA-SA100603E Motherboard Replacement: step 5, image 1 of 1
    • Remove the keyboard.

  6. Asus X550ZA-SA100603E Motherboard Replacement, Battery: step 6, image 1 of 2 Asus X550ZA-SA100603E Motherboard Replacement, Battery: step 6, image 2 of 2
    • Disconnect the multi-wire battery plug from the motherboard.

  7. Asus X550ZA-SA100603E Motherboard Replacement: step 7, image 1 of 3 Asus X550ZA-SA100603E Motherboard Replacement: step 7, image 2 of 3 Asus X550ZA-SA100603E Motherboard Replacement: step 7, image 3 of 3
    • Pull the two tabs holding the battery in place and lift the battery up. It should remove easily.

  8. Asus X550ZA-SA100603E Motherboard Replacement, Motherboard: step 8, image 1 of 1
    • Use a Phillips #0 screwdriver to remove the thirteen black 4 mm screws from the face of the motherboard.

    • Use a Phillips #0 head screwdiver to remove the four silver 4 mm screws from the face of the motherboard

    • Use a Phillips #0 head screwdriver to remove the one black 4 mm screw from the indented area above the fan.

  9. Asus X550ZA-SA100603E Motherboard Replacement: step 9, image 1 of 3 Asus X550ZA-SA100603E Motherboard Replacement: step 9, image 2 of 3 Asus X550ZA-SA100603E Motherboard Replacement: step 9, image 3 of 3
    • Use the precision tweezers to flip the black switch holding the film connected to the USB port.

    • Gently remove the film from it's connection to the motherboard.

  10. Asus X550ZA-SA100603E Motherboard Replacement: step 10, image 1 of 2 Asus X550ZA-SA100603E Motherboard Replacement: step 10, image 2 of 2
    • Gently pull the thick wire in between the fan and the motherboard. To release the wire connected to the motherboard, gently pull towards the cooling fan.

  11. Asus X550ZA-SA100603E Motherboard Replacement: step 11, image 1 of 2 Asus X550ZA-SA100603E Motherboard Replacement: step 11, image 2 of 2
    • Gently pull the red, black, and white wire found on the top right-hand corner of the motherboard.

  12. Asus X550ZA-SA100603E Motherboard Replacement: step 12, image 1 of 2 Asus X550ZA-SA100603E Motherboard Replacement: step 12, image 2 of 2
    • Lift the black and white wires out of their ports at the top of the motherboard.

  13. Asus X550ZA-SA100603E Motherboard Replacement: step 13, image 1 of 1
    • Lift the top right corner of the motherboard to access the final wire.

    • Gently remove the wire from the port connecting it to the motherboard.

  14. Asus X550ZA-SA100603E Motherboard Replacement: step 14, image 1 of 1
    • Remove the motherboard from the laptop.

Conclusion

To reassemble your device, follow these instructions in reverse order.

One other person completed this guide.

2 Comments

Hello, I am interested in know how could I change the diode m51j, due to the volts from the USB don't function it, please could you help me, my email address is ing.gabriel.alcazar@gmail.com if you have the technical manual will be great

Thank you

sadkiel002 - Reply

This is also the same disassembly for upgrading the system memory. DDR3L PC3L-12800 1600MHz SODIMM, 16 GB max, 2 memory slots.

pacerbob - Reply

Add Comment

View Statistics:

Past 24 Hours: 0

Past 7 Days: 1

Past 30 Days: 6

All Time: 2,048