
Asus ROG G751JL-DS71 Left and Right Track Pad Buttons Replacement

What you need

  1. Asus ROG G751JL-DS71 Left and Right Track Pad Buttons Replacement, Left and Right Track Pad Buttons: step 1, image 1 of 2 Asus ROG G751JL-DS71 Left and Right Track Pad Buttons Replacement, Left and Right Track Pad Buttons: step 1, image 2 of 2
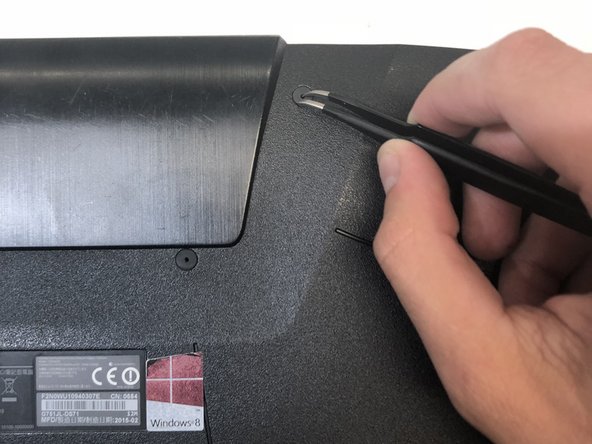
    • Lift the rubber cover found on the bottom of the laptop.

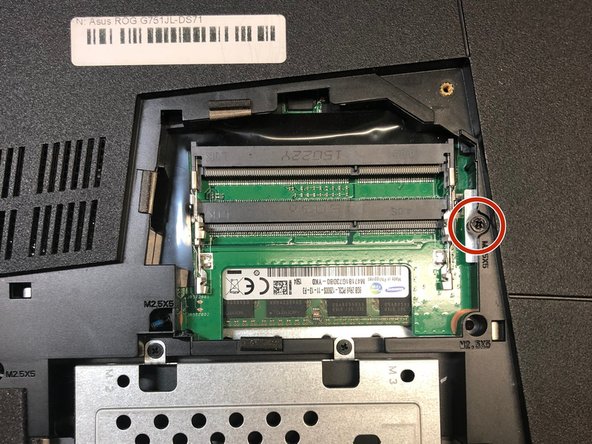
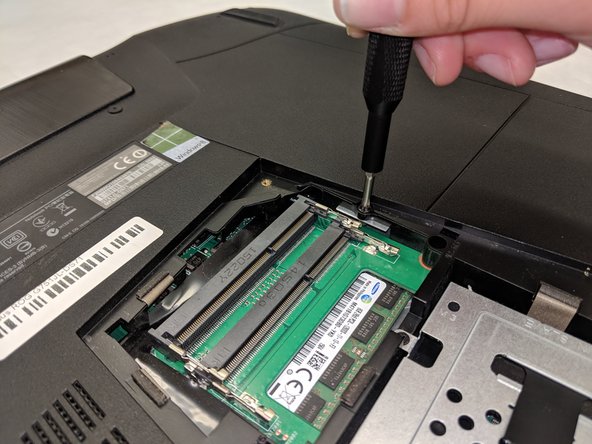
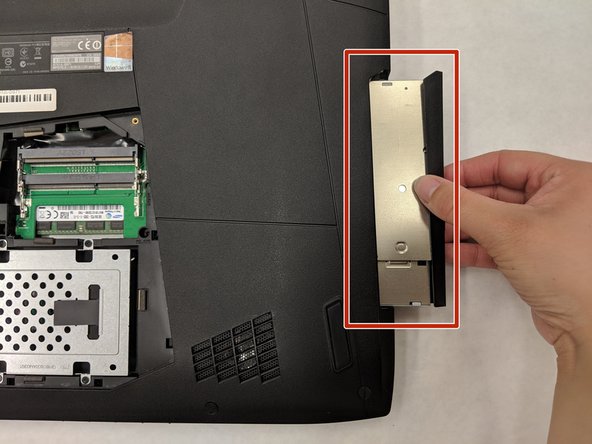
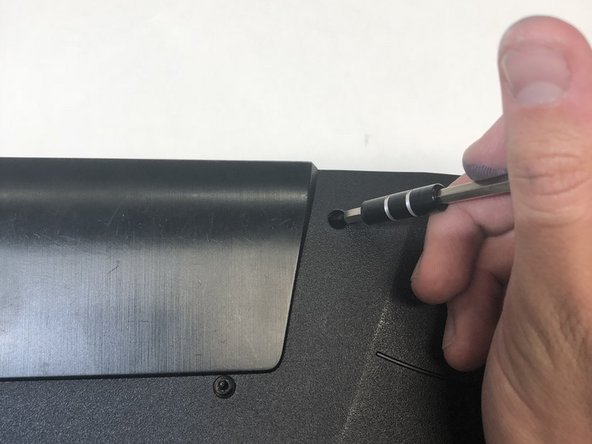
    • Remove the 5.2 mm screw with a Phillips 1 Screwdriver.

  2. Asus ROG G751JL-DS71 Left and Right Track Pad Buttons Replacement: step 2, image 1 of 3 Asus ROG G751JL-DS71 Left and Right Track Pad Buttons Replacement: step 2, image 2 of 3 Asus ROG G751JL-DS71 Left and Right Track Pad Buttons Replacement: step 2, image 3 of 3
    • Use the standard spudger to remove the back center panel.

  3. Asus ROG G751JL-DS71 Left and Right Track Pad Buttons Replacement: step 3, image 1 of 3 Asus ROG G751JL-DS71 Left and Right Track Pad Buttons Replacement: step 3, image 2 of 3 Asus ROG G751JL-DS71 Left and Right Track Pad Buttons Replacement: step 3, image 3 of 3
    • Use a Phillips 1 Screwdriver to remove the 5 mm screw that is located underneath the back panel.

  4. Asus ROG G751JL-DS71 Left and Right Track Pad Buttons Replacement: step 4, image 1 of 2 Asus ROG G751JL-DS71 Left and Right Track Pad Buttons Replacement: step 4, image 2 of 2
    • Pull out the optical drive found on the side of the laptop.

  5. Asus ROG G751JL-DS71 Left and Right Track Pad Buttons Replacement: step 5, image 1 of 3 Asus ROG G751JL-DS71 Left and Right Track Pad Buttons Replacement: step 5, image 2 of 3 Asus ROG G751JL-DS71 Left and Right Track Pad Buttons Replacement: step 5, image 3 of 3
    • Remove the screws holding the hard drives in place using a Phillips 1 screwdriver.

    • Using the small flaps, remove the hard drives by hand.

  6. Asus ROG G751JL-DS71 Left and Right Track Pad Buttons Replacement: step 6, image 1 of 2 Asus ROG G751JL-DS71 Left and Right Track Pad Buttons Replacement: step 6, image 2 of 2
    • Use a pair of tweezers to remove the top four rubber stoppers found on the bottom of the laptop.

  7. Asus ROG G751JL-DS71 Left and Right Track Pad Buttons Replacement: step 7, image 1 of 2 Asus ROG G751JL-DS71 Left and Right Track Pad Buttons Replacement: step 7, image 2 of 2
    • Use a Phillips 1 Screwdriver to remove the top four 8.5 mm screws.

  8. Asus ROG G751JL-DS71 Left and Right Track Pad Buttons Replacement: step 8, image 1 of 3 Asus ROG G751JL-DS71 Left and Right Track Pad Buttons Replacement: step 8, image 2 of 3 Asus ROG G751JL-DS71 Left and Right Track Pad Buttons Replacement: step 8, image 3 of 3
    • Use a metal spudger to carefully pry the top back panel off.

    • While removing the top back panel, be careful not to break the four pin connector located underneath.

    • Disconnect the four-pin connector and remove the top back panel from the computer.

  9. Asus ROG G751JL-DS71 Left and Right Track Pad Buttons Replacement: step 9, image 1 of 1
    • Use a Phillips 1 Screwdriver to remove the four 6.8 mm screws underneath the back panel.

  10. Asus ROG G751JL-DS71 Left and Right Track Pad Buttons Replacement: step 10, image 1 of 1
    • Use a Phillips 1 Screwdriver to remove the ten 5.2 mm screws holding the main panel in place.

  11. Asus ROG G751JL-DS71 Left and Right Track Pad Buttons Replacement: step 11, image 1 of 3 Asus ROG G751JL-DS71 Left and Right Track Pad Buttons Replacement: step 11, image 2 of 3 Asus ROG G751JL-DS71 Left and Right Track Pad Buttons Replacement: step 11, image 3 of 3
    • Use a metal spudger to pry the keyboard from the base of the laptop.

    • Lift the keyboard carefully so as to not tear or break the four ribbon connectors underneath the keyboard.

  12. Asus ROG G751JL-DS71 Left and Right Track Pad Buttons Replacement: step 12, image 1 of 2 Asus ROG G751JL-DS71 Left and Right Track Pad Buttons Replacement: step 12, image 2 of 2
    • Use a pair of tweezers to undo each of the four ribbon connectors.

    • The keyboard is now completely disconnected from the laptop and you can remove it.

  13. Asus ROG G751JL-DS71 Left and Right Track Pad Buttons Replacement: step 13, image 1 of 2 Asus ROG G751JL-DS71 Left and Right Track Pad Buttons Replacement: step 13, image 2 of 2
    • Use a pair of tweezers to undo each of the two ribbon connectors.

    • Use a Phillips 1 Screwdriver to remove the four 6.8 mm screws underneath the back panel.

    • The Left and right button is now completely disconnected from the laptop and you can remove it.

Conclusion

To reassemble your device, follow these instructions in reverse order.

3 other people completed this guide.

D'Artagnan Scott Engle

Member since: 04/01/19

297 Reputation

1 Guide authored

Team

IUPUI, Team S8-G8, Wilson Spring 2019 Member of IUPUI, Team S8-G8, Wilson Spring 2019

IUPUI-WILSON-S19S8G8

4 Members

3 Guides authored

0 Comments

Add Comment

View Statistics:

Past 24 Hours: 0

Past 7 Days: 1

Past 30 Days: 8

All Time: 1,097